• Skip to primary navigation
  • Skip to main content
  • Skip to primary sidebar
  • Skip to footer

Kim Power Style

  • Home
  • Contact
  • About
  • Tutorials

Tutorials

One Room Challenge Fall 2017 | Week 5 | Shiplap time!

10:38 pm by kim 18 Comments

Welcome back to the One Room Challenge Fall 2017 week 5, it’s time to get our shiplap on!

If you’re new here, hello! You can follow along with the previous One Room Challenge weeks here:

Week 1 | Week 2 | Week 3 | Week 4 |

You can also follow along with all the other bloggers and designers and see what there up to this week here.

One Room Challenge Fall 2017

One Room Challenge Fall 2017 Week 5 Shiplap Time!

(This post has been sponsored by Metrie, all thoughts and opinions are my own)

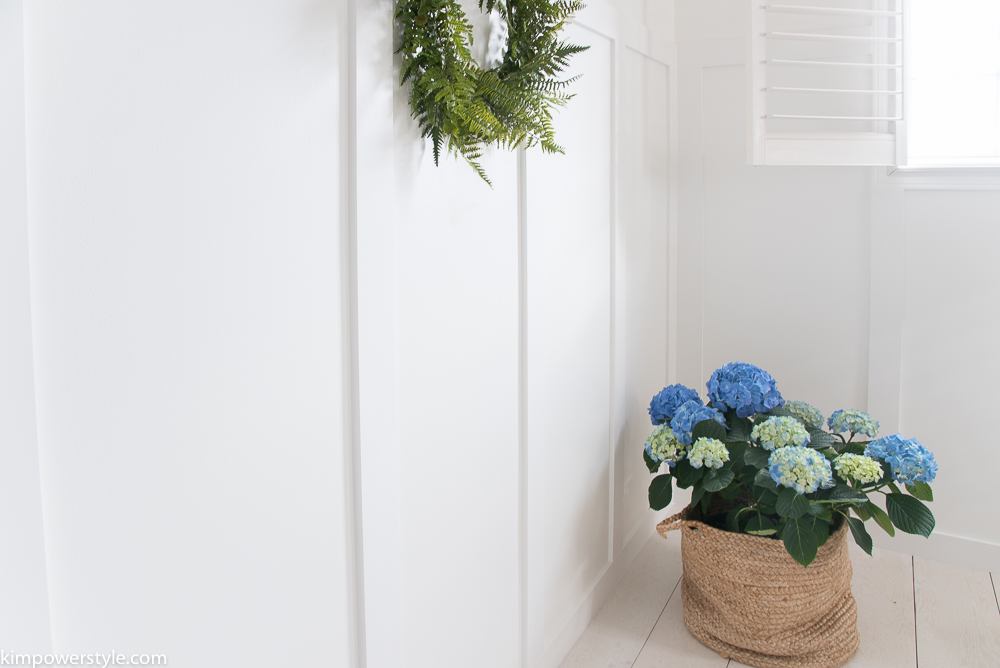
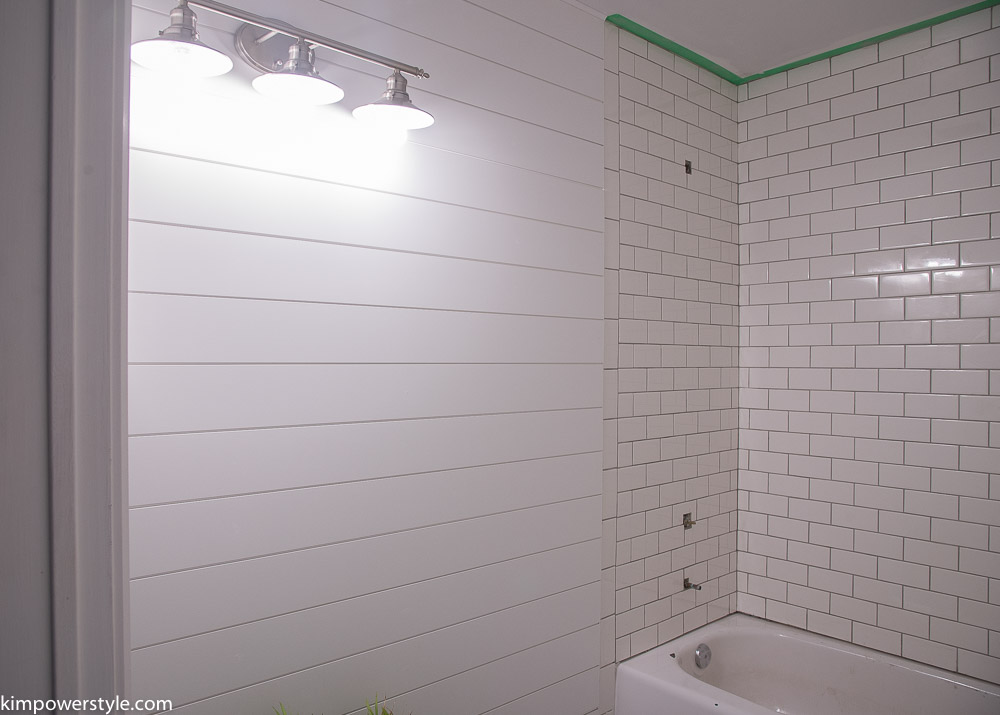
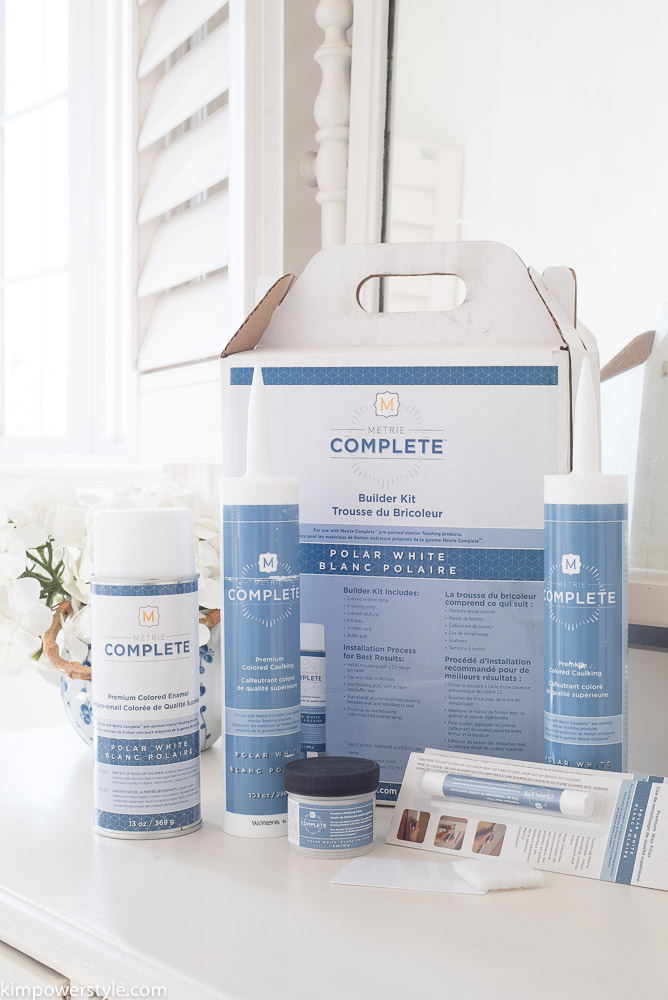
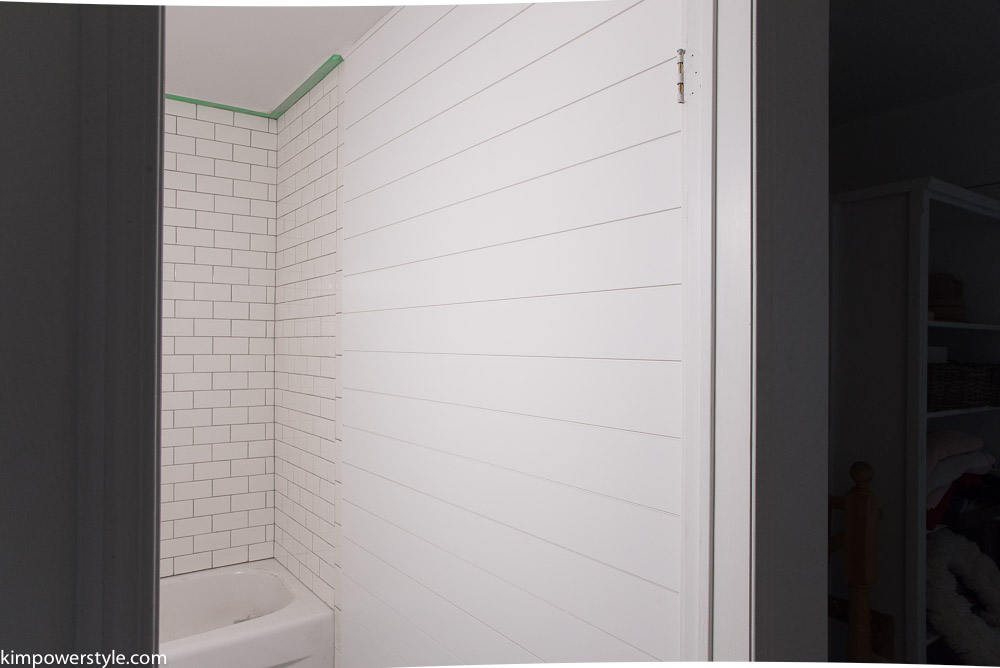
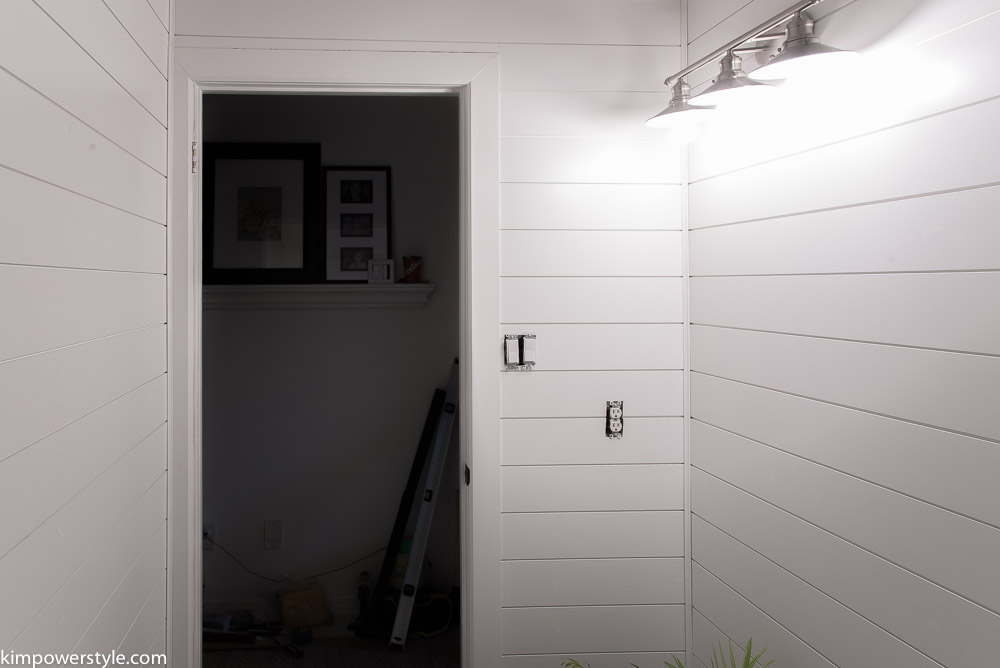
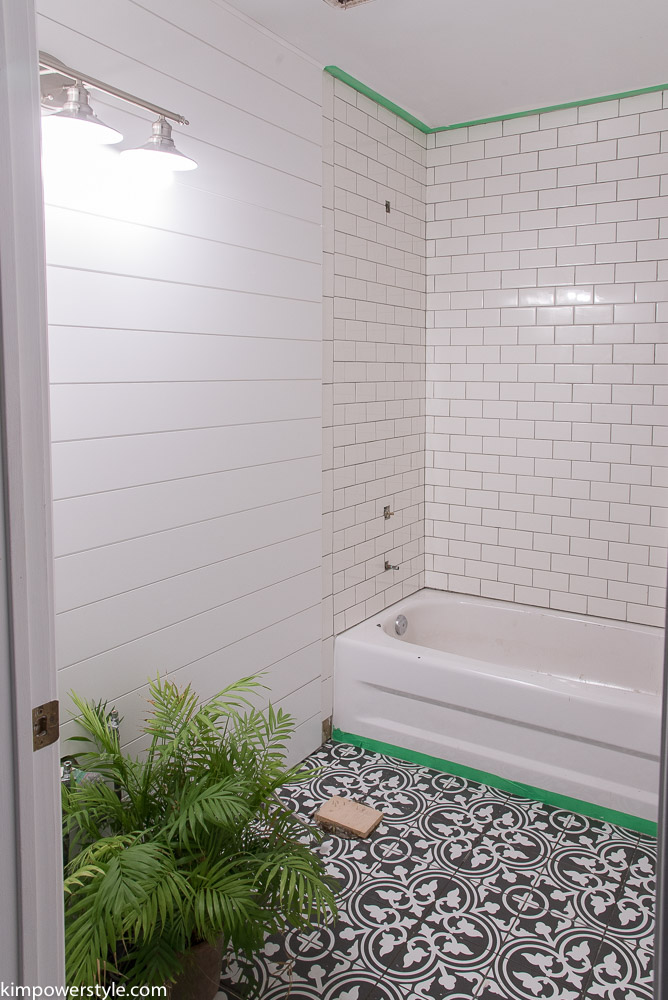
This week we had some help from Metrie who offered their gorgeous Metrie Complete®  Shiplap for our Modern Farmhouse Bathroom Makeover. The shiplap comes already primed and painted in “Polar White”  which is a beautiful crisp white and you know I love me some white 😉

One Room Challenge Week 5 Shiplap Time!

I have to say this was one of the easier projects for this challenge! We’ve applied shiplap before using thin plywood boards and made our own spaces using coins. With the tongue and groove feature on these shiplap boards there was no more watching our quarters and loonies rolling away on the floor! It was simpler to lay the boards and it looked so much more uniform. The fact that the boards are all pre-painted a beautiful satin finish also saved a lot of time. Instead of filling nail holes with wood filler,  sanding then priming and painting, you fill in the holes with a wax and then buff. Metrie offers a Metrie Complete finishing kit with everything you need to finish your project:

Metrie Complete finishing kit

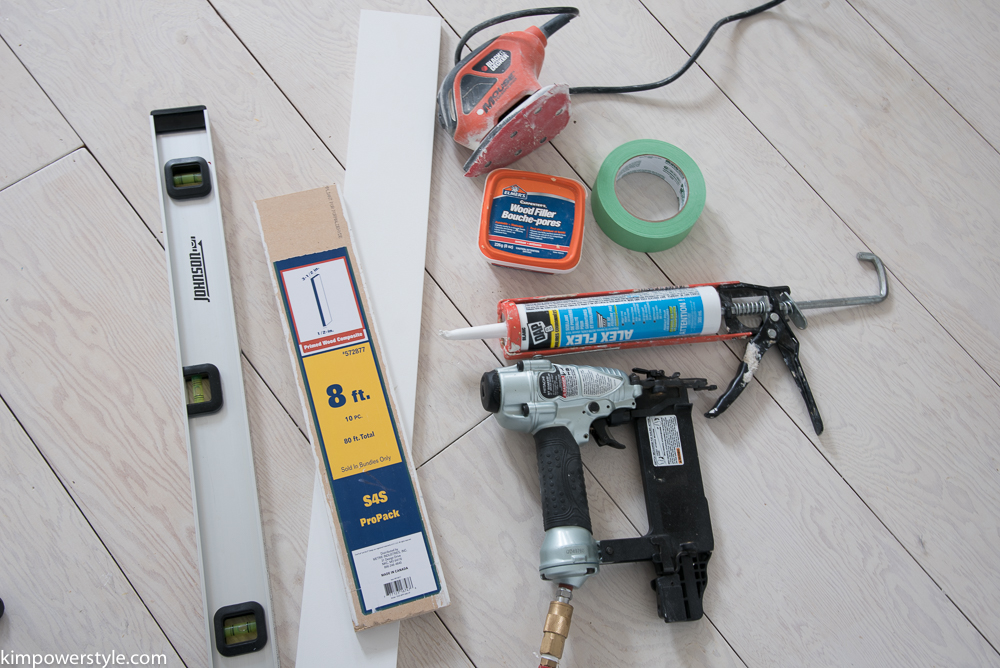
How We Did it and What You’ll Need:

One Room Challenge Week 5 Applying Shiplap

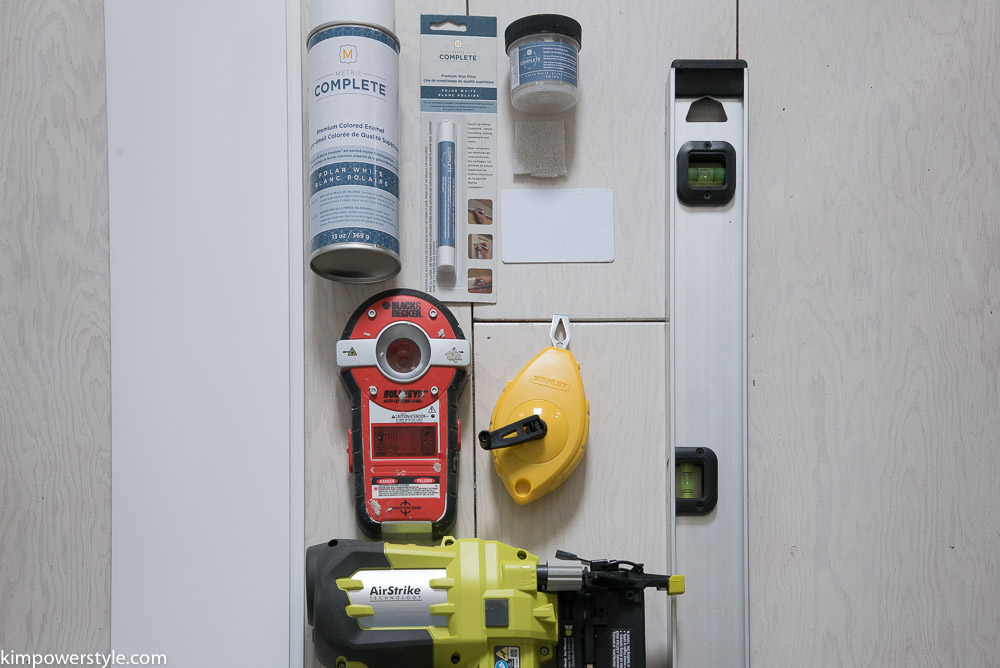
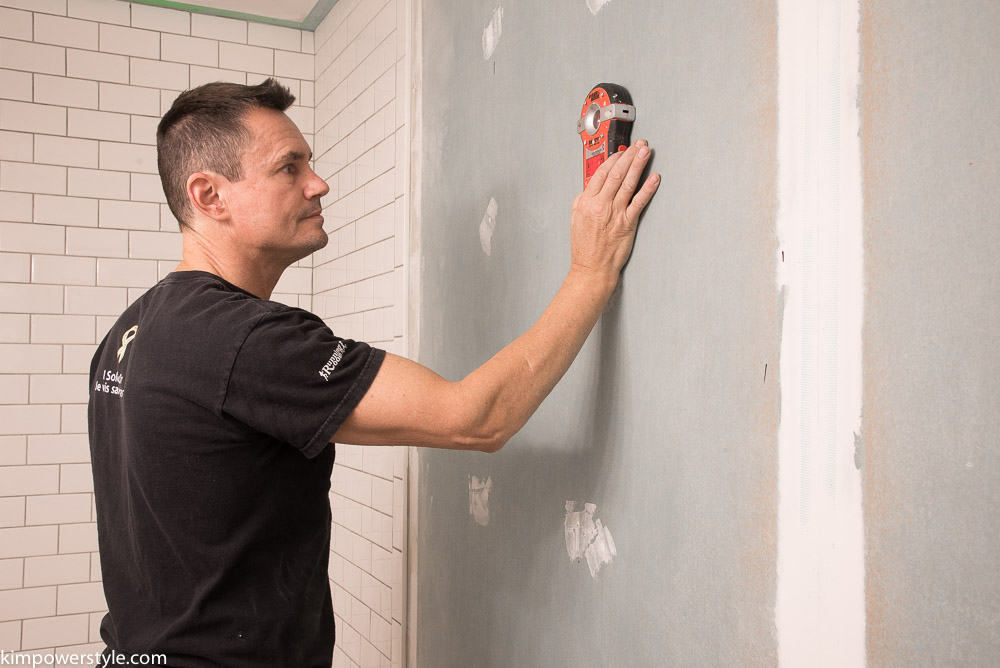
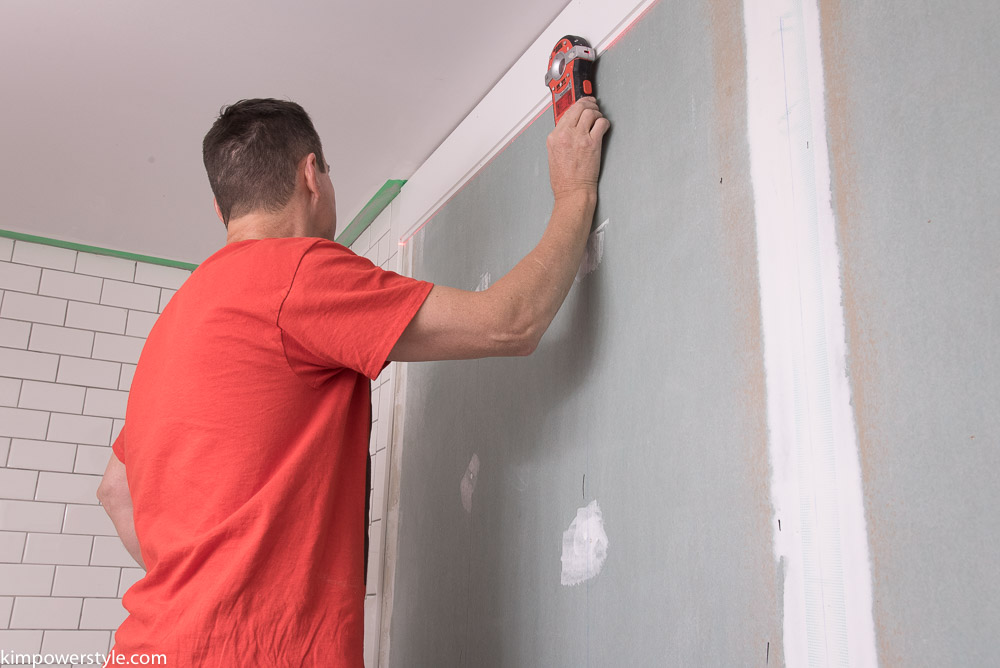
  1. Find the studs in your wall with a stud finder.

One Room Challenge Week 5 Applying Shiplap

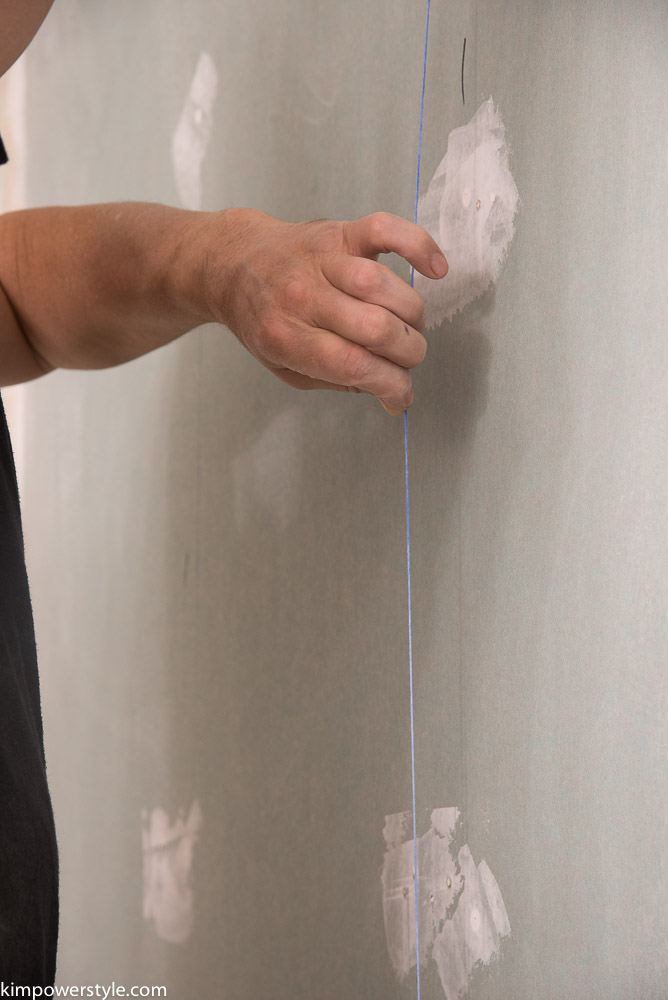
2. Mark the studs  and then use a chalk line or a level to mark them down the wall.

One Room Challenge Week 5 Applying Shiplap

3. Some people start from the bottom, but I like to have full boards around the ceiling line. Place your first       board with tongue side down and use a level to make sure your first board is level.

One Room Challenge Week 5 Applying Shiplap

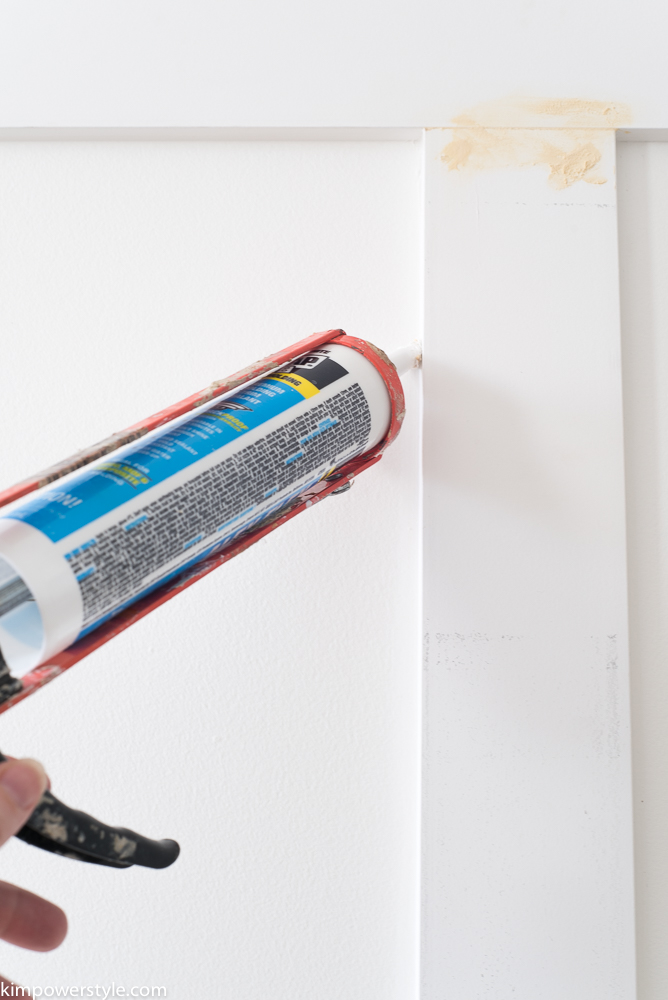
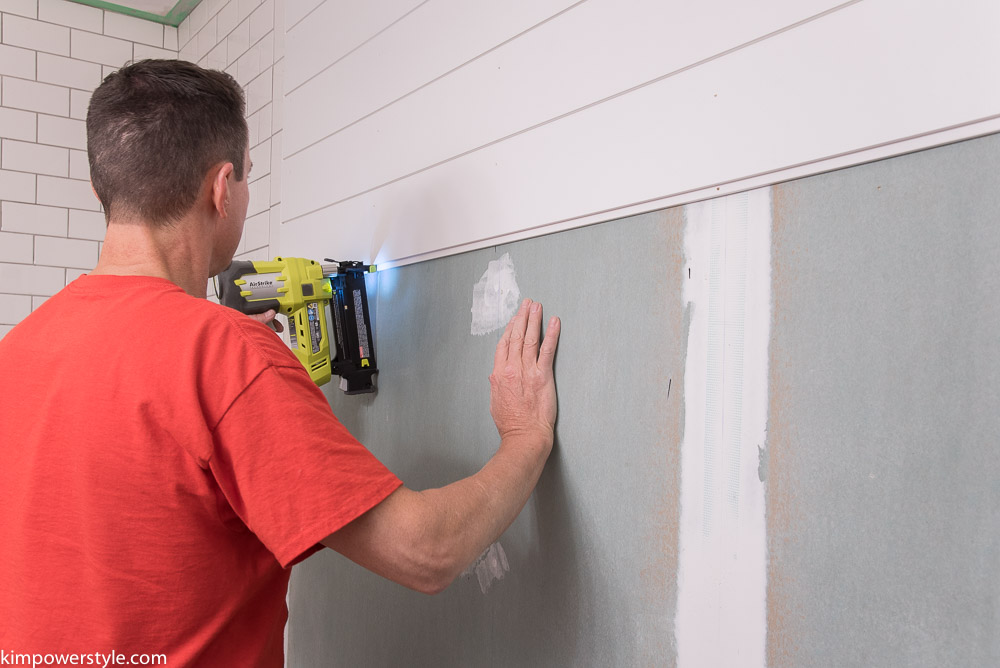
4. Add your boards and nail them using your nail gun. Where you nail into the tongue, you’ll need to fill in your nail hole before you place your next board. It’s much easier filling those holes before you add the next  board. (Don’t ask me how I know!)

One Room Challenge Week 5 Applying Shiplap

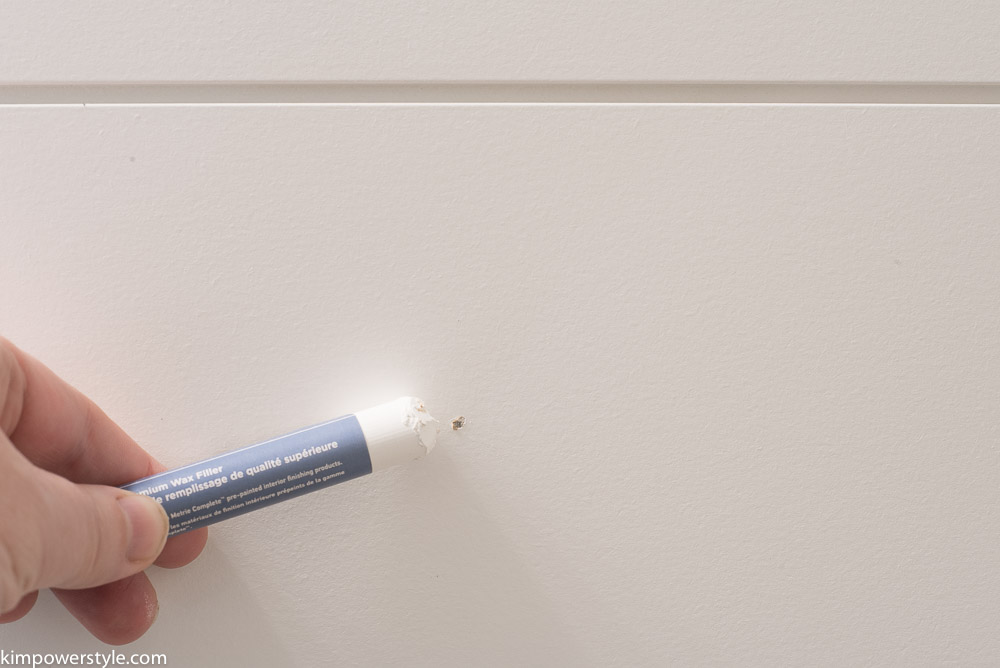
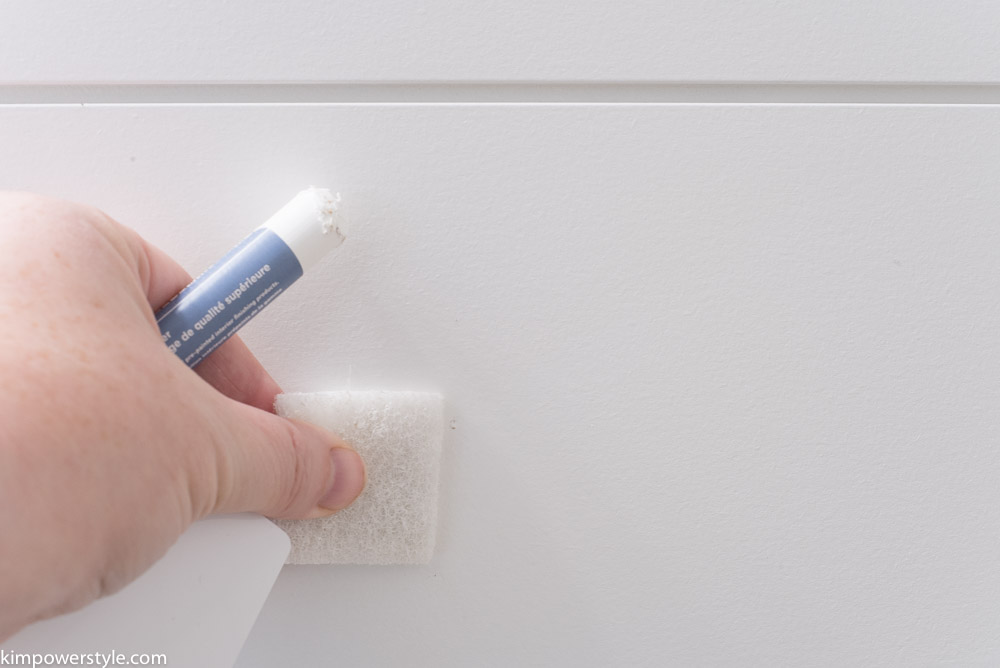
5. To fill in your holes,  use your wax stick or putty jar. I mostly used the wax stick.

One Room Challenge Week 5 Applying Shiplap

6. You can use your scraper card or a putty knife  to remove any excess wax.

One Room Challenge Week 5 Applying Shiplap

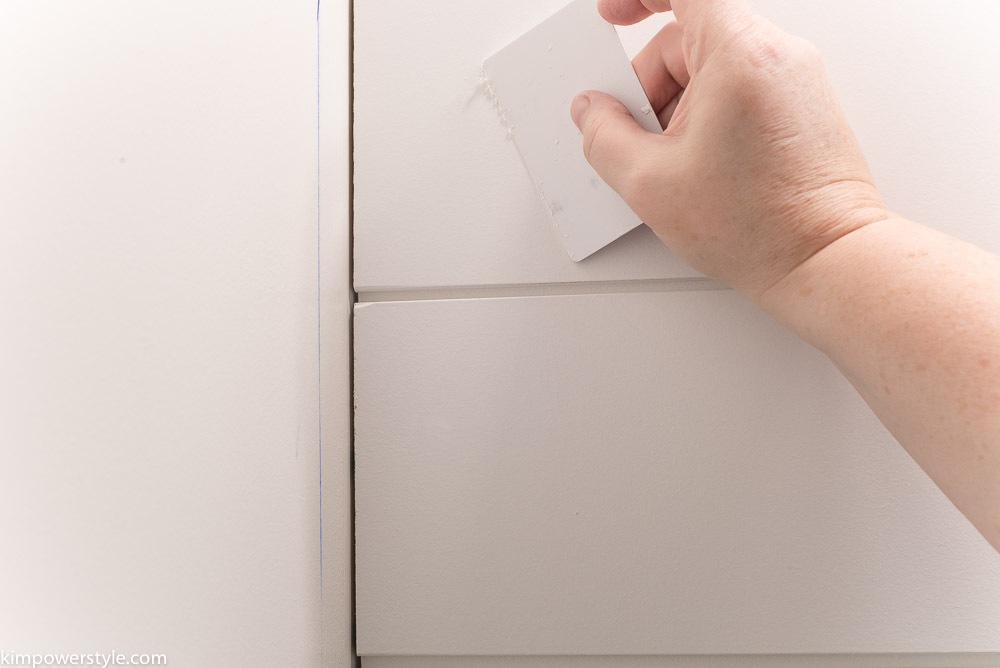
7. Use the abrasion pad to buff out and smooth the area.

One Room Challenge Week 5 Applying Shiplap

8. We applied cove molding to the ceiling and in the corners to make the seams uniform. we also caulked with Metrie’s caulking. All the products in the Builder finishing kit comes in the same “polar white” colour as the shiplap so that everything matches.

One Room Challenge Week 5 Applying Shiplap

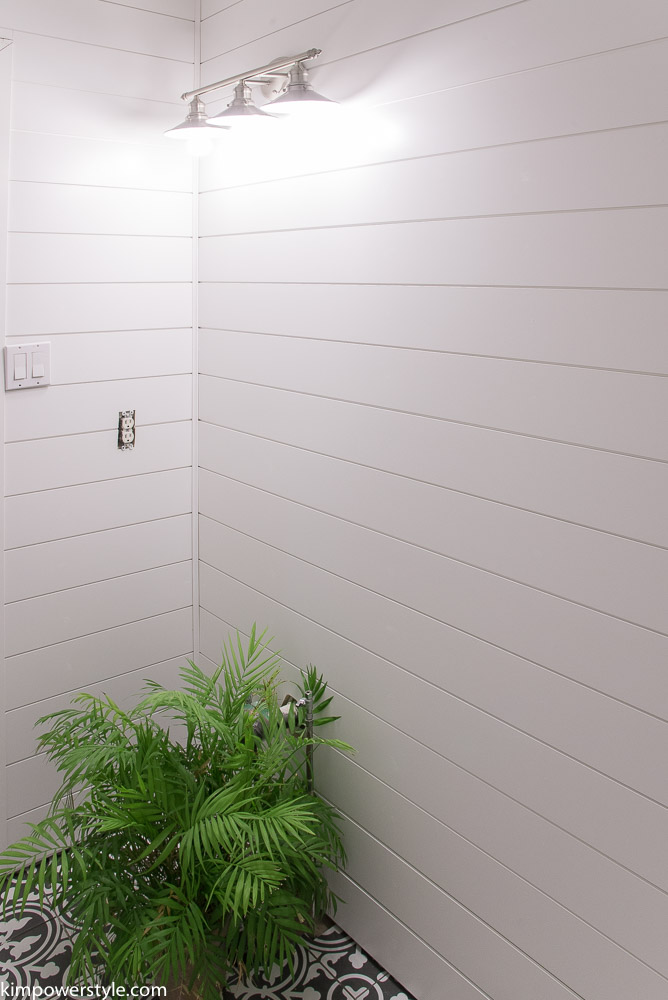
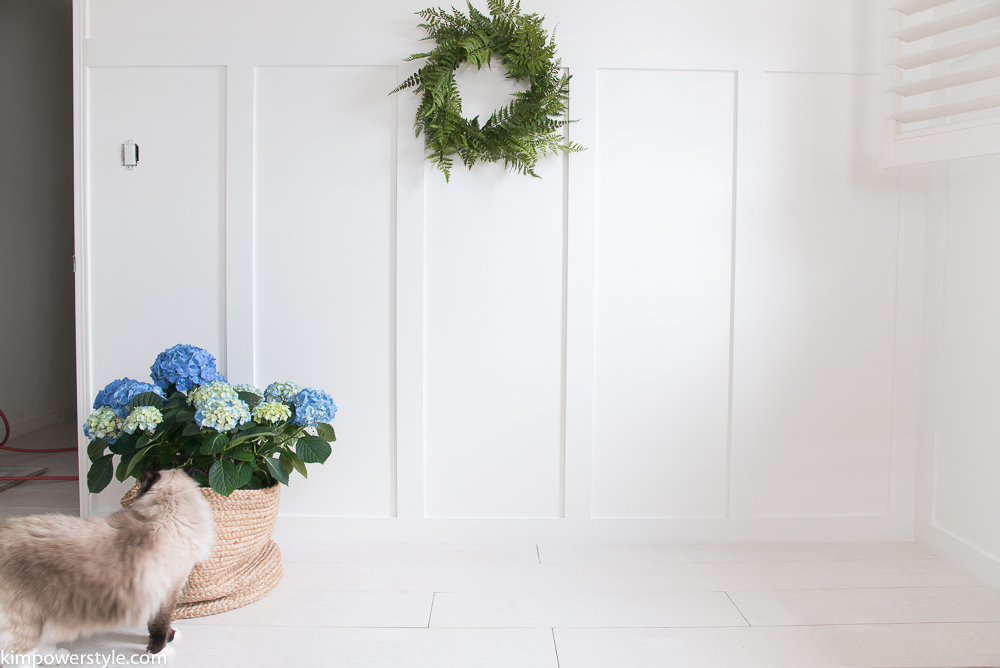
Yes that’s my famous camouflage plant! I’m using it to hide those unsightly pipes sticking out of the floor.

One Room Challenge Week 5 Applying Shiplap

One Room Challenge Week 5 Applying Shiplap

One Room Challenge Week 5 Applying Shiplap

There is still a lot to do. I’m so grateful for the added week!

  • We still need to grout the floor tile.
  • Once the floor tile is grouted we’ll be able to put on the last two pieces of subway tile near the floor.
  • Add the baseboards.
  • Finish the caulking
  • Clean up the ceiling
  • Put the ceiling fan back on. (Still not sure why that is off lol!)
  • Put the vanity together and pray it fits!
  • Bring the toilet back in.
  • Hang the mirror.
  • Install the taps and hardware.

Thanks so much for joining along on our makeover/reno challenge! Just a reminder that a week has been added onto our schedule, so the final reveal will be on November 16th. To see some more makeover/renos you can follow along with all the other bloggers and designers here.

Blessings,

Kim

Thanks to our sponsors.

Sponsors for ORC Fall 2017

Filed Under: diy, One Room Challenge™, shiplap, Tutorials

How to Wash IKEA Slipcovers

6:00 am by kim 32 Comments

How to Wash IKEA Slipcovers

How to wash IKEA Slipcovers

One of the questions I get asked all the time is how to care for and how to wash IKEA Slipcovers. I’ve had slipcovers for almost twenty years now and I’ve washed quite a few and learned a trick or two in that time.

Let me start off by asking you to read the care instructions for your particular slipcover on the IKEA site. Different colours and patterns of the IKEA slipcovers are made from various fabrics and various mixes of fabrics and require different care.

My sofa is from the Ektorp series and has the ” Vittaryd White” Slipcover.

Care instructions from IKEA:

Removable cover
Machine wash, warm, normal cycle.
To be washed separately.
Do not bleach.
Do not tumble dry.
Iron, high.
Dry clean any solvent except trichloroethylene.
Product description
65 % polyester, 35 % cotton
How to clean IKEA slipcovers
My armchairs are from the Farlov series and  have the “Flodafors White” slipcovers.
Care instructions from IKEA:
Removable cover
Machine wash, warm, normal cycle.
To be washed separately.
Do not bleach.
Do not tumble dry.
Iron medium temperature, max 300°F/150°C.
Iron on reverse side.
Dry clean any solvent except trichloroethylene.
Product description
59.5 % cotton, 24 % polyester, 16.5 % linen
I bought these Farlov Armchairs last March and I’ve washed them recently for the first time. I think they turned out great. I’ll share how I did both the farlov and ektorp covers.
                                                                                      How to clean IKEA Slipcovers
  1.  I Always start by removing the main cover first and get that in the machine.  While thats washing I’ll start  wrestling with the seat cushions. I like the main cover to be the first piece on after the wash. (I start this process in the evening so that the covers have time to dry overnight.)How to Clean your IKEA Slipcovers
  2. Remove the seat covers.  This is not an easy feat and the whole darn process is like doing a workout to tell you the truth. But like all workouts, worth the effort when you’re done!untitled-6127
  3. After I remove the covers, I always do up the zippers before washing. It just helps to prevent them from getting caught up and becoming damaged.How to Clean your IKEA Slipcovers
  4. Next, I will do spot treatments if needed. I use the same detergent I use to wash the covers as I do to spot treat. I knew that chocolate fell somewhere!How to Clean your IKEA SlipcoversHow I clean my IKEA slipcovers
  5. If you’ve read the IKEA instructions they say not to use bleach and I  very rarely do. I find it’s very rough on fabric. Usually I place the recommended amount of detergent and oxi-clean in my front loader first and then add the slipcovers. I wash it in a normal wash cycle but add an extra rinse to make sure they’re as white as can be.
  6. This is where I’ve added my own spin to how to wash Ikea slipcovers. (This step is contrary to the IKEA instructions and you do so at your own risk!) After the covers are washed, I remove them from the washer and give them a good shake. Then I will put them in the dryer for 2-5 minutes! I put them on timed dry and check after 2 minutes. I’m basically letting the covers barely come to a warm. This works every time to relax the fabric. I do not leave them in any longer than that even if the dryer doesn’t feel warm. Any longer than that and you run the risk of your covers shrinking! Which they will and you will not be able to fit them back onto your furniture!
  7. I quickly take them out, shake them again and race them upstairs. If its the cushion covers, I’ll lay them smoothly over the kitchen chairs while I put them on one at a time. If it’s the main cover, I get that sucker on asap and begin my smoothing process.
  8. Lastly, I put the cushion covers back on and begin to smooth and stretch them out with my hands. This helps get out the wrinkles. It’s kinda like ironing with your hands!

This is before I do my “hand ironing”, notice the bottom of the slipcover:

How I clean my IKEA slipcovers

My hand ironing thingy:

I bought these Farlov Armchairs last March and I've washed them recently for the first time. I think they turned out great. I'll share how I did both the farlov and ektorp covers.

This is the after, notice the bottom wrinkles are almost gone:

I bought these Farlov Armchairs last March and I've washed them recently for the first time. I think they turned out great. I'll share how I did both the farlov and ektorp covers.

Now that the covers are all on and smoothed out I place the cushions all around so that they stay smooth and they can dry evenly all around. It’s a bit of a mess and that’s why I do it in the evening. By the morning everything is dry and has stayed wrinkle free! Simply put the cushions back together and your good for another few months!

How I clean my IKEA slipcovers

How I clean my IKEA slipcovers

How to wash IKEA slipcovers

I hope this tutorial on how to wash Ikea slipcovers has been helpful to you! There’s nothing like having clean and great looking slipcovers every few months.

Blessings,

Kim


Filed Under: Home decor, Tutorials

Driftwood Candle Holder Tutorial Redo

2:22 am by kim 6 Comments

 Driftwood Candle Holder Tutorial Redo

One of the first projects/tutorials I did when I first started my original blog “Restoration House”  was this Driftwood Candle Holder tutorial. That was seven years ago and I still have my original piece! This is such a simple and easy project to do and literally only takes minutes and makes a bit impact! I’ve also included a wooden post I had cut into 3 foot lengths to show you that you can use practically anything made out of wood and turn it into a candle holder. You can find the original tutorial here.

Simple & Easy Candle Holder Tutorial

Here is my original piece and my favourite, I love the organic shape of it. This one was made with a 1.5″ spade bit which is the perfect size for tea lights.

Driftwood-Candle-Holder-Tutorial

Driftwood-Candle-Holder-Tutorial

You’ll need:

  • A piece of driftwood or wood that is at least 1.5″ thick.
  • Drill
  • Spade bits. They come in many different sizes and are used according to the size of the candle you want to use.
  • Sandpaper to sand off any bits from around the holes.
  • The candle of your choice.

Driftwood-Candle-Holder-Tutorial

For my tapered candles I used a 3/4″ spade bit which was a little small but I was able to whittle the candle bottom to fit snuggly. The 7/8″ was a little too big and I want the candles to be snug so they don’t fall over.

Driftwood Candle Holder Tutorial

Because driftwood is an organic shape, you have to lay it down on the floor so it levels itself out. Every piece will lie differently.

Driftwood Candle Holder

Once it’s level, decide how many candles you’d like and how far apart  you’d like them to be. If you need to, you can get a measuring tape and mark your places. I just eye balled it.  You will drill straight down so that your candles will stand level. You can drill down to an inch depth or more if you’re using tapered candles. Tea lights should only go as deep as the candle itself to avoid fire hazards. (I would suggest using faux tea lights, they make such pretty ones now and it’s much safer!)

Driftwood Candle Holder

Driftwood Candle Holder

I drilled down about an inch. If you need to you can place some tape on your spade bit to mark how far your bit needs to go.

Driftwood Candle Holder Tutorial

You may need to sand around the edges for any jagged pieces. I found the harder the wood the more sanding was needed. You can see that the new wood piece needs more sanding.

driftwood candle holder tutorial

My holes were slightly smaller than my candles so I had to whittle down the ends so that candle ends fitted in really snuggly. You don’t want your candles wobbling around!

Driftwood Candle Holder Tutorial

Driftwood Candle Holder Tutorial

Driftwood Candle Holder Tutorial

Driftwood Candle Holder Tutorial

Driftwood Candle Holder Tutorial

I found a wooden post at my local HD and had it cut into 3 pieces. You can stain or paint your wood to suit your needs. I left mine natural. You can also use larger spade bits and make a pen/pencil holder. There’s no end to what you can create.

Driftwood Candle Holder Tutorial

Driftwood Candle Holder Tutorial

Driftwood Candle Holder Tutorial

Driftwood Candle Holder Tutorial

untitled-5646

Safety Precautions:

  • I have real tea lights in the candle holder above but I would suggest using the little faux ones. It really is much safer. Driftwood by nature is extremely dry and can ignite so quickly! I’ve heard from others how this has happened.
  • Make sure your tapered candles are in snuggly if you’re using real ones.
  • Never, ever leave candles burning unattended!

A Driftwood Candle Holder Tutorial

I’m hoping that you will give this a try, it really is quite easy and can be done in minutes!

Thanks so much for dropping by! If you haven’t already done so, subscribe so you don’t miss a post, they’ll go straight to your inbox!

Blessings,

Kim

Filed Under: diy, summer, Tutorials, Uncategorised

An Easy Stamp DIY for Canada Day

4:29 pm by kim 4 Comments

An Easy Stamp DIY for Canada Day

Hi everyone! Today I’m sharing the eeaassiest DIY that you can do by yourself or with your kids. It literally took me ten minutes! It’s an easy stamp DIY for Canada Day.

This July 1st we will be celebrating Canada’s 150th birthday, so it’s a pretty big day for those of us up North! I thought I would share a little DIY anybody can do to help with our holiday decorating. There are so many great celebrations going on and our neighbourhood is very big on showing our Canadian pride so most porches/verandas will be decked out. I always have some pillows on my muskoka chairs on the porch so I thought I’d get festive with some Canadiana ones.

Canada Day DIY

I picked up some plain white cushion covers from IKEA for $4.99 each. I found some fabric paint at Michael’s Craft Store and I had a potato. I cut my potato in half and then cut out my rendition of a maple leaf. Next you grab some cardboard to put inside your cushion cover to prevent the paint from leaking through and to give you a nice flat surface to stamp on.  I put some fabric paint on a foam plate and dipped my potato into it. It really is that easy. I just freehanded where to place my leaves.

Canada Day DIY

Canada Day DIY

Canada Day DIY

The beauty of this DIY is that it doesn’t have to perfect…Right up my alley! The fact that your leaves all have the same shape gives it a uniformity that makes it look cohesive and put together. Great for anyone to try. The possibilities of what you can stamp on your pillow are endless.

Canada Day DIY

Canada Day DIY

Pretty easy to do right? I’m coming up with all kinds of things I could stamp on fabric now! 😉

Special thanks to Lucy at Craftberry Bush for hosting this blog hop. Now you can check out some more of my favourite bloggers below and see all of their wonderful Canadian Celebration Ideas!

An InLinkz Link-up


Filed Under: diy, summer, Tutorials

Simple Coconut Lavender Salt Scrub

8:31 pm by kim 5 Comments

A Simple Coconut Lavender Salt Scrub DIY

I’m sharing a quick and simple DIY Coconut Lavender Salt Scrub with you today. This is an easy to do scrub with things you probably already have in your home. You really don’t need a big bunch of dried lavender 😉 or essential oils. I’ve made this in under a minute running out to the gym by throwing in some salt and a handful of coconut oil into a plastic baggy..so no excuses!

A Simple Coconut Lavender Salt Scrub

You’ll Need:

  • Organic Coconut Oil
  • Epsom Salt
  • Lavender (optional)
  • Lavender Essential Oil (optional)
  • Measuring cup
  • Container to put your scrub in
  • Mortar and Pestle (If you’re grinding up herbs/flowers etc.)
  • Mixing bowl
  • Mixing spoon

A Simple Coconut Lavender Salt Scrub

I chose to use lavender because I love the scent and I happened to have a bunch of dried lavender. As I mentioned before, you really don’t need to add anything but the coconut and epsom salt to use this as an effective body scrub.

A Simple Coconut Lavender Salt Scrub

If you’re using lavender or other herbs. You can grind them up as fine as you’d like. Remember, you will be slathering this all over your skin so you don’t want it to to be too rough!

A Simple Coconut Lavender Salt Scrub

I mixed in 3/4 cup of coconut oil to every 1 cup of epsom salt. You can always change this up to whatever suits you. I also like the coconut oil to be in a solid form as it’s much easier to use.

A Simple Coconut Lavender Salt Scrub

untitled-5011

I added a tablespoon of the dried lavender. Once again, you can add as little or as much as you’d like.

A Simple Coconut Lavender Salt Scrub

A Simple Coconut Lavender Salt Scrub

I added ten drops of lavender essential oil to my batch. You can add more or less according to how strongly you want it scented

A Simple Coconut Lavender Salt Scrub

Now you can give it a good stir. This may take a  couple of minutes to incorporate all the ingredients together.

A Simple Coconut Lavender Salt Scrub

I used these little jars I found at the dollar store, they’re cheap and  you can make them air tight. They also make cute little containers if you’re giving them away as gifts.

You can now decorate them with labels, ribbons etc.

A Simple Coconut Lavender Salt Scrub

Simple Coconut Lavender Salt Scrub

A Simple Coconut Lavender Salt Scrub

How simple was that! I hope you try and make your own.

Blessings,

Kim


Filed Under: diy, Tutorials

Wall Stencilling How-To | Week 3 | One Room Challenge Spring 2017

2:31 pm by kim 58 Comments

Wall Stencilling How-To

How to stencil a wall. One Room Challenge

One Room Challenge

Well it’s week 3 of the One Room Challenge and oh how the weeks have flown by! This week I’ve added some colour and pattern above the board and batten by using a stencil. I’ll share a little wall stencilling how-to but first let’s look at where we’re going. If you’re just tuning in now you can follow the progress by reading week 1 and week 2.

Here is the mood/inspiration board for the room:

Mood board for ORC 2017

If you notice, the board and batten as well as my stencil treatment above it aren’t on my mood board. I still hadn’t decided at the time what kind of a treatment to add. I knew that I wanted a modern coastal farmhouse look thats much in keeping with the rest of my home right now. Once I decided on the board and batten I knew I wanted to do something above it. Wallpaper can be pretty pricey even for a relatively small space so I decided on stencilling. There are so many gorgeous patterns out there now and when you add the colour factor, the possibilities are endless! I decided to go with Royal Design Studios Stencils for my stencil and chose the Floral Fireworks allover stencil 21″x 23″. I had the paint colour already and had been waiting for a chance to use it. I used the Fusion Mineral Paint in “Liberty Blue”.

How to Stencil a Wall to look like Wallpaper

How to stencil a wall. One Room Challenge

I have to say that I love the way it turned out! I’m still deciding on wether or not to finish the very top as I’m kind of liking the somewhat scalloped looking edge. I guess you’ll find out on the final reveal! 😉

Wall Stencilling How-To

Let’s start with what you’ll need:

How to stencil a wall. One Room Challenge

  • You’ll need a stencil of your choice
  • A small roller and/or a stencilling brush
  • Good quality painter’s tape
  • Lot’s of paper towel
  • A small paint tray or a styrofoam plate will do
  • A level
  • Measuring tape
  • Spray on adhesive for the back of your stencil (optional)

How to stencil a wall. One Room Challenge

1.Using your measuring tape, find the centre of the wall. Affix your stencil to the top and centre of your wall. Check to make sure that your stencil is level.

How to stencil a wall. One Room Challenge

2. Load up your roller/brush with paint , enough to cover the entire thing evenly.

3. Remove most of the paint by off loading it onto some paper towel. This is important as you don’t want excess paint to bleed underneath the stencil. Less is better when it comes to stencilling!

How to stencil a wall. One Room Challenge

4. Begin to roll out over your stencil. You can lift up the corner of the stencil to make sure you’re not applying too  much paint and bleeding through.

5. Move your stencil over to the the next position. Your stencil will have registration marks that will guide you to the correct placement. I found that the paint was dry enough to move onto the next placement without disturbing the previous paint.

How to stencil a wall. One Room Challenge

6. Once you come to a corner or edge. Apply your painters tape to protect the edge and the adjacent corner.

How to stencil a wall. One Room Challenge

7. Place the tape on the side of your stencil that you will be stencilling. In this case the left of the corner. Don’t tape the right side down as this will need to be flexible. (In the above pic. The right side is taped just to hold the stencil up while I photographed the pic, otherwise that side should not be taped)  Using your roller to paint into the corner by pressing into it.

How to stencil a wall. One Room Challenge

8. When doing edges and corners, you can use your roller to press into the corner/edge and  then use your fingers to press your stencil down into the corner/edge. You can continue to roll at this point or use a little stencil brush to get right into the edge. I just continued on with my roller.

How to stencil a wall. One Room Challenge

9. Continue to go around the room until you have finished. You may have to stop and clean the excess paint buildup from your stencil. I did this once and placed it in my bathtub to clean.

Royal Designs Studio has some great how-to videos and instructions on their site that I would encourage you to watch if you’re thinking of trying this out.

If you look at my walls there are lighter and darker areas. I actually love this as it gives the appearance of water colour. I also found that in places near the corners and edges where It seemed that I made some major “out of the lines” mistakes, the pattern was very forgiving. If there are areas that you feel you need to address, you can simply get a little brush and use the base colour to help clean up the lines. I thought I was going to have to do a lot of cleaning up of the lines but it seems to blend in and has just become part of the pattern.

How to stencil a wall. One Room Challenge

So here is a little peek into my Modern Coastal Farmhouse Office/Workroom. If you look to the right of the photo, you’ll see a peek of something else we’ve been working on! 🙂 Thanks so much for joining me on my first journey with the One Room Challenge and stay tuned for more projects on the way! You can follow along with others on their journey as well right here!

(This post was done in collaboration with Royal Design Studio Stencils, all photography, thoughts and opinions are my own.)


Filed Under: diy, Home decor, Makeovers, spring, Tutorials, Uncategorised

One Room Challenge Spring 2017 | Week 2 | Board and Batten

8:54 pm by kim 46 Comments

One Room Challenge | Week 2 | Board and Batten

One Room Challenge

Welcome to week 2 of the 6 week One Room Challenge hosted by Linda of Calling it Home! Well, the madness has begun and I’ve dragged the hubby into it as well and we tackled the walls in our little…wait for it, it’s a mouthful…Modern Coastal Farmhouse Office/Workroom. Lol. This is the mood board I created to steer me in the direction I want to go with in this room:

Mood board for ORC 2017

If you remember in Week 1, I wasn’t exactly sure what kind of treatment I was going to apply to the walls. I knew I wanted it to have a coastal farmhouse vibe but done in a modern way. I love shiplap and have used it in a few rooms on the main floor, but I wanted to try something different this time. After searching through my Pinterest pins and other sites,  I finally decided on board  and batten. I thought it would add character and charm to my little room and to be honest, it looked like it required less work than I was used to with shiplap!

ORC week 2|Board and batten

I think it turned out great! It seems to fit this room perfectly and I’m wondering why I didn’t do it before. It brings such character to this little 9×12 space. I think that Jack approves too! I’ve added a bit of greenery  to break up the white a bit so you have a better idea of how the space looks.

Below are the tools hubby and I used to complete the project:

Supplies for the board and batten, Spring ORC

(This post contains affiliate links, I only share products I know and love)

We used:

  • Pre-primed already cut MDF boards that were 3.5″ wide. We removed the old baseboards and used these as not only the boards but for baseboards too. We wanted a totally even and cohesive look with all the seams matching.
  • Nail gun with 2″ nails. we didn’t use PL glue on the boards, although you can if you’d like. We just nailed  every couple of feet and didn’t even worry about hitting studs as each piece is fairly lightweight on it’s own.
  • We used a level to make sure each board was straight, so important as your own eye can fool you! You can also use a laser level to level your top boards. We have one, but it was lost in the abyss that is our garage so we did without it.
  • Caulking, to caulk all the seams, I even do the bottom where the baseboards meet the floor. I think the attention to finishing details can make the difference between a “diy” and a “professional” look.
  • We used wood filler to fill in all the nail holes and the seams.
  • A sander to sand all the wood filler off. I love my B & D mouse sander. This fella has seen a lot of action!
  • Painter’s tape. I use this when I am painting the baseboards to avoid getting any paint on the floor.
  • Lastly, you’ll need the paint of your choice.

The only difficult part of this application was figuring out the math! Our walls were all different widths so the width between boards on one wall may be different than the widths between boards on another. We did the math calculations and stood the boards against the walls to test out what would look  best. Once you’ve figured out the spacing and marked where your boards will go, the project moves on fairly quickly. We placed and nailed the baseboards down first then we put up our vertical boards and left the top horizontal ones till the last. While my husband was nailing in the boards, I was right behind him applying the caulking and wood filler, so we were a quick efficient team. As with every project, always measure twice and cut once!


Spring 2017 One Room Challenge Board and Batten

Spring 2017 ORC Board and Batten

Spring 2017 ORC Board and Batten

Spring 2017 ORC Board and Batten

Spring 2017 ORC Board and Batten

Once again, I’m so happy with how this project turned out. If this is something you’ve been thinking about doing, I would say do it! It’s a small amount of work for a huge impact and would make a great weekend project. Thanks for joining me for week two, stay tuned for week 3 as it only gets better from here. We’ve got some great projects planned. You can follow along on Instagram too as I tend to share there first. To receive our blog posts as soon as they’re posted hit the subscribe button and they will be sent straight to your inbox! And don’t forget to go visit all the other participants too, you can find them here.

Blessings,

Kim

Filed Under: diy, Home decor, Makeovers, One Room Challenge™, spring, Tutorials Tagged With: Makeover, One Room Challenge

DIY Throw Rug Pillow Tutorial

6:00 am by kim 11 Comments

DIY Throw Rug Pillow Tutorial

I’m loving my DIY throw rug pillows so much that I thought I’d share with you all exactly how I did it. I found the rug at Homesense and it was love at first sight! I was thinking about using it as my kitchen rug but it was too darn pretty to be hidden away on the floor. I knew I wanted to see this pattern often. It was a 2.5’x3.5′ rug which would easily give me three different pillows of varying sizes if I added a complimentary fabric to the back. I’ll share with you how easy it was to put together in case you’d like to try it yourself! I used a simple envelope style, no zippers! I did a post years ago on how to make an envelope styled pillow called the “the 5 minute pillow” you can find that here.

DIY Throw rug into pillows

Turn your favourite throw rugs into pillows

Throw Rug Pillow Tutorial

Materials Needed:

  • Throw rug of your choice.
  • A complimentary fabric for the back of your pillow.
  • Sewing Machine.
  • Measuring Tape.
  • A good pair of sharp scissors.
  • Pins.
  • Thread.

Tutorial:

  1. Start by figuring out how you’d like to cut up your rug. My rug had lines and patterns that made it easy for me to divide it up. I ended up with three rectangles. The middle one being the larger. This tutorial will reference to the middle piece.
  2. Finish off your raw cut side. The rug will have two finished sides (meaning they’re already bound with a hem so no fraying) and 2 unfinished sides. If you have a serger, go ahead and serge the unfinished sides. If you have a regular sewing machine like me that’s ok, you can do a zig zag stitch on your unfinished sides, this is going to keep the ends from fraying which they will! I actually did a very wide and tight zig zag and went over it twice! The edge started to fray right away and I was able to salvage it.                            Throw rug made into a throw pillow
  3. Now you’re going to measure and cut your coordinating fabric. (This will be the back of your pillow and will have two overlapping pieces which work as the “envelope” to get your pillow insert in and out from)  For your first piece, measure the length of your rug minus two inches (because that piece will be sewn 2″ inches down from the opening end of your pillow) and add 1″ inch for a hem. Eg. if your rug piece is 10″x30″ than your first piece of fabric will be 10″x29″The width will be the same width as the rug. For the second, smaller piece of fabric, I usually will do an 9 inch flap plus allow for a 1″ hem, making it 9″ of fabric. I use this same measurement every time I make an envelope pillow, only the width will change according to how wide your pillow is). The width for both pieces of fabric will be the same.
  4. Next, sew a 1″ hem on one end of  each of the two fabric pieces.Diy throw rug into pillow
  5. Now you will take your shorter fabric piece first and lay it over your rug piece, right sides together with your hemmed edge facing towards the middle.DIY Throw rug Pillows
  6. Take the longer fabric piece and lay it over your rug piece, right sides together with the hemmed edge about 2″ down from the opening side edge (L side here). Your long piece should be laying over the rug and also most of the shorter piece. So in some places you will have three layers.DIY throw rug pillowsDIY throw rug pillows
  7. Pin around the perimeter paying close attention to pin down where the hems are. Now sew along the perimeter of the pillow about 1/2″ in.DIY throw rug pillows
  8. Remove your pins and turn your pillow rightside out. You’ll notice you have a good size pocket to place your insert into. Now take the small flap and turn it rightside out and fold it over the other end of your insert. Go inside and stretch out the corners. You’re done!DIY throw rug pillowsDIY throw rug pillowsDIY throw rug pillowsDIY throw rug pillows

I hope this was easy to understand and that your were able to make your own! Don’t hesitate to leave a comment and ask a question if your need to. I’m happy to help! Please subscribe if you’d like to receive these posts straight into your inbox.


Filed Under: diy, Home decor, pillows, Tutorials Tagged With: diy, Home decor, Pillows, tutorial

DIY Tea Cup Candle Tutorial

12:07 am by kim 3 Comments

Tea cup candle tutorial

Hi everyone! Just sitting here wondering where the heck January went! I have to admit that the first few weeks of the year I had little energy and it was difficult to get back into the swing of things. However, February always energizes and reminds me that spring is indeed coming. It’s also my wedding anniversary month and the hubby and I will be celebrating our 30th this year! Not sure where those thirty years went either! Our anniversary is actually on Valentine’s Day, (makes it easy for the hubby to remember!) I thought that these little vintage tea cup candles would make a lovely little addition to a little Valentine’s Day desert table I made up for the occasion. I hope you’ll try them, they are super easy to do!

DIY Tea Cup Candle Tutorial

Materials:

  • Tea cups, you can use what you have at home or you can easily find them at a thrift store for a couple of dollars.
  • Wax, you can buy your own from a craft store, or do what I did and use melt down candles. I used an old candle from IKEA and it was super cheap.
  • Wax adhesive, you can find this at a craft store like Michael’s or you can find it here.
  • Candle wicks with metal bottom. Also can be found at your local craft store or here.
  • An empty can large enough to hold your candle and contain the wax.
  • A pot to place the can inside.
  • Wooden Skewers, I found mine at the dollar store.

Optional Materials:

  • Essential oils or wax candle scents. I don’t like to use scented candles for the kitchen or around food. I do love using them for other living spaces  though.
  • Crayons or wax colour melts. Yes! you can use wax crayons if you’re looking to tint your candles.

(Material list contains affiliate links for your convenience!)


Tea cup candle ingredients

Tea cup candle tutorial

I start off by putting a little bit of wax adhesive on the bottom of the metal end of the wick. These wicks come with the little metal plate and have a thin wax covering that makes them a little stiff so they’ll stay in place easier.

Tea cup candle tutorial

The metal end is then attached to the bottom of the inside of the tea cup. This helps it to stay in place when you pour in the wax. I then wrap the wick around my skewer to help hold it straight and in place.

Tea cup candle tutorial

In the meantime, I have my candle sitting inside the tin can. I have the tin can placed in a pot filled half way up with water and the temp set to medium. Once the candle is melted you can use the skewer to remove the old wick. If you wanted to tint your wax you can add a crayon or wax tint melts now. Stir with the skewer. This is also when you can add your scent if you’d like one.

Tea cup candle tutorial

With a bit of aluminum foil under the cup and saucer,  pour the melted wax into the cup until it’s as high as you’d like.

Tea cup candle tutorial

Tea cup candle tutorial

Once the wax is dry, you may notice that it has shrunk a bit. You can pour more melted wax to level it out again.

Tea cup candle tutorial

Tea cup candle tutorial

How cute are these? They can be used anywhere! I would use the scented ones on the bedside table or by the tub when you’re bathing. They’d make a great little gift as well.

Tea cup candle tutorial

Thanks for dropping by! I’d love to know if you tried these and how they turned out.

-Kim

Filed Under: diy, Tutorials

A Tea Towel Bedskirt-Week 3 of the Guest Room Makeover

6:00 am by kim 6 Comments

A Tea Towel Bedskirt For an Ikea Bed- Week 3 of the Guest Room Makeover

Hello everyone! In week three of my guest room makeover I’ve made a bedskirt for my Ikea bed. The Ikea bed has slats and a normal bedskirt doesn’t fit properly so I came up with a way to get around that. Linen was my  fabric of choice but  not something the budget allowed. I’d been looking for a project to use this tea towel fabric with and it fit in with the decor and the budget. It was 50% off!

A tea towel bedskirt for an Ikea bed

Tea towel fabric for a bedskirt

The tea towel fabric comes in a 20″ width which made it easy to work with, I simply had to cut off 6″ along one side. It also comes with a hem on either side of the length which meant I only had one hem to do.

Bedskirt fabric with gathering tape.

I applied gathering tape to the raw edge which I folded under and then sewed it on.  Once the tape is sewn on there are two strings that you pull and it gathers the fabric for you. I used double the length of fabric so it would gather nicely. I sewed together three separate pieces for the three sides of the bed that are seen.

Velcro tape under the bed

I meant to use the velcro with a taped side but totally forgot. That’s when my old trusty glue gun came in! I applied the velcro under the side of the bed using glue from the glue gun.

Bedskirt with velcro

The gathering tape attaches nicely to the velcro.

Tea towel fabric bedskirt on an Ikea bed

A tea towel fabric bedskirt

Tea towel bedskirt fabric

Both my boys Jack and Bubs have joined in for this post. They usually follow me around wherever I go and there is no moving them out of the way! I’m sure you’ll see them in many of my posts.

A tea towel fabric bedskirt

Thank you again for joining me in the guest room saga! I’m so pleased with how it turned out. Stay tuned for the reveal next week and please subscribe if you’d like to see more of these posts!

-Kim

Filed Under: diy, Makeovers, Tutorials, Uncategorised

  • Go to page 1
  • Go to page 2
  • Go to Next Page »

Primary Sidebar

Hi, I'm Kim Read More…

Instagram

Follow along on Instagram

Sign up and don't miss a post!

Recent Posts

  • Festive Bacon Wrapped Chestnut Holiday Appetizer
  • DIY Mantel Decorated for Christmas
  • Simple and Cozy Fall Home Tour
  • Simple Fall Tablescape

Archives

Footer

Copyright © 2025 · Foodie Pro Theme by Shay Bocks · Built on the Genesis Framework · Powered by WordPress