Hi everyone!
I hope you’re all enjoying this long weekend! As most of you celebrate President’s Day, we Canadians are celebrating Family Day and I am celebrating this day by making cushions!
Last week I was watching a local TV show called Cityline. Thursday is Homeday where they give decorating advice, tips etc. A regular on the show, seamstress Mary Dobson did a tutorial on how to make a five minute cushion. She had me at cushion! I love making cushions, you can change a room up with a little bit of fabric and now an extra 5 Minutes!
I also wanted to try making one of these faux grain sack cushions that I’ve seen in blogland lately using a fabric marker and fabric paint. I have to say the fabric paint turned out better for me.

This is the black one I made. Many of you may not know this but I love black!

I used my favorite dropcloth material for these. Butters is a little upset that my pinecones are preventing him from jumping up on his stool to get to the sofa!

I think it turned out well.
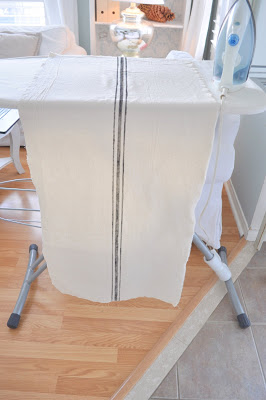
You begin with 1 piece of fabric. Just add 2 inches to the width of your insert.Then double the length of your insert and add 8 inches for your flap.My inserts were 18×18 so I ended up with a piece of fabric 20x 44 inches.

It actually only takes five minutes after you have cut your fabric and then folded and pressed your seems. Here I started by pressing my two ends

After the two ends are pressed you will bring down the flap 6 inches right sides together.
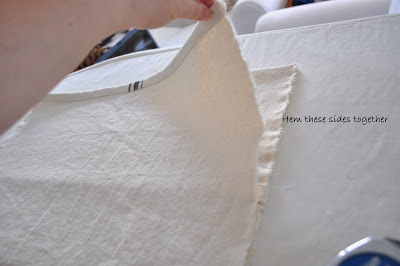
You will then bring up the bottom end right up to the top. After this you will hem the sides together. At times three layers of fabric.

After your two hems are done turn the cover right side out. You will have a little envelope like this, the flap will still be inside out.

Stuff in your insert.

Now you turn over the flap and voila!

You have a quick and easy 5 minute cushion cover.

I had made some other ones with more of a beachy blue color
.


I hope you’ve enjoyed this tutorial and thanks for stopping by!
Be Blessed!
I’ll be partying with these ladies this week:
Coastal Charm
Between naps on the porch
Faded Charm
My Uncommon slice of Suburbia
A Beach Cottage
Savvy Southern Style
Shabby Chic Cottage
The shabby Nest
My Romantic Home
Funky Junk Interiors
Chic on a Shoestring Decorating
French Country Cottage
DIY Showcase
Simply gorgeous!!
Lovely Kim!! I just adore these types of pillows!!
Your dog is very sweet.
We don't have family day here in B.C. 🙁 !!
Enjoy the day with your
loved ones!!
Pamela xo
Happy Family Day to you and your family, Kim! I wish we had a holiday like that here in the U.S. Those pillows are gorgeous and are a beautiful addition to your living room!
The timing of this post couldn't better, by the way. I need to make pillow covers for a living room set I'm painting. However, after spending a weekend wanting to cry because I screwed up curtains meant for my kitchen cabinets, I was thinking there's no way I could handle making pillow covers if I couldn't manage simple curtains! The thought of trying to teach myself to sew in zippers or button closures was about to send me over the edge! I just watched Mary's video and I'm so glad you shared it–thank you!
Kim,these pillows are great,I'm making Euro Shams out of the same thing..will show them soon.
Pattie
Kim the stripes are awesome. I'm not kidding when I say I just made some coasters with the same stripes, they're going up on etsy tonight. So spooky – great minds think alike!
Love your pillows Kim!!! They look so nice and easy I will certainly give them a try. Thanks so much for sharing.
Cindy
Oh my gosh Kim your so good…I love those,I want to find a table runner like that…your so talented my friend!! x0
soooooooo gorgeous! thanks for sharing it with us. i'll check out mary's tutorial as well. always an inspiration here…merci! 🙂
What is your favorite dropcloth material? Where do you find it. I like it!
Kim, The pillows are fabulous! I am going to try this technique next time.
xo,
Sherry
Oh Kim! These are fabulous. I can't believe you can create this with paint and markers. I've got to try it too!!
Thanks for sharing! Love it and your blog!
Tammy 🙂
I saw that tutorial with Mary too …. I like your pillow better than her's.
mmmm yum. I just bought some fabric paint for a different project but I just might give this a whirl too! thanks for sharing your cute results!
http://www.northerncottage.blogspot.com
Pretty cool! It's like magic!
I just figured out how to make those envelope covers last weekend and I can't believe I always used to make them the long, hard way.
If I keep practicing maybe one day I'll be able to do them in 5 minutes….. mine took about a half hour each.
Anyway, I love how yours turned out. I've been thinking about making a dropcloth pillow with some pink, fabric flowers. But I haven't gotten the guts to try it yet.
Did you get the fabric paint from Michaels??
Did you bleach the fabric first or leave it creamy??
🙂
I love how you make this look so easy! Thanks for the tutorial and the link! I really like envelope styled pillows because they are easy to slip on and off to wash. Black is a really great accent to bring out other colors. Love how this looks in your French-y chair!
Hugs,
Michelle
They look fabulous,and easy to make too!!
Kathy
Hi Kim-
Such a better way and EASIER too. Thanks for sharing the info. I will be making my pillow covers like this from now on.
My best- Diane
How cute is this?? *LOVE* it…and I think I can actually handle this one since I am sewing ignorant. Lol!
It looks fabulous!
Mary
so simple and so pretty. I think I just found my weekend project! thanks. Blessings, Joanne
10minutes2breathe.blogspot.com
This turned out so lovely…I love how great the closet looks, too!
They look fabulous! They also look somewhat simple for a girl who can't sew. Thanks for the tutorial. Happy Family Day or happy cushion sewing day…
You had me at grain sack, Kim! I'm a grain sack addict! 🙂 Loved how yours turned out – and so easy, too! Thanks for sharing your wonderful tutorial on this pillow slip, and Happy MM!
xoxo laurie
Love them….you did a great job! The pine cones on the footstool….perfect!
Kim, I love those and what a great tutorial. If I ever quit painting things I may be able to sew some. I am not a big sewer, but I do have a machine. Love your photos.
Your furbaby is adorable! Loving those pillows too. The black one is my favorite, but I love how the blue ones are displayed.
This has got to be the fastest way to make a pillow cushion ever! I love the stripes. I will just have to get more drop cloths. Right now I'm using some for curtains I'm making.
You make it look so easy! Bookmarking for the future. I can sew a straight line, but not much else!
Dropping by from How To's Day. Hope you'll come see the informal picture wall I did for DD2.
Allison
Atticmag
I need to try this! I love them!
Best,
Ashleigh
The pillows look amazing,I'll have to give it a try.
Gee, I never watch Cityline…but maybe I should start watching it.
I see Marilyn Dennis has her own show now, was she not the host of Cityline? I didn't care for her too much….
Very nice pillow!
Your pillows look absolutely charming~ love the black one! They look darling just sitting on your shelf too!! 🙂 Something I have been thinking about trying to make too- Thanks for the tutorial!! 🙂
I've been thinking about you and your dropcloth bedskirt as I am in the midst of making a bedskirt myself. It seems to be a never ending mass of fabric! As soon as I am done, I would really like to make these envelope pillow covers. Thanks for the GREAT tutorial!
Super cute pillows Kim…love 'em! I love Cityline too and I'm always so happy when I get a Thursday off and can watch Homeday! ~Deb~
They are lovely Kim….I've been making pillows in a similar way for years….I like the way yours are done and will be trying it out soon. Thanks for sharing….
Love this! I've never made a pillow this way and I can't wait to try it out myself! Thanks!
Cute, I so love the stripes that you did. You could do so many colors and the pillows will still go with each other…..I hope that you will link this up with my Show and Share linky party, going on all week. Your cute table in your previous post is cool too! http://craftygeordi.blogspot.com/2011/02/show-and-share-sunday_20.html
I stopped over from the Lettered Cottage, love this project, think I am going to have to try this, they would look great in our living room. I like your style as well! I think I will have to become a follower so I can stop by often! Thanks for sharing this, glad I found your blog!
First of all, Kimberly, your images are just gorgeous!!! I love your home, your sofa, the ottoman, all of it. And that shelving with the baskets is to die for. Now onto the cushions, I have been looking for something simple I can try to start off my sewing. I'm only just learning, and this is perfect! Thank you Thank you! xoxo tami
They are perfect…I love those pillows and thanks for sharing the how-to! xoxo beth
They're lovely, Kim!! Thanks so much for sharing! 🙂
Beth.
Your pillows are beautiful and I love the different colors. Thank you for sharing and for the how-to. These are definitely on my list to do!!
I'm thinking that maybe, just maybe… even I could do THAT! Thanks for sharing!
I love this! This is actually something I think I could pull off. Thanks for sharing:)
Oh My! Your pillow are beautiful. I am so going to steal this idea and make a few for myself. I just love it so much.
These are absolutely fabulous! And thanks so much for the tutorial!
So beautiful!
These look amazing. I want to do some…need to go buy some dropcloths and fabric paint first. 🙂
These scream oasis, come and rejuvenate.
Don't forget to add this project in our linking party where every Wednesday we showcase projects for our readers to discover.
http://www.passionatelyartistic.com/2011/02/colours-of-spring-be-inspired-linking.html
Thank you,
Maggie
http://passionatelyartistic.com
Just beautiful! I am definitely going to make some of these. Thanks for sharing.
So pretty! You make it sound so easy. Love your gorgeous shelf!
Oh thank you for this post… I have a drop cloth I've been going to make covers with and I'm going to try this version… I don't do zippers so this will be the perfect slip for me… I love the stripes you put on yours as well, I might give that a try too. I love the changes you've been making in the living room!
What an awesome idea! Thank-you for this post. I want to try this!
Love love love this idea!!!!
XO
Kristin
I LOVE these !! Thanks so much for sharing this wonderful tutorial, too !! *Becca*
The beachy blue is wonderful. I LOVE your serene style, thanks for the tutorial, Lori
I can wait to try this! I love your style!
They are perfect! Thanks for sharing! I'm just about to start making some pillows and I love your version.
Thank you so much for sharing, Im on a mission for making a home made home & pillows is on my list I will be trying this…oh blog land is over whelming with all these great ideas I dont know where to start 🙂
I need to give this a try! Your pillows are wonderful, thank you for sharing! I came over from WOW and am so glad I did! xoxo
WoW it turned out so great! Thanks for posting the tutorial I ant wait to try this.
I love the cushions and your little dog!
Wow…I'm really late chiming in on this post! I saw the episode of Cityline that you mentioned. I think I needed more coffee, but I couldn't figure out what Mary Dobson was doing! Your pictures have really helped me…I think I understand the directions now! I'm going to try this project soon!
Awesome.I love your creativity.The pillows turned out so nice. Have a warm and cozy day…Chickie
I love these – and it even beats the button closure I normally make with a narrower overlap. I really miss Cityline while I'm over here in Ireland – there's nothing good like that show here….
Very nice and clever, I think I might have a go at it!! thanks for the idea,
Trish xo
Beautiful! Love your blog…gotta stop by more often!!
Love your grain sack pillows.
Thank you so much for sharing this tutorial. Yours turned out just adorable!
~Danylle
I know I already posted a comment, but I actually made one of these today! Check it out on our blog, I noted we found it on your blog! http://hammersandhighheels.blogspot.com/2011/02/easy-linen-striped-decorative-pillow.html
What a great idea. I love how your pillow turned out. Don't forget to join me for More The Merrier Monday and link up all of your great projects.
http://diyhshp.blogspot.com
Very cool. I'll have to try this out. I've been looking for ones for my bedroom and these are perfect!
Hi there~ Just stopping back by to say thank you for sharing this at Feathered Nest Friday! 🙂
Kim – beautiful work and you make it look so easy! I'm including a link in this week's highlights. Thank you so much for sharing your creativity in the DIY Project Parade. 😉
Have a wonderful week!
Roeshel
What a wonderful pillow cover. I'm no seamstress but I think even I can make this. Thanks
Such beautiful pictures- so inspiring!
Great idea! I'm going to try it!
Thanks,
Kaye
Super cool! I will have to try this!
Hi! I'm Allie from http://www.mrschmidheiser.blogspot.com and I love this DIY. Come stop by and let me know you did so!
You turned your flap down 6 inches? Mary's tut says 4 inches. Why the difference? I want to do one of these but am confused why your directions are different. Thanks!
I am glad to have found your blog this morning. Happy new follower.
MC
This is very interesting, You are a very skilled blogger. I have joined your feed and look forward to seeking more of your fantastic post. Also, I have shared your web site in my social networks!
TM-T88V Direct Thermal Printer – Monochrome – Dark Gray Receipt Print
Good website! I really love how it is simple on my eyes and the data are well written. I am wondering how I might be notified whenever a new post has been made. I have subscribed to your RSS which must do the trick! Have a nice day!
Blue Microphones Radius Microphone Shock Mount
Fabulous!
This is great!