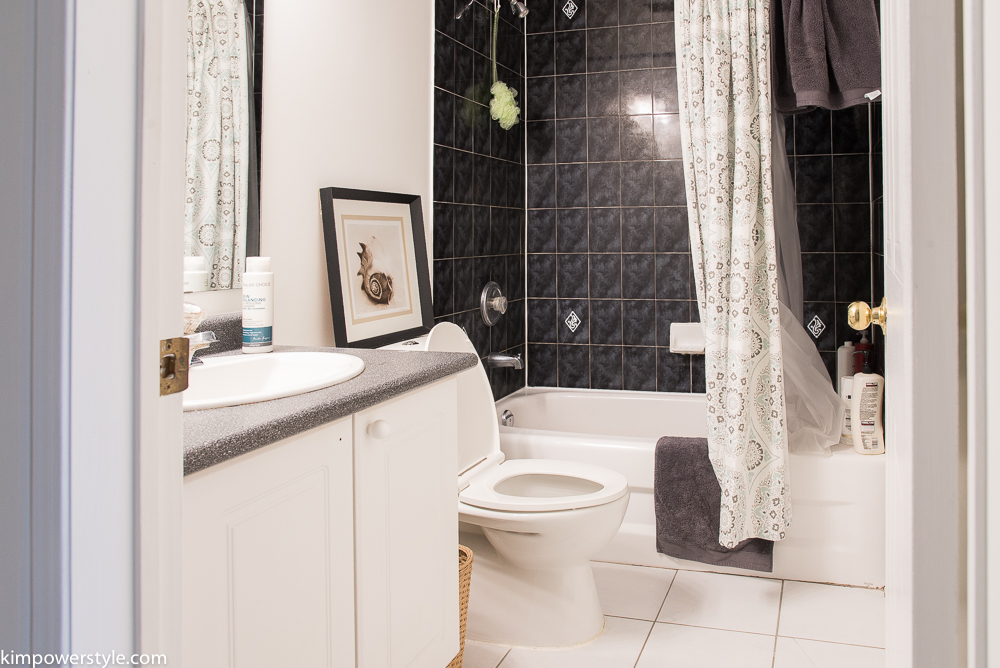
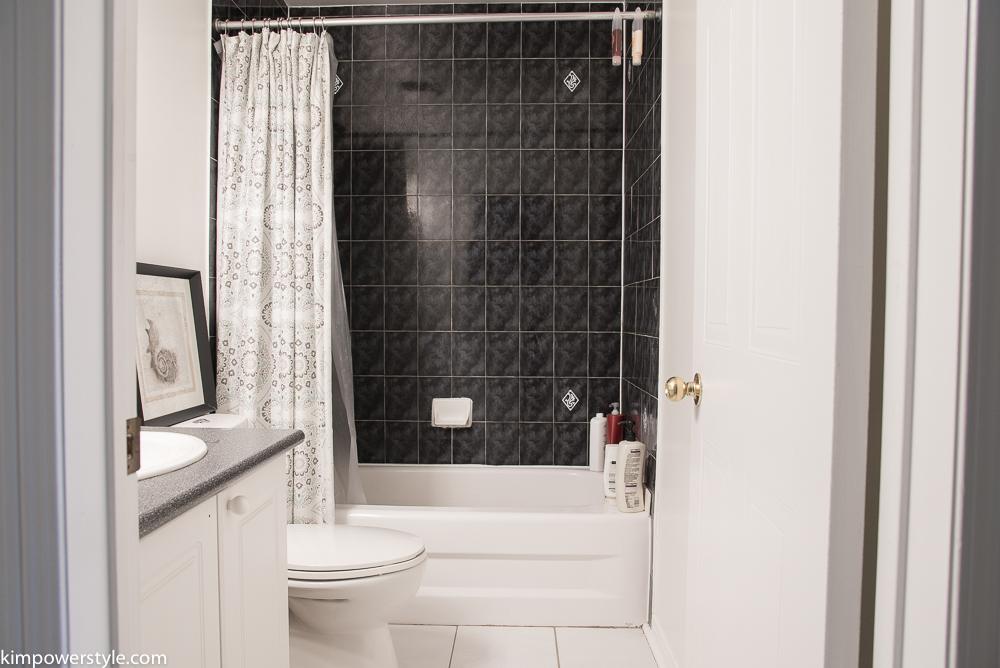
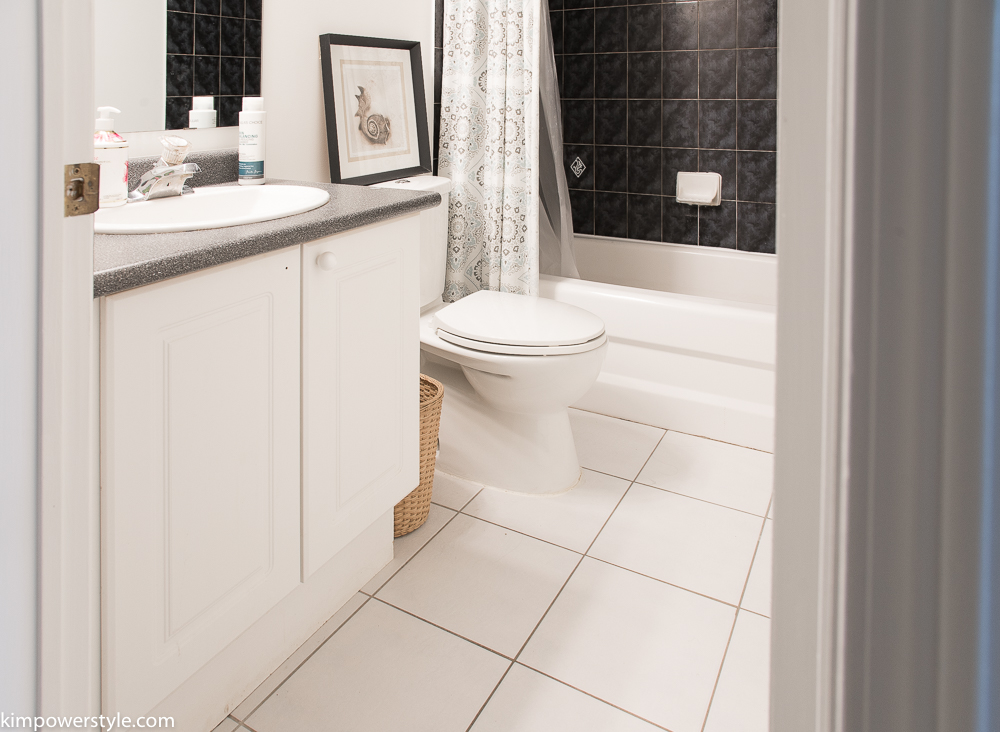
• Skip to primary navigation
  • Skip to main content
  • Skip to primary sidebar
  • Skip to footer

Kim Power Style

  • Home
  • Contact
  • About
  • Tutorials

kim

One Room Challenge Fall 2017 | Week 2 | Demo Week

8:45 pm by kim 16 Comments

Demo Week

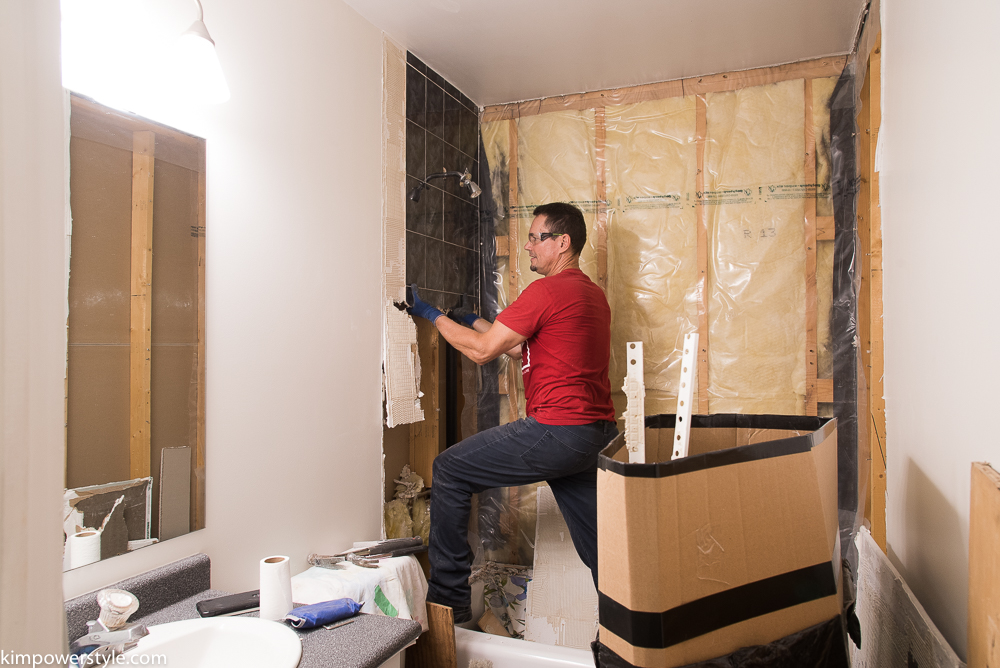
Welcome to week 2 of the ORC. If you’re just joining in with me today, here is a link to week 1 where I explain my plans to turn this dated room into a Modern Farmhouse bathroom. We’ve all  watched the home makeover shows where the “demo day” is  that amazing day where you’re able to start tearing out walls, tiles and aged appliances etc. At the end of the day everything has been removed and you’re left with a clean slate to start building from. Well folks, as the old saying goes, “only on TV”!  Unless you have a team of workers working behind you, there is no such thing as a demo day! It’s taken the hubby days to remove tile, drywall, a vanity, mirror, toilet and the dreaded floor tile. This One Room Challenge week 2, has kicked our butts. What we thought would be that lauded “demo day” has turned into the seemingly never ending “demo week”!

One Room Challenge Fall 2017

So this is what happened…get ready for some non-pretty pics.

Week 2 ORC, demo week

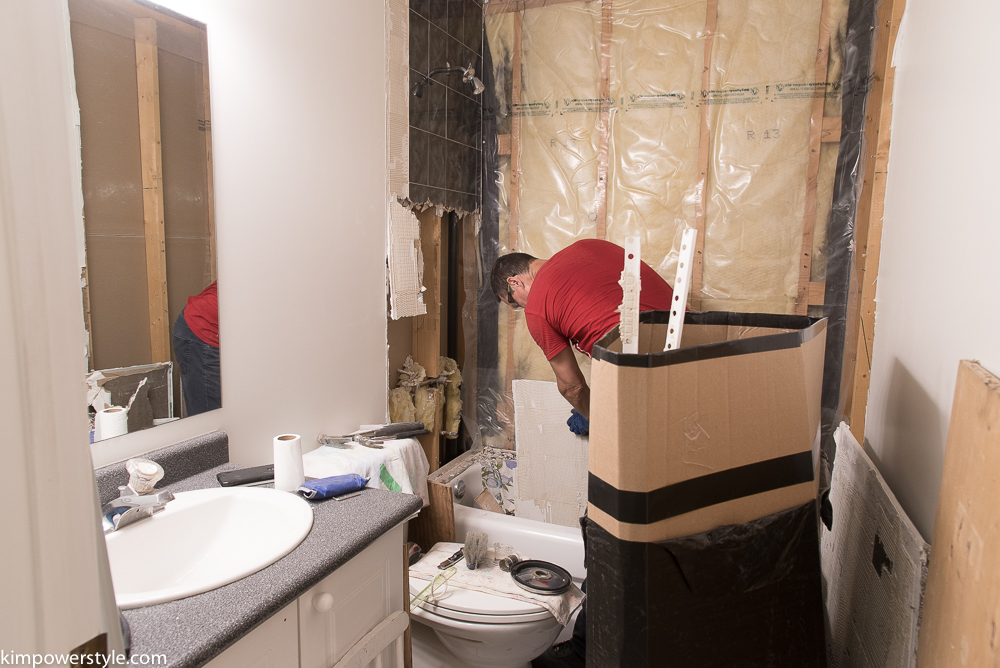
At first my hubby tried to take each tile off at a time. With the hopes we could save the drywall behind it and not have to worry about replacing it. No. somewhere or somehow you damage that drywall behind and you end up having to take it all down. After this lesson was learned, my hubby just took the drywall and tile down together in sheets. It was a much faster process doing it this way.

Week 2 ORC, demo week

Week 2 ORC, demo week

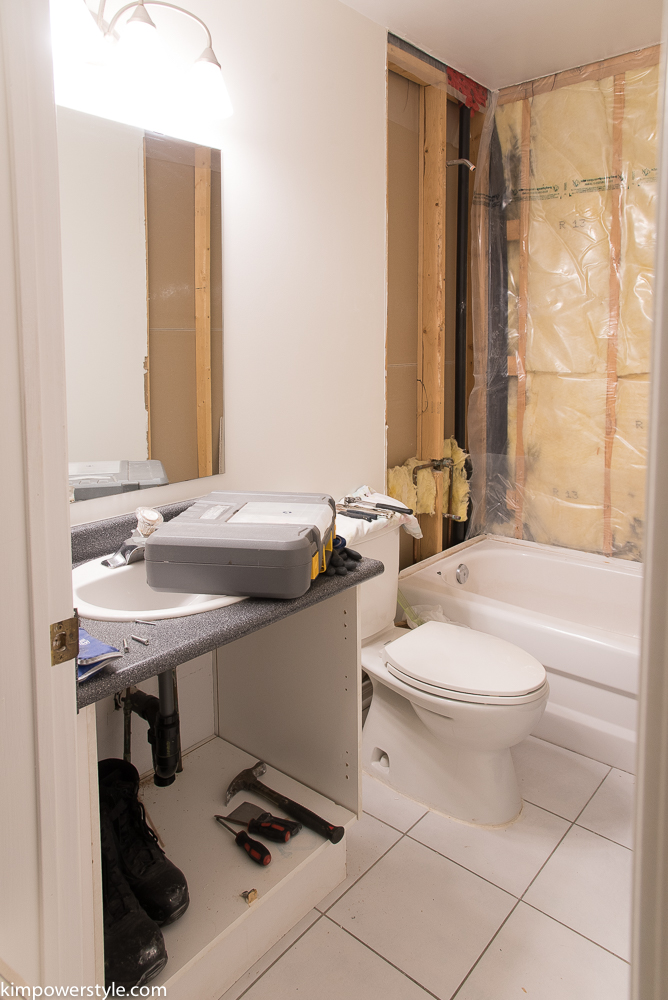
When it came time to take out the vanity, we noticed there were no water shut-off valves. So after turning off the water in the whole house and many trips to the Home Depot later, we were able to avoid a flood and remove the vanity…only to find this!

Week 2 ORC, demo week

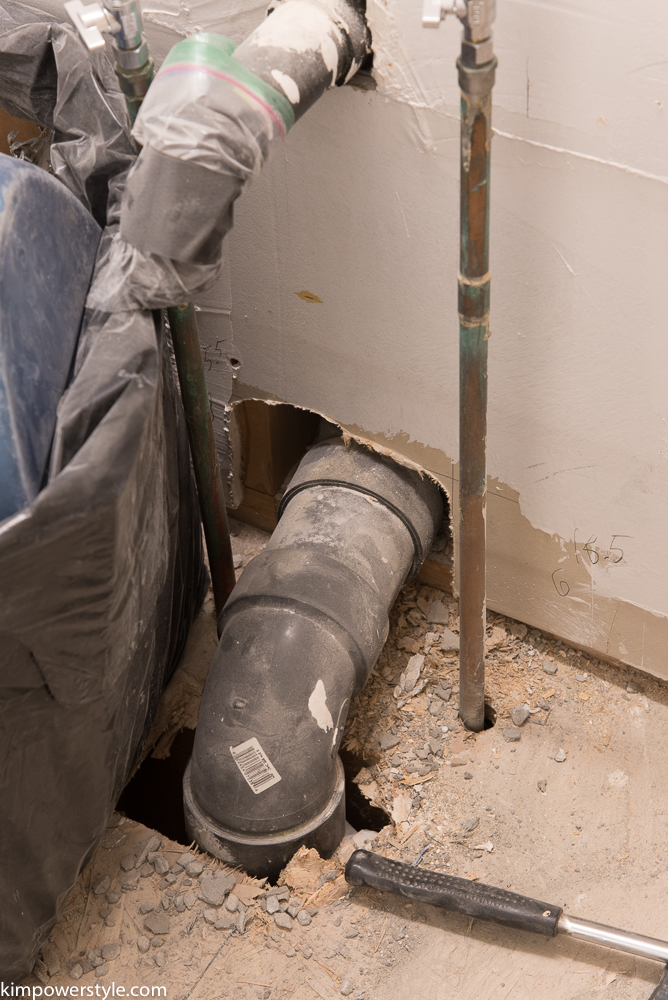
The water pipes come up straight out of the floor! There is also this gigantic black drainpipe jutting out of the floor and into the wall. If you look at my mood/vision board you’ll notice that the vanity I wanted  was up off the floor. In fact every vanity I liked was up off the floor. It makes a smaller space seem airier and larger. Well now I have to change my plans on that vanity. This whole pipe mess will have to be covered up.

Week 2 ORC, demo week

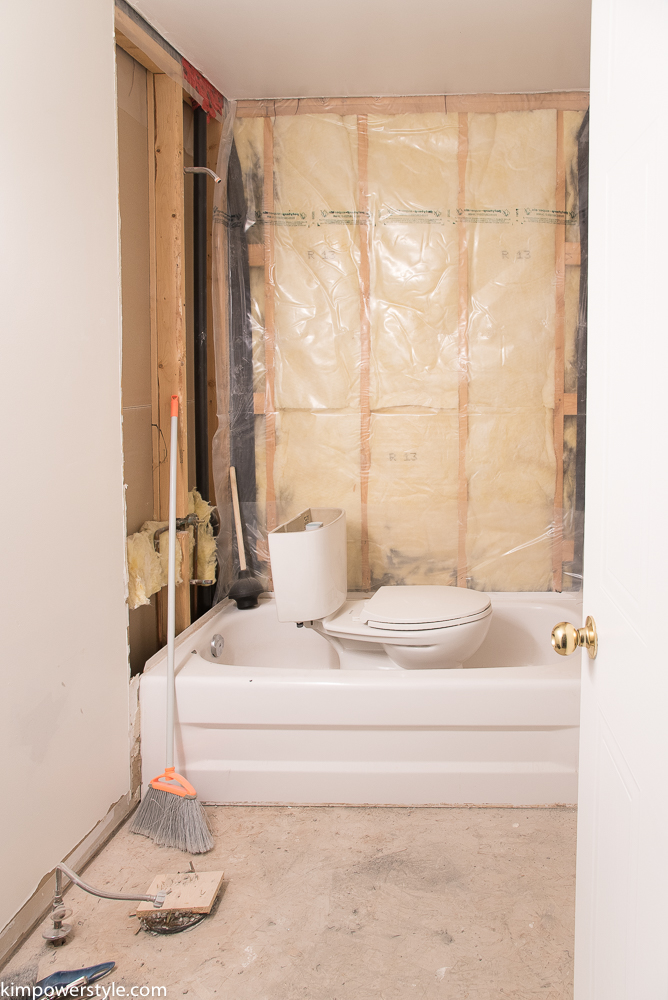
The floor tile, mesh and concrete thingy was the worst. We finally called up a friend and we borrowed a jack hammer, yep, we ( and by “we” I mean the hubby)  were jack hammering this room until late last night. We finally got it all up. Other than removing a few staples and a few stray pieces of dry wall, I think we’re done the demo stage. Phew! When things look like this, it’ hard to believe it will ever be done!

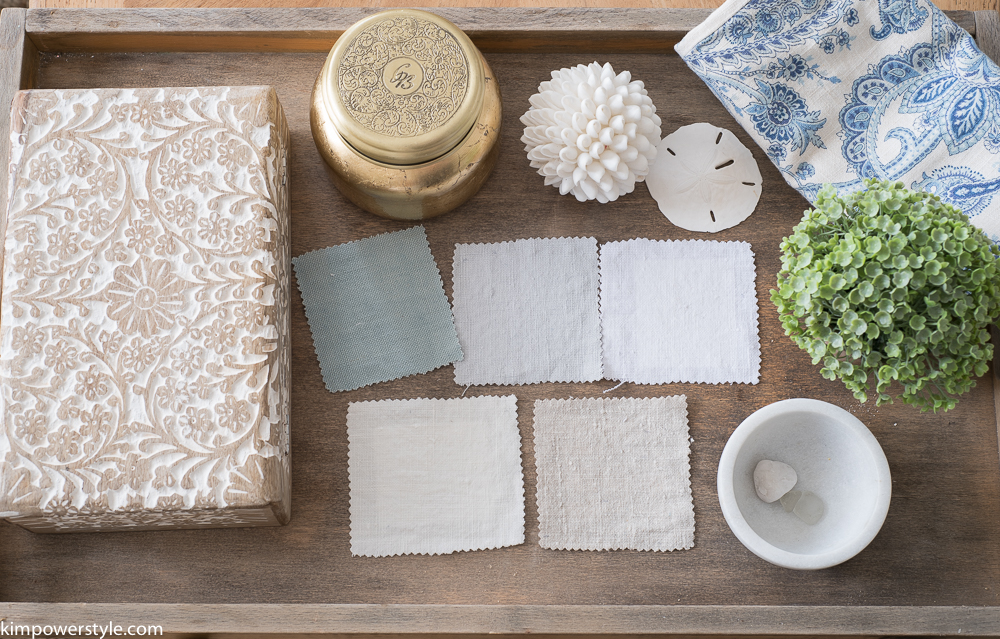
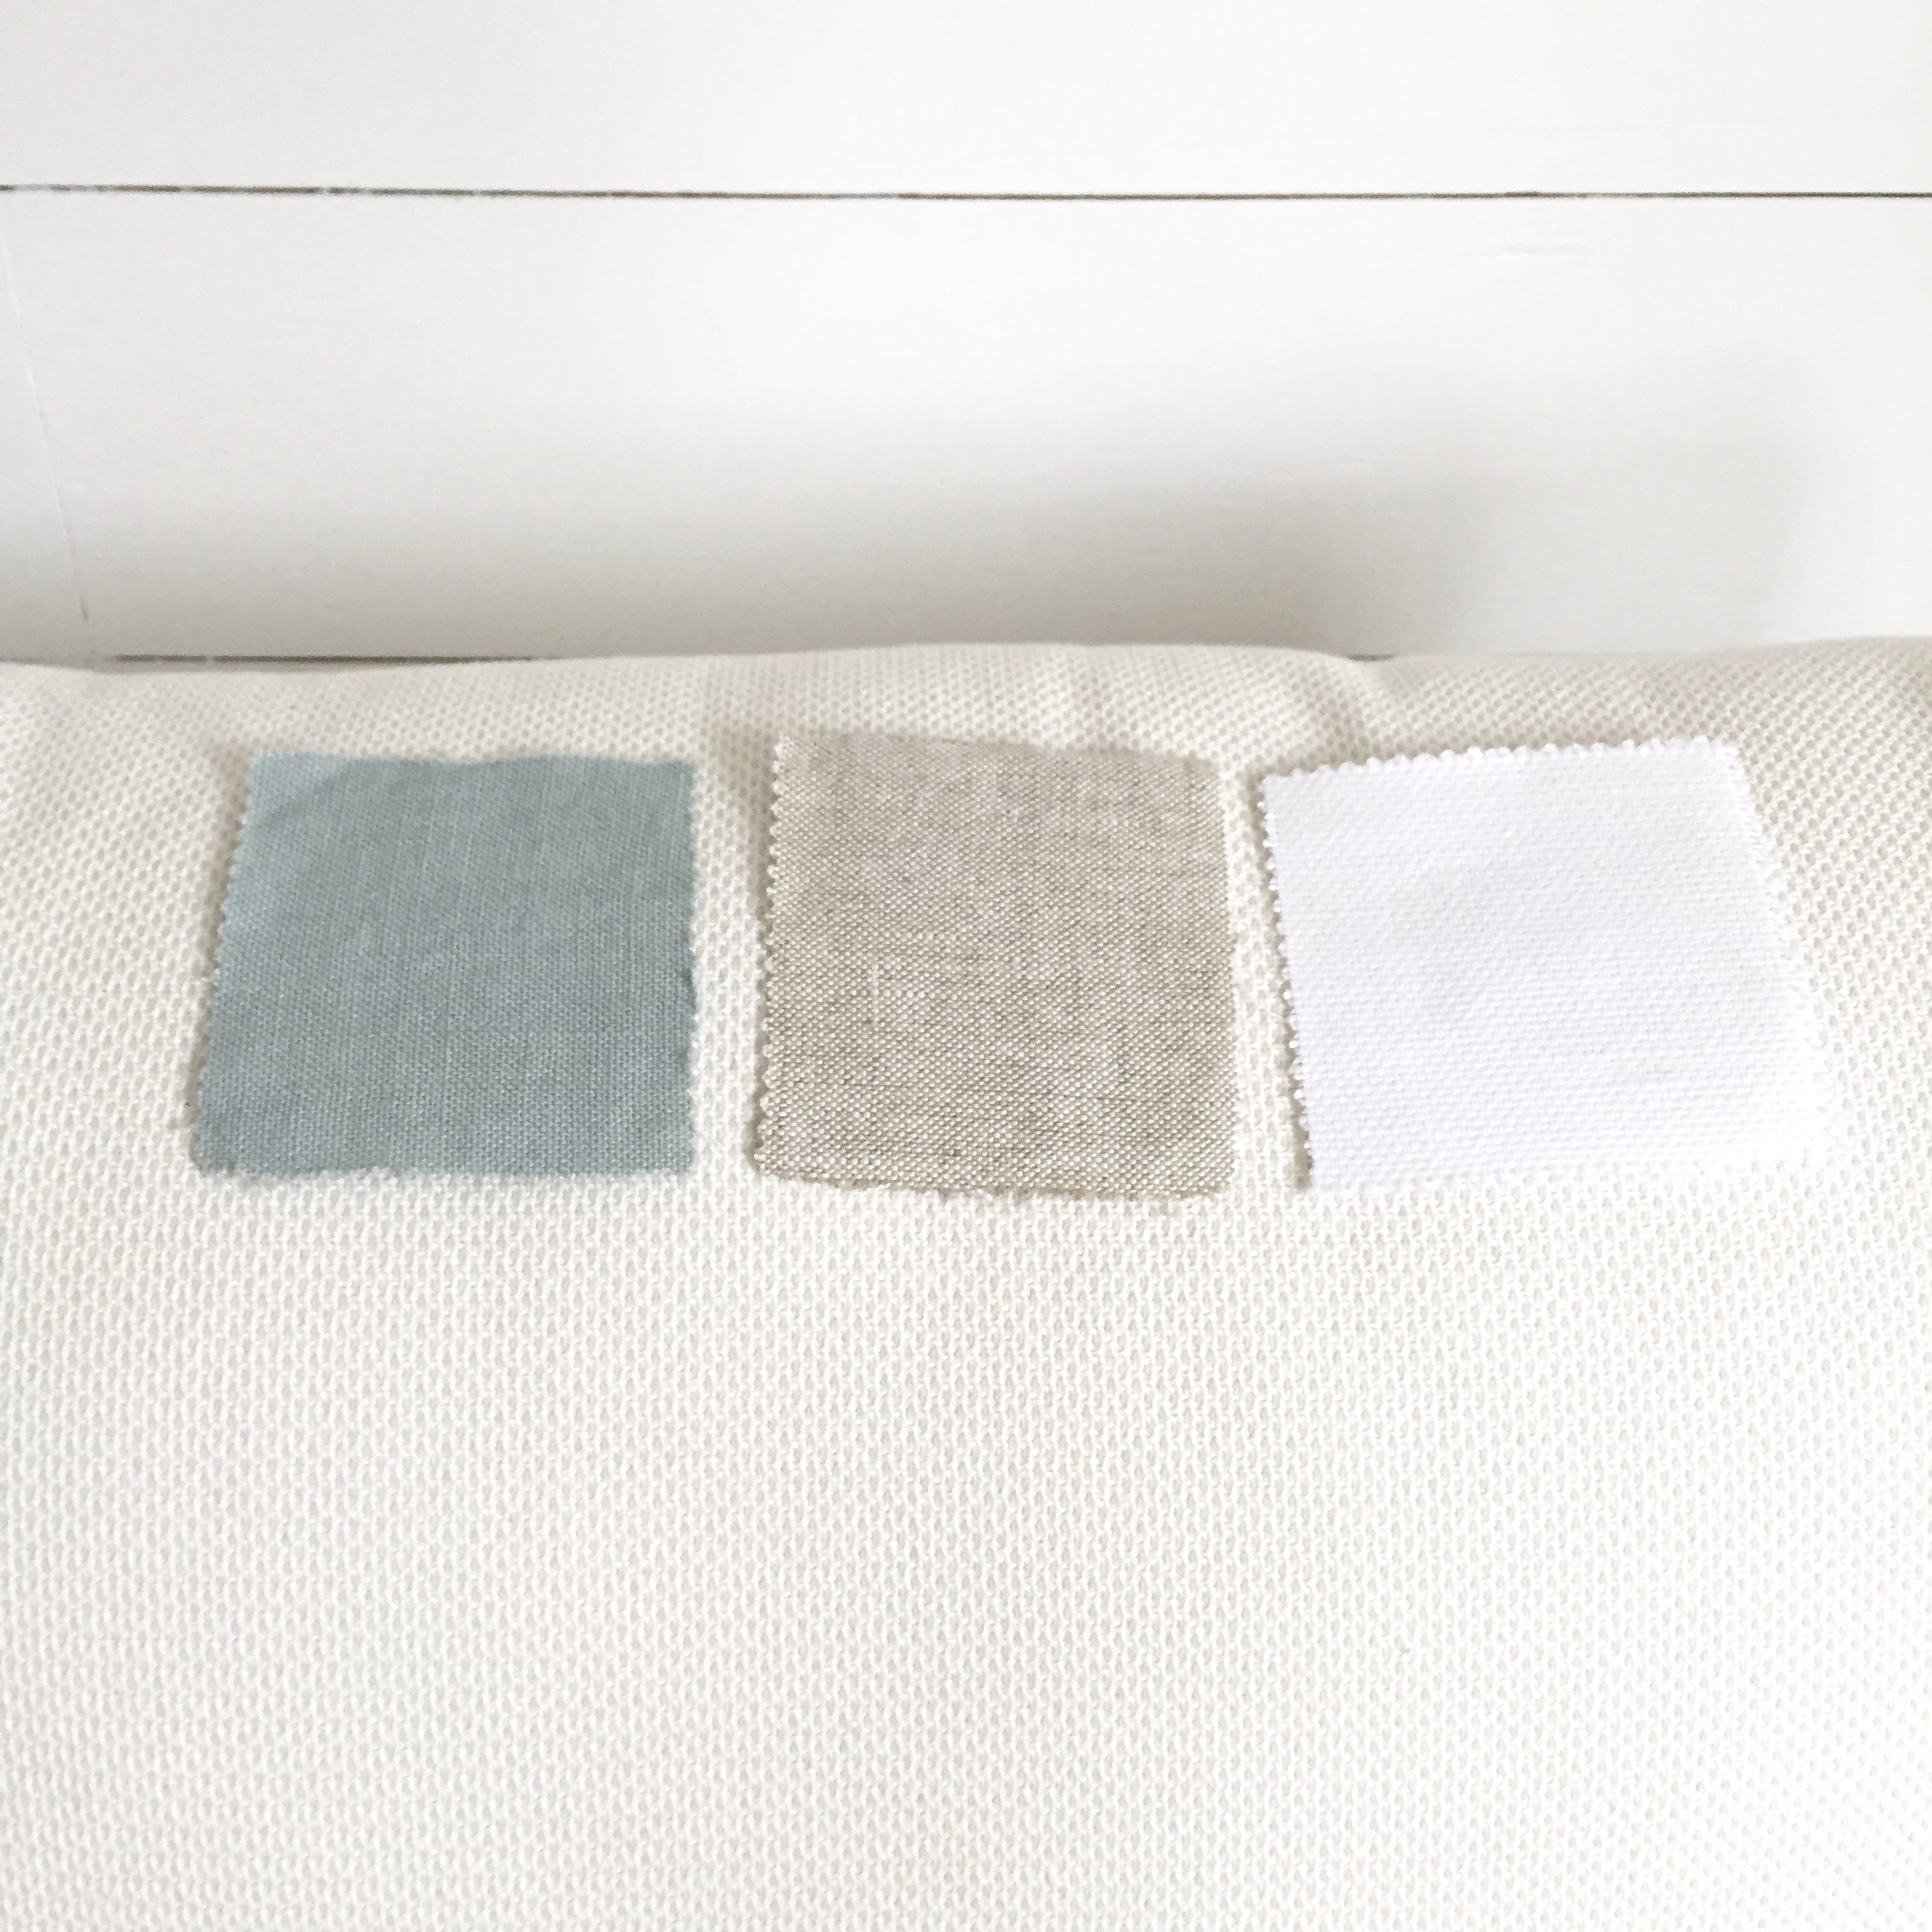
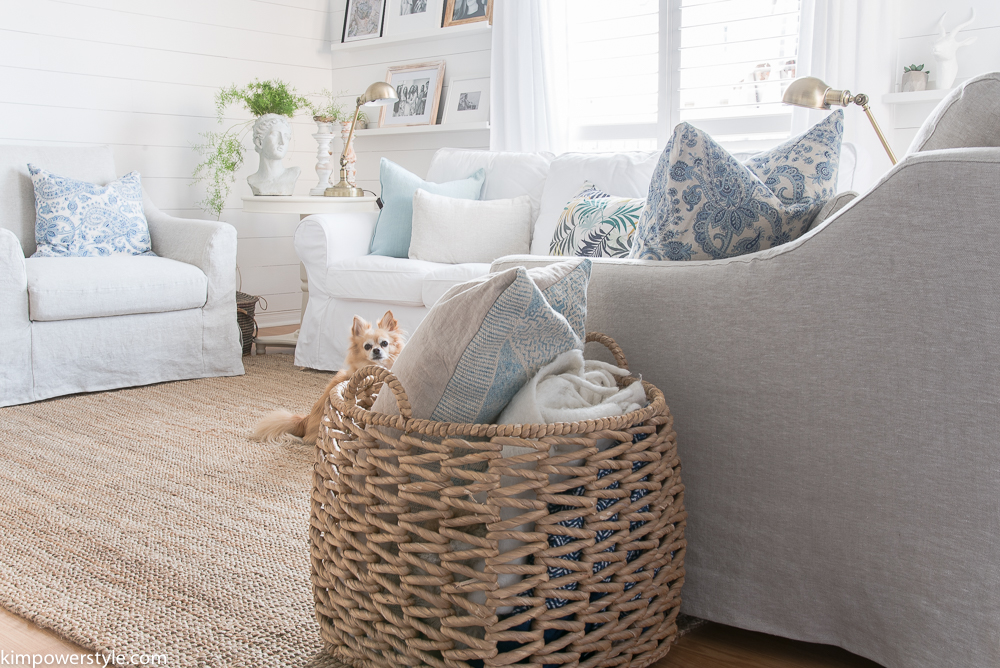
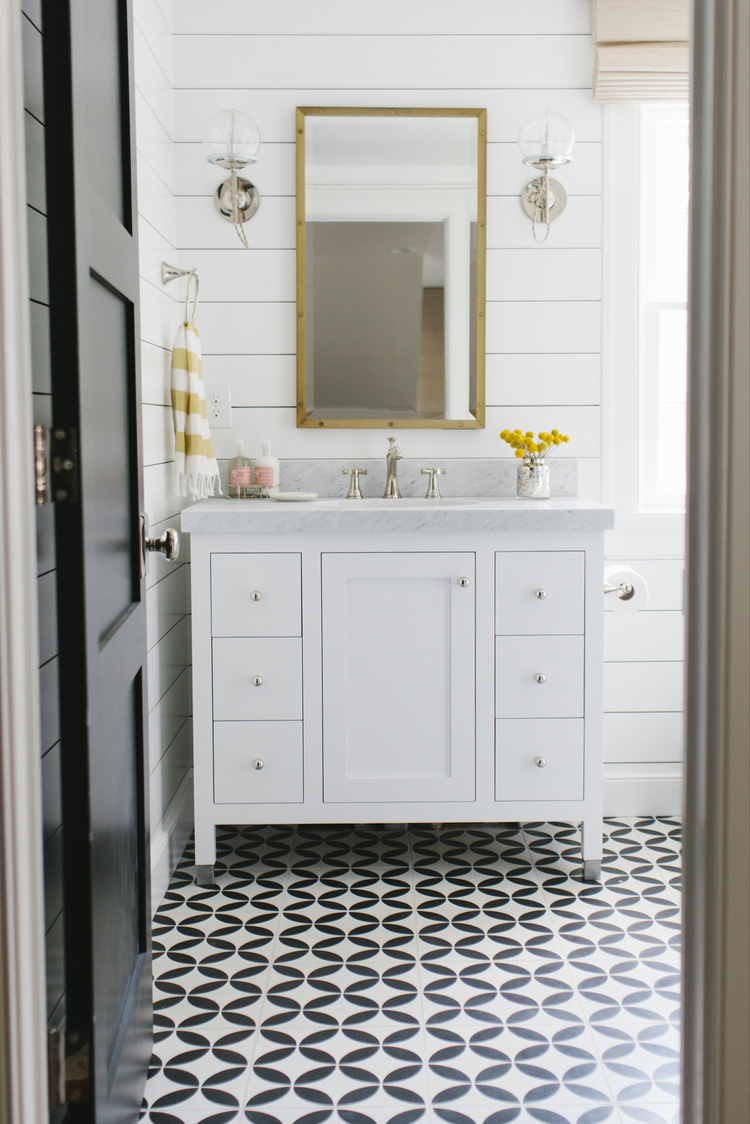
So now before those pictures burn a hole into our retinas, let’s take a look at how I envisioned this room to look. It may completely change by the time I get through but nevertheless  lets focus on my pretty vision.

Modern Farmhouse Bathroom


Here is some lovely inspiration via Studio Mcgee because Shea and her team know how to do a bathroom!

Studio Mcgee

(source)

Studio Mcgee

(source)

Studio Mcgee

(source)

My vision for how this space can look is the only thing that’s keeping me sane at this point. This reno thing is not for the faint of heart! Don’t forget to join me back here next week to follow along as well as pop in and see all the other participants, I’m hoping there will be major progress in this room by then. Please let there be progress!! Lol.

Thanks to my sponsors who are contributing to my Modern Farmhouse Makeover this time around!

Sponsors for ORC Fall 2017

Filed Under: diy, Fall, Makeovers, One Room Challenge™

One Room Challenge Fall 2017 | Week 1 | Our Modern Farmhouse Bathroom

8:54 pm by kim 14 Comments

One Room Challenge Fall 2017 | Week 1

Call me crazy but I’m doing it again! This will be my second time participating as a guest in the biannual room makeover series called the One Room Challenge hosted by Linda from Calling it Home. Twenty featured design bloggers are chosen to participate, as well as 200 plus guest Participants to make over a room in six weeks!  So much decor and makeover inspiration to check out on the ORC site….And so the madness begins…again!

One Room Challenge Fall 2017

To say I’m a little nervous is an understatement! The last time I participated in the One Room Challenge we were making over our office space. We applied board and batten, hung a barn door and the rest was decor and cosmetic changes. This time around we will be making over our small main bathroom and there will be demoing involved people, Eek! This bathroom is used by my daughters when they come to visit and stay in the guest room. When it’s clean and the shower curtain is pulled across, it can almost look pretty. I even had my daughter do a fresh coat of paint on it a few months back. But that black tile has been the bane of my existence (a little dramatic I know) since we bought our home. It’s the one thing I told my husband had to go! The vanity was passible when we first moved in but it has served it’s purpose and is ready to go as well.  So let me share this room with you.

Here is the before (It sounds better than right now, because these photos are a little embarrassing!) Please don’t judge. Yes there is a missing  knob on the  vanity door.

Bathroom Before Pic

Maybe I wasn’t being too dramatic when I said that the black tile was the bane of my existence?!

Bathroom before photo

One Room Challenge bathroom before photos.

So let’s move on to what I hope our after will look like:

Mood board

So here is the moodboard/vision I have for my new Modern Farmhouse Bathroom:

Modern Farmhouse Bathroom


I placed all my favourite things in this moodboard to achieve this modern farmhouse look. It’s a look that will go well with my coastal farmhouse/cottage vibe I have going on in the rest of my home and I love every element from colour to texture.

 Plan of Action

  • Remove the black tile and replace with plain white subway tile.
  • Apply white modern shiplap by Metrie to the rest of the room.
  • Change out the hardware in the shower/tub stall.
  • Do something creative with the floor tiles.
  • Remove the old vanity and replace it with something more up to date.
  • Remove the builder basic mirror and replace it with a new round one.
  • Remove the old lighting and replace it.
  • Add accessories, shower curtain, waste basket, stool etc.

It’s exhausting just reading this! You can find all the other participants here.  Don’t forget to check back next week to follow along with the process as well as to check if the hubby and I are still alive and married… Okay let’s get this party started.. Honey, get the hammer!


Filed Under: diy, One Room Challenge™, shiplap

Simple and Easy Fall Tablescape

6:00 am by kim 13 Comments

Today I’m joining my “Year of Feasting” friends. We’ve been sharing our tablescapes and how we entertain with our friends and family throughout the year. Thanks to Dannyelle from Life is a Party for hosting our little group!

Join me today as I share a simple and easy fall tablescape all ready for Thanksgiving. There will be links at the bottom of the post for you to check out my talented friends too.

Simple and Easy Fall Tablescape

Next week will be the first weekend in October and we Canadians will be celebrating our Thanksgiving Holiday.  I recently shared my dining room decorated for fall using faux eaucalyptus, baby boo pumpkins and some glass tea lights up the centre of the table. It looks great for the fall season and I knew it would transition into a beautiful Thanksgiving tablescape too. I simply added place settings to what was already there. What could be easier than that?

Thanksgiving tablescape

Thanksgiving/Fall tablescape

Thanksgiving/Fall tablescape

Thanksgiving/Fall tablescape

Thanksgiving/Fall tablescape

Thanksgiving/Fall tablescape

Simple and Easy Fall Tablescape

Simple and Easy Fall Tablescape

Thanksgiving/Fall tablescape

I love collecting vintage white ironstone pieces, they go with everything and they’ve stood the test of time. A platter for the turkey, tureens for the veggies, stuffing and gravy and all we need is the food! I used rattan placemats from Ikea, plain white napkins and my workhorse white plates. These fun blue ceramic bowls tie in the rest of the blue decor I used for fall and add a bit of colour to the table.

Thanksgiving/Fall tablescape

Thanksgiving/Fall tablescape

Last year my daughter and son in law hosted us at their house to Celebrate their first Thanksgiving together as a married couple. It was such a great time for all of us and a bit of a break for me! We’ll be back at our house this year as my son in law is out of the country with the military. We’ll have to make this one a little extra special as we’ll all be missing him. I love to decorate and make my home as cozy and inviting as possible for  my family. It’s really about making memories!

Thanksgiving/Fall tablescape

Thanksgiving/Fall tablescape

I hope you enjoyed my little tour and that you all have a warm and memorable Thanksgiving with your family and friends! Don’t forget to check out the links below to follow along with my friends as they share their Thanksgiving tables.

Blessings,

Kim

(I’ve added some affiliate links below so that you can shop this post!)

[show_shopthepost_widget id=”2875052″]

The DIY Mommy || Life is a Party

Kim Power Style || Vin’yet Etc.

The Leaner Observer || Woman In Real Life

Sustain My Craft Habit || Flourish and Knot

Filed Under: Fall, Seasonal tours

Simple Fall Decor In Our Dining Room

7:00 am by kim 15 Comments

This week I’m continuing my simple fall decor in our dining room and I’ve joined another great group of bloggers for our Joyful Home Fall Tour. We want to welcome you into our homes and  share how we celebrate the season, making our homes cozy and welcoming for friends and family alike. There are links to everyone at the bottom of the post so be sure to check them out for some great inspiration!

Simple Fall Decor In Our Dining Room

This year I wanted to make decorating our home for fall to be as simple as possible.  I started by giving this room a good decluttering…it tends to be that one room  that we dump all the little extras into. I think most of us have a room that serves that purpose. At least I hope it’s not just me!

I love the look of white and wood with a bit of greens thrown in and incorporated this into my fall scheme. If you’ve been following along on my home tours this year you’ll know that I’ve kept a lot of my blues and have used blue and sage in my pumpkins too. Finding this faux eaucalyptus garland and faux baby boos on sale from Pottery Barn was a score. It’s a bit of an investment but I love using both of them in my decor and they can be difficult to find in my neck of the woods. This way I have them whenever I need and they always look fresh! I’ve also found some faux eucalyptus at Ikea that was very reasonably priced. If budget  or a lack of time is an issue, you can always use leaves and branches from your yard. They’ll look great and the littles can help you forage for some too.

Cozy fall home tour

I placed the garland down the centre of the table and interspersed it with the baby boos and a few glass votive tealights. I love fairy lights and use them all year round, they can really make something simple into something special. We all need a little sparkle! That’s it for the table, It can stay up until the season is over and I’ll use it for Thanksgiving dinner as well. We Canadians have our Thanksgiving in early October, so I’ll be sharing my simple Thanksgiving tablescape next week.

Cozy Fall Home Tour in the Dining Room

Cozy Fall Home Tour in the Dining Room

If you’ve been following along on my home tours this year you’ll know that I’ve kept a lot of my blue decor and have used blue and sage in my pumpkins as well. You can find my previous tours here and here. On the mantel I added those faux pumpkins along with some faux eucalyptus. The brass terrarium and thrift store candlesticks were already there and look so pretty with the the lovely sage and navy pumpkins. It’s quick and  simple but makes a lovely festive statement.

Cozy Fall Home Tour in the Dining Room

Cozy Fall Home Tour in the Dining Room

Cozy Fall Home Tour in the Dining Room

Cozy Fall Home Tour in the Dining Room

Cozy Fall Home Tour in the Dining Room

I added a few fairy lights on the mantel as well. You can never have too many fairy lights. 🙂

Cozy Fall Home Tour in the Dining Room

I kept my blue velvet pillows from the summer and they fit right in.

Simple fall decor in our dining room

My hope in sharing these tours is to inspire you. I love showing people that it only takes a few little simple touches to change out your decor. It doesn’t have to be elaborate or expensive to make your home cozy and inviting.

Thanks for stopping by and don’t forget to check out all the great inspiration below!

Blessings,

Kim

Maison de Pax | White Lane Decor | Farmhouse on Boone | Lemons to Lovelys

My Vintage Porch | Meaningful Spaces | A House With Books | Delightfully Noted

Kim Power Style | Tidbits | Belle Amour Designs | The Mountain View Cottage

Filed Under: Fall, Seasonal tours

Cozy Fall Home Tour

6:00 am by kim 26 Comments

Hello and welcome to day 5 of the Canadian Bloggers’ Fall Home Tour! A special thank you to Shannon from AKA Design and Christina from The DIY Mommy for hosting the tour. To see all the tours from 23 other talented bloggers you can check out the links below. Now sit back, grab something with pumpkin in it and join me as I share my cozy fall home tour!

Cozy Fall Home Tour

Cozy Fall Home Tour

I know I’ve said it before but fall is my favourite season! I love the cooler weather, everything pumpkin and snuggling up with some cozy blankets by the fire!

When it comes to fall decor I like to keep it simple. Changing up the pillows, like this velvet harvest yellow one (just sounds fall like), adding some super cozy warm blankets and a few pumpkins is all it takes to add some fall to my home.

Cozy Fall Home Tour

Cozy Fall Home Tour

Bubs is finding the decor very cozy too!

Cozy Fall Home Tour

Cozy Fall Home Tour

Cozy Fall Home Tour

Cozy Fall Home Tour

Cozy Fall Home Tour

Cozy Fall Home Tour

Cozy Fall Home Tour

Cozy Fall Home Tour

Cozy Fall Home Tour

Cozy Fall Home Tour

Cozy Fall Home Tour

I shared my fall breakfast nook last week, you can find that here. I’ll be sharing my dining room next week so be sure to come back!

Fall HomeTour in the Breakfast Nook

I hope you enjoyed my cozy fall home tour! For some more great inspiration, check out the links below.

Blessings,

Kim

2017-Fall-Canadian-Bloggers-Home-Tour

Monday

AKA Design
Amidst the Chaos
Lemon Thistle
Love Create Celebrate
So Much Better With Age

Tuesday

The Learner Observer
Woman in Real Life
Life is a Party
Clean and Scentsible

Wednesday

Satori Design for Living
The Happy Housie
Rambling Renovators
Craftberry Bush
The Sweetest Digs

Thursday

The DIY Mommy
Home To Heather
White Wood
A Pretty Life
Vin’yet Etc

Friday

Kim Power Style
PMQ for two
The Creek Line House
Sustain My Craft Habit
northern style exposure

Filed Under: Fall, Seasonal tours

Fall Tour in the Breakfast Nook

7:00 am by kim 32 Comments

Hello everyone and welcome, I’m so glad you’re here! Today kicks off the the first of my fall home tours of the season and stay tuned as I’ll be sharing more in the next couple of weeks.

I’m joining in with some blogger friends for the Fall Decor and Entertaining Blogger Home Tours hosted by Angelina at Peonies and Orange Blossoms.  Be sure to check them all out at the bottom of this post.

If you’ve been following along with this week’s blog hop and you’re coming from Rosemary and Thyme, thanks for stopping by. Janet has some scrumptious fall desserts over there and I hope you’ve found some creative inspiration for your own homes!

Fall Tour in the Breakfast Nook

Fall HomeTour in the Breakfast Nook

Fall is one of my favourite seasons. I love the cool weather, wearing boots and sweaters, hearty meals and nights by the fireplace.  There’s something about fall that causes us to want to nestle in and enjoy all the comforts of home and I love making our home feel cozy, warm and inviting.

Fall Tour in the Breakfast Nook

I’m starting my fall tour in the breakfast nook. It’s kinda central to everything  so this is where I first start bringing in the fall decor. Nothing says fall like pumpkins and I love to use them, fresh and faux. There are so many different kinds and colours to choose from now so you don’t need to stick with the traditional orange colours, although I love those too! I’ve kept the decor in the breakfast nook neutral and chose these wooden pumpkins to place on the shelving as well as these sweet little white baby boos on the table.

Fall Tour in the Breakfast Nook

The blue and white curtains have been switched out for these brown floral ones from the Pottery Barn. I’ve had them for years and still love them come the fall. They look great with the burlap table runner.

I love using greenery in my decor and fall is no exception. I swagged some faux silver dollar eucalyptus along the shelf and used some fresh stems with some cabbage florets in a vase. You don’t need to buy any greenery if that’s not in your budget. You can always cut some branches and put them in a vase, they’ll look great. Investing in some life-like faux greenery is another idea and it pays for itself eventually and you can use it year round.

Fall Tour in the Breakfast Nook

Fall Tour in the Breakfast Nook

Another thing I love about fall is the baking. The fall harvest yields all kinds of goodies for us to use and when the temps go down, you don’t mind turning on the oven again. There’s nothing more comforting than  the aroma of cakes and muffins baking. If you don’t have time to bake you can always pick something up from the grocers. Displaying it on a cake stand or platter makes it look homemade and welcoming,  great for when company comes by.

Fall Tour in the Breakfast Nook

Fall Tour in the Breakfast Nook

Fall Tour in the Breakfast Nook

Fall Tour in the Breakfast Nook

Thanks for joining me for my fall tour in the breakfast nook. I hope you were able to get some inspiration for your own fall home. Next up on the tour is Back to the South and In case you’ve missed any other tours from this week, I have the links down below.

Blessings,

Kim

Fall Decor


Monday
DIY Beautify || Raising a Farmhouse || Unlikely Martha || The Welch House || Life on Shady Lane
Tuesday
Frazzled Joy || North Country Nest || A Purdy Little House || Hood Creek Log Cabin || Peonies & Orange Blossoms
Wednesday
The Whimsy One || Polka Dot Poplars || A Home to Grow Old In || Virginia Sweet Pea || Lincluden Cottage Life
Thursday
 
Semigloss Design || Keys to Inspiration || Reinvented Collection || Of Fairies and Fauna || Rosemary and Thyme
Friday
 
Kim Power Style || Back to the South || Living Large in a Small House || From House to Home || Centsably Creative || Life is a Party || The Organized Mama ||  || Our Crafty Mom

Filed Under: Fall, Home decor, Seasonal tours

Hearty Slow Cooker Beef Bourguignon

5:00 am by kim 7 Comments

Thanks for joining me today along with 10 other bloggers as we share some of our favourite slow cooker recipes! Fall is my favourite season and I love it when the air starts to get cooler and we go from barbecues and salads to more hearty indoor comfort meals. There is nothing more hearty than a delicious beef bourguinon made slow and easy in your slow cooker. This tasty slow cooker beef bourginon recipe has a little work on the front end but once that’s done you can enjoy the aroma of it cooking away while you enjoy your day!

untitled-6435

Slow Cooker Beef Bourguignon Recipe:

Ingredients:

  • 5 slices of bacon chopped
  • 3 lbs stewing beef
  • 1 cup good red wine
  • 2 cups beef broth
  • 1/4 cup soy sauce
  • 1/4 cup tomato paste
  • 1/4 cup flour
  • 1 lb baby potatoes
  • 5 medium carrots chopped
  • 4 cloves of garlic minced
  • 10 0z mushrooms sliced
  • 8 oz pearl onions
  • 2 tbsp fresh thyme minced
  • fresh parsley finely chopped for garnish
  • salt and pepper to taste

Instructions:

  1. Add chopped bacon to a pan over medium heat and brown for 3-4 minutes. Remove bacon and place in slow cooker.
  2. Salt and pepper stewing beef and place in the pan to sear in the bacon fat in small batches. Add beef to slow cooker.
  3. Pour the cup of red wine into the pan and deglaze all the bits from the bottom.
  4. Whisk in beef broth, soy sauce and tomato paste. Once those ingredients are incorporated, whisk in the flour and let simmer for a couple of minutes. Add to slow cooker.
  5. Add the potatoes, chopped carrots, pearl onions, sliced mushrooms, minced garlic and thyme.
  6. Stir all the ingredients together and cook on low for 6-8 hours or until beef is tender.
  7. Once it’s done, finely chop some fresh flat leaf parsley on top and you’re ready to serve.

Slow Cooker Beef Bourguignon

Slow Cooker Beef Bourguignon

untitled-6464

untitled-6465

untitled-6481

Slow Cooker Beef Bourguignon

This delicious meal can be served with a crusty loaf of bread and creamy mashed potatoes. It’s definitely worth the added time it takes to sear the meat once you taste that rich dark gravy. It makes a great week night meal or a special Sunday supper with the family. I hope you try it, I promise you won’t be disappointed! Don’t forget to check out all the links below and visit the rest of the bloggers for some more great slow cooker recipes.

Blessings,

Kim

Slow Cooker Reipes


Slow Cooker Beef Bourguignon by Kim of Kim Power Style

Slow Cooker Loaded Baked Potato Soup by Jo-Anna of A Pretty Life

Cheesy Sweet Potato and Bacon Soup by Tara of Suburble

Weight Watchers Crock Pot Chicken Tacos by Virginia of Fynes Designs

Slow Cooker Honey Garlic Chicken with Peppers by Christina of The DIY Mommy

Slow Cooker Hot Fudge Cake by Kendra of Joy In Our Home

Slow Cooker Chicken Fajita Chili by Christine of Amidst the Chaos

Slow Cooker Apple Sauce by Jen of Kitchen Counter Chronicles

Slow Cooker Beef Stew by Shannon of AKA Design

Mexican Pulled Pork by Sarah of Flourish & Knot

Slow Cooker Spinach and Artichoke Dip by Dannyelle of Life is a Party

Filed Under: Fall, recipes

Bedroom Update with BEHR MARQUEE Paint

6:00 am by kim 20 Comments

We Partnered with BEHR® for this project. All thoughts, opinions and project ideas  are my own.

My master bedroom has been due for an update for a while now and although I love white, it was time to inject some colour. Dark and moody paint colours are really on trend right now and I’ve wanted to take the plunge and try something new for a while now. But as much as I love making a design statement, the thoughts of diving headlong into a room full of a dark colour scared the heck out of me! I tried out BEHR MARQUEE® Interior Paint & Primer in One, it was just the opportunity I needed to tip-toe into this new world of colour.
I had applied board and batten in my office last spring and knew I had wanted to try it again in my bedroom. It really lends to the coastal cottage vibe of my home and works perfectly for those of us who want to try a more dramatic colour but are a little timid to commit to a full room of it.

Bedroom Update with BEHR MARQUEE Paint

Here is the bedroom before… kind of blah right?

Bedroom Update with Behr Marquee Paint and Board and Batten

Here is the After… amazing what a bit of paint can do! Follow along and we’ll show you how we did it.

Master Bedroom Update

Board and Batten:

You’ll need:

  • MDF boards in the size of your choice
  • Brad Nailer
  • Table Saw
  • Jig Saw
  • Level
  • Wood filler
  • Latex Caulking

The hubby and I removed everything from the room so we would have space to work.

We started by removing the existing baseboards, a bit of a pain I know but we wanted all the board pieces to match up evenly and this base trim was just too thin.

Bedroom Makeover with Behr Marquee Paint

We used the 1/2″ x 3 1/2″ MDF pre-primed base boards in the valupak from the Home Depot. They come in 8′ lengths and there are 10 pieces in the valupak. This was used for all the board and batten in the room, approximately 3 valupaks.

Mater Bedroom Update

Next we applied our MDF baseboards  all around the room using a brad nailer.

Master Bedroom update

Once the  baseboards were applied, we rested the vertical pieces on top of the baseboards starting in the corners. Making sure they were level! Our vertical boards were 59″ in height. You can decide how tall you want your board and batten to be. It was roughly 2/3 of our 8′ walls.

Master Bedroom Update with Board and Batten and Paint

This next part can be tricky and includes that four lettered word “Math”! My husband was the one who figured this part out. We started by laying our boards against the wall to see approximately how far apart we wanted  them to be. Not all of your walls will be the same size so you may find that on one wall your boards are 21 inches apart and on another they are 19 inches apart. As long as they look uniform and there isn’t  that big of a difference from wall to wall. Remember to measure twice and nail once! Make sure that each board is level before you nail too.

Master Bedroom Update with Board and Batten and Behr Marquee© Paint

For outside corners we just butted the joints up. We didn’t bother with tricky angle cuts as we’ll be filling in all the joints with wood filler and/or caulking. We then laid the upper horizontal boards across. Don’t worry if there are some small gaps, you’ll be filling them in with wood filler.

Master Bedroom Update with Board and Batten and Paint

When all our boards were applied we used wood filler to fill the nail holes and gaps where MDF meets MDF. Once it was dry we lightly sanded to a smooth finish.

Master Bedroom Update with board and batten and Behr Marquee Paint

We added latex caulking wherever the boards met the wall. This is time consuming but finishes the job off so nicely. Caulking covers a multitude of sins!

Master Bedroom Update with board and batten and Behr Marquee Paint

Painting:

For paint we used the BEHR MARQUEE one coat coverage interior paint from Home Depot. We applied Compass Blue to the upper walls and Cameo White for the board and batten. When my husband saw the first brush stroke of the Compass Blue applied to the walls, he was a little shocked! I told him not to worry, it was going to look great, “I know what I’m doing”.  Inwardly I was asking myself what the heck was I doing and trying not to let my own panic show!  It didn’t take long till I realized It looked great and I had made the right choice. That happens all the time.

Master Bedroom Paint Update

We started with the upper portion of the wall and applied Compass Blue. I taped off the ceiling using painters tape to avoid any mishaps while I used a brush to cut-in. A quick roll was all that was needed to apply this super thick paint to the walls. I had to touch up a few places where I cut-in otherwise this really is one coat coverage!

Master Bedroom Update with board and batten and Behr Marquee Paint

For the board and batten we used Cameo White. I used a brush to do all the trim work and then used a roller for the wall.

Master Bedroom Update with board and batten and Behr Marquee Paint

It turned out beautifully!

Master Bedroom Update with board and batten and Behr Marquee Paint

The after…I painted the “blah” out of that room!

Master Bedroom Update with board and batten and Behr Marquee Paint

The hubby was so impressed, he kept walking around the room saying “wow!”

Master Bedroom Update


Bedroom Update with Paint and Board and Batten

Master Bedroom Update


Master Bedroom Update

Bedroom Update with New Paint and Board and Batten

Bedroom Update with New Paint and Board and Batten

Master Bedroom Update

I’m so glad we decided to try something that was a little out of our comfort zone. The room has a dramatic edge to it but still has that simple, cozy cottage look that I love. I hope this gives someone the courage to step out and try something new!

Blessings,

Kim

Filed Under: diy, Home decor, Makeovers

Custom Slipcovers for my Ikea Armchairs

6:00 am by kim 27 Comments

Custom Slipcovers For My Ikea Armchairs

I partnered with Bemz for this post. As always, all thoughts, opinions and Ideas are 100% my own.

Custom Slipcovers for IKEA Armchairs

Custom IKEA Slipcovers

Last spring I was on the lookout for a couple of armchairs for my living room, I never dreamed I’d be getting custom slipcovers for them! We had already replaced my ten year old Ektorp Sofa with a new one and I was about to replace my one Ektorp armchair  for two new ones when I found this, the Farlov! It wasn’t even in the showroom yet but it was in the catalog. I loved the clean lines and it came with a white slipcover..so, I bought two, without actually seeing them in person! I was a little surprised at the size of these chairs as I was assembling them (they’re big), but the bigger surprise came when I opened the box to get at the slipcovers. Not to offend anyone who has these and love them, but I was so disappointed! I had expected a white cotton similar to my sofa slipcover but these had the appearance of a creamy polyester tweed..not the look I was going for at all. That’s when I decided to try out a company I had heard of who make custom slipcovers for IKEA furniture called Bemz.

Custom IKEA Slipcovers

I went on their site to see if they were making custom slipcovers for the Farlov yet, seeing how it was fairly new. I was so happy when they were and when I saw all the fabric choices, over 25o+ colours and prints to choose from, I was doing my happy dance! This is just a small sampling of what you’ll find on their site.

Custom IKEA Slipcovers

Bemz will send you 5 free samples to help you to decide on a fabric of your choice. This process may take a bit of time because there is so much to choose from.. and you may change your mind.. a few dozen times! I placed all my samples on the chair to see if that would help me to decide. I eliminated the greys and charcoals, as much as I loved them, they wouldn’t go with the rest of my decor. I also eliminated the stripes, it would have been too much pattern in such a small space. It also would have made it difficult for me to change/add different colour pillows with the seasons. I needed something a bit more neutral.

Custom IKEA Slipcovers

I ended up with these six, but I knew the denim floral would be too much in my small space.

Custom IKEA Slipcovers

I came up with a mood board using colours and textures I have in the room. Wood, white and brass together with my favourite blue and white paisley pillow covers.

Custom IKEA Slipcovers

Custom IKEA Slipcovers

I finally made it down to three and this is where I had to ask my friends on Instagram to help me! I asked everyone on IG stories for their top pick and most people chose the “brera lino duck egg” linen (the sample on the left). I decided I’d go with that one since it was in keeping with my coastal farmhouse/beachy vibe I love. But…you guessed it, I changed my mind! At the last minute I realized that although I do love the colour, I wasn’t sure how it would look come fall and then Christmas. How would I style it and work other colours around it? I decided to stick with my trusty neutrals and I went for this beautiful 100% linen called “brera Lino-natural”.

Custom Slipcovers

I love the natural linen! The custom slipcovers fit perfectly and are so comfortable to sit in. For those of you who want to try living with neutrals but the thoughts of crisp white slipcovers are a little scary, this is a great option. They come pre-washed and are machine washable. If you’re looking to cover a new or existing sofa, chair etc., they have something for every style.

Custom IKEA Slipcovers

Custom IKEA Slipcovers

Custom IKEA Slipcovers

The farlov comes with a lumbar pillow and they made a cover for that too. I also had them make a couple of throw pillows in the” brera lino duck egg” fabric that I had initially chose. I think they look great!

Custom #IKEA #Slipcovers

Custom IKEA Slipcovers

Custom IKEA Slipcovers

I think the slipcovers on my two farlov armchairs turned out beautifully and I’m loving the fabric choice…although I think any of those fabrics would have looked great! I’m kinda rethinking my sofa cover now..hmmm.Lol.

Blessings,

Kim


Filed Under: Home decor

It’s Friday I’m In Love…Five Things On My Nightstand that I’m Loving

7:43 pm by kim 2 Comments

It’s Friday I’m in Love…Five Things on my Nightstand that I’m Loving

Happy Friday ! Welcome to the 2nd instalment of my new series “It’s Friday I’m in Love” Where I’ll be sharing things that have caught my eye during the week. I’ll be sharing anything and everything. From pillowcases to lipstick cases to blogs and spaces that I’m loving right now. I’ll be providing affiliate links when I can so that if you see something you like you can find it too!

Last week the hubby and I did a little Master Bedroom Update with paint. I’ll be sharing that soon! I wanted to update the things that I have on my bedside table and did a little “shop the house”.  I took this marble tray that I had on my coffee table and used it on the nightstand. (It’s so amazing when you change the location of accessories  from around your home and it’s like you’re seeing it again for the first time!) It’s filled with all the goodies that I’ve been loving this week. Some new and some old and reloved again!

Products I'm loving this week. Jo Malone cologne, Anthropologie Candle, The ordinary Skincare

Five things on my nightstand that I'm loving. Jo Malone cologne, Anthropologie candle, The Ordinary skincare


I found this marble tray at Homesense and have been using it on my coffee table to corral my candles. I thought I’d try it out on the bedside table and it looks just as great there too.

I love Jo Malone cologne and one of my very favourite scenst is Wild Bluebell. This is how their site describes it : “Vibrant sapphire blooms in a shaded woodland. The delicate sweetness of dewy bluebells suffused with lily of the valley and eglantine, and a luscious twist of persimmon. Mesmerising.” Yeah, what they said! I put it away every now and then to make it last a little longer, but I’ve definitely found it again this week and I’m in love again!

The Capri Blue Mercury Candle from Anthropologie is my all-time favourite candle, and that is saying a lot!   These are pricey candles but worth every penny. It’s my “splurge item” that I never regret buying. They last for a long time and they can scent up the whole upstairs. They’re pretty to look at too!

Five things on my nightstand that I'm loving. Jo Malone cologne, The ordinary skincare, Anthrropologie candle.

My next two loves are these two product from Decium’s “The Ordinary” skincare line. If you follow me on my IG stories, you’ll know that I bought and have been trying out almost everything from this no frills, low cost line. I’ll be doing a blogpost on the line soon but thought I would mention these two stand out products. The Alpha Arbutin 2% has been working well at fading spots and improving  overall skin tone. The Caffeine Solution 5% EGCG has actually worked in reducing puffiness and darkness under the eyes. I’m loving both of these and  I’ll be sharing more about them and other products from the line in a post coming soon.

Five products on my nightstand that I'm loving this week. The ordinary skincare, Anthropologie candlee, Jo Malone Cologne.

What have you been loving this week?

Blessings,

Kim


I’ve included some affiliate links below. 
[show_shopthepost_widget id=”2779992″]

Filed Under: Beauty, It's Friday I'm in Love

  • « Go to Previous Page
  • Go to page 1
  • Go to page 2
  • Go to page 3
  • Go to page 4
  • Go to page 5
  • Interim pages omitted …
  • Go to page 16
  • Go to Next Page »

Primary Sidebar

Hi, I'm Kim Read More…

Instagram

Follow along on Instagram

Sign up and don't miss a post!

Recent Posts

  • Festive Bacon Wrapped Chestnut Holiday Appetizer
  • DIY Mantel Decorated for Christmas
  • Simple and Cozy Fall Home Tour
  • Simple Fall Tablescape

Archives

Footer

Copyright © 2025 · Foodie Pro Theme by Shay Bocks · Built on the Genesis Framework · Powered by WordPress