• Skip to primary navigation
  • Skip to main content
  • Skip to primary sidebar
  • Skip to footer

Kim Power Style

  • Home
  • Contact
  • About
  • Tutorials

Christmas

Festive Bacon Wrapped Chestnut Holiday Appetizer

5:00 am by kim 8 Comments

Merry Christmas everyone!

Today I wanted to share this oh so easy festive bacon wrapped water chestnut holiday appetizer with you. Did I say it was oh so easy? It’s actually my first time making them and I ran into a major issue…I’ll explain.  Also, there will be links down below for you to click on for more festive Holiday appetizer ideas. No need to go anywhere else friends!

Festive Bacon Wrapped Water Chestnut Holiday Appetizer

I had heard about these delicious appetizers from friends and family and was finally able to try one for myself at a holiday get together. They were delish! Well you had me at bacon because anything wrapped in bacon has to be good right? (Vegans/Vegetarians need not answer this!) So I thought I would try making these when it came time to join my friends from the Seasonal Simplicity Christmas series featuring appetizers.

As usual, I was making these last minute and ran to the grocery store to get my chestnuts. All the other ingredients I had on hand. I asked for canned chestnuts but there were none so I bought a sealed bag of chestnuts thinking it would be the same. After preparing and baking them we couldn’t wait to bite into one of these and try them out.

My daughter tried one first and when she made a face and tried not to spit it out…I knew something was wrong! I tried one myself only I couldn’t even swallow it!

Needless to say friends, I learned that chestnuts are not the same as water chestnuts! Even when they’re wrapped in bacon!

One is from a tree and one forms on the roots of grass like plants. Water chestnuts are crunchy even when cooked and I’ve eaten them plenty of times in Chinese food. How I got this so wrong is beyond me!

Anyways, I went out and found the canned water chestnuts, prepared and baked them the same way and they were delish!!

So here ya go:

Festive Bacon Wrapped Water Chestnut Holiday Appetizer

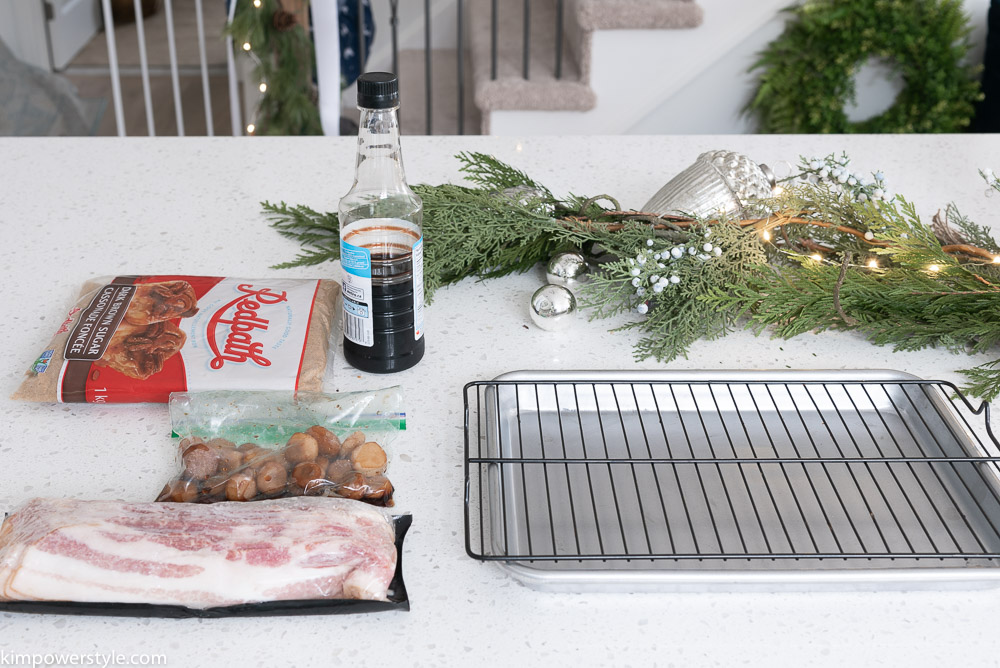
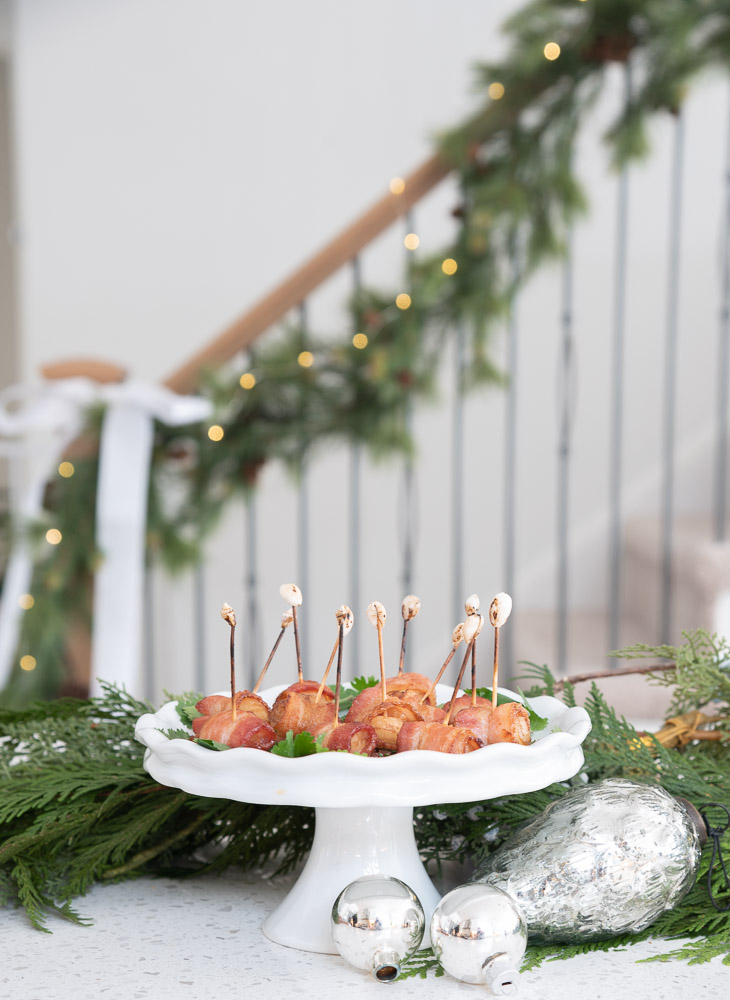
Bacon Wrapped Water Chestnuts:

  • 1 lb. of bacon
  • 1 can of whole water chestnuts
  • 1/3 cup of soya sauce
  • 1/3 cup brown sugar
  • toothpicks
  • optional plum sauce or dipping sauce of your choice

Festive Bacon Wrapped Water Chestnut Holiday Appetizer

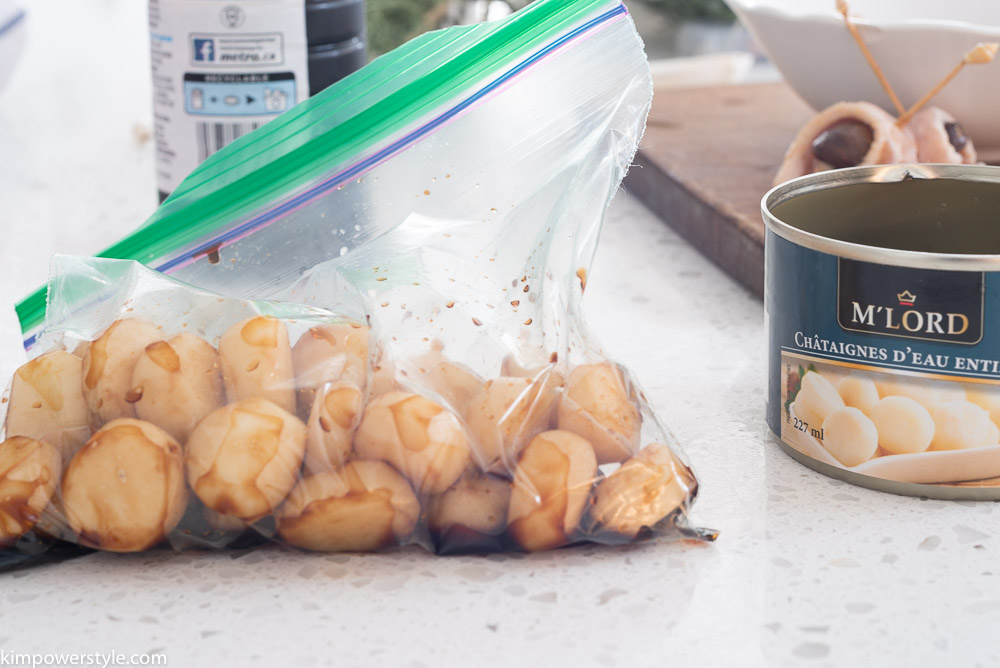
  1. Start by marinating your water chestnuts in the soya sauce for at least an hour up to 24 hours.
  2. Preheat oven to to 375°

Festive Bacon Wrapped Water Chestnut Holiday Appetizer

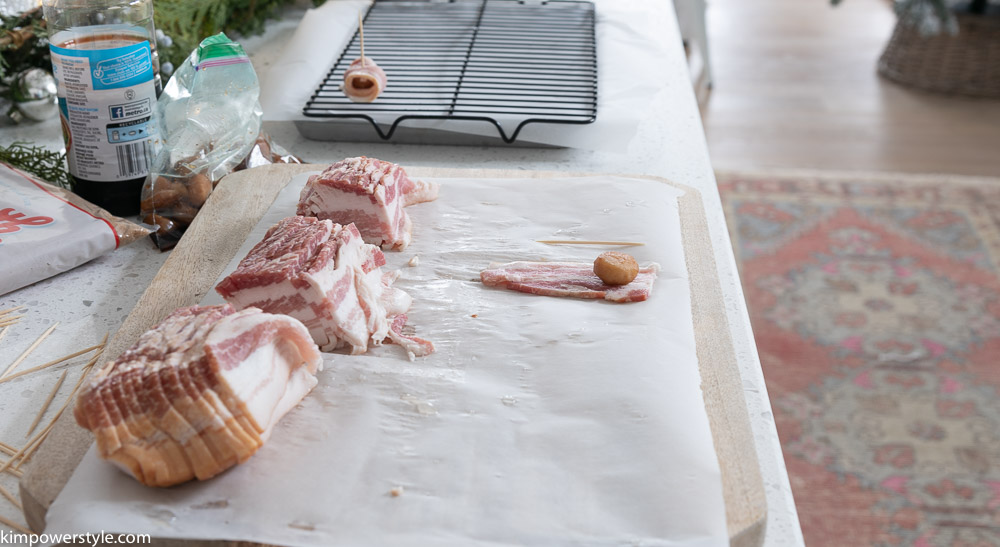
3. Cut your bacon slices into 3

4. Dredge each water chestnut into the brown sugar.

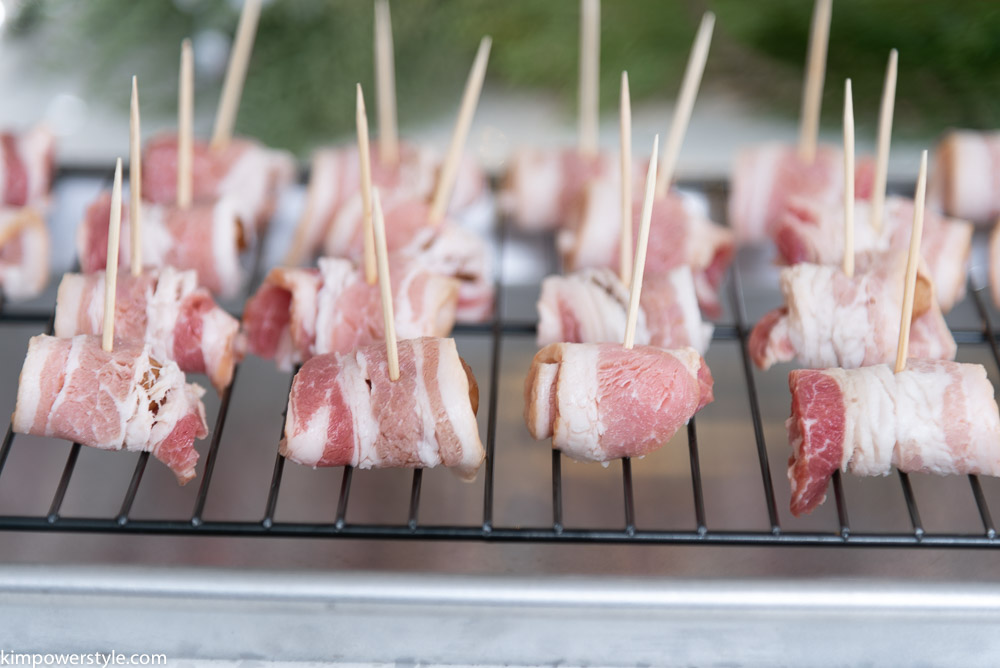
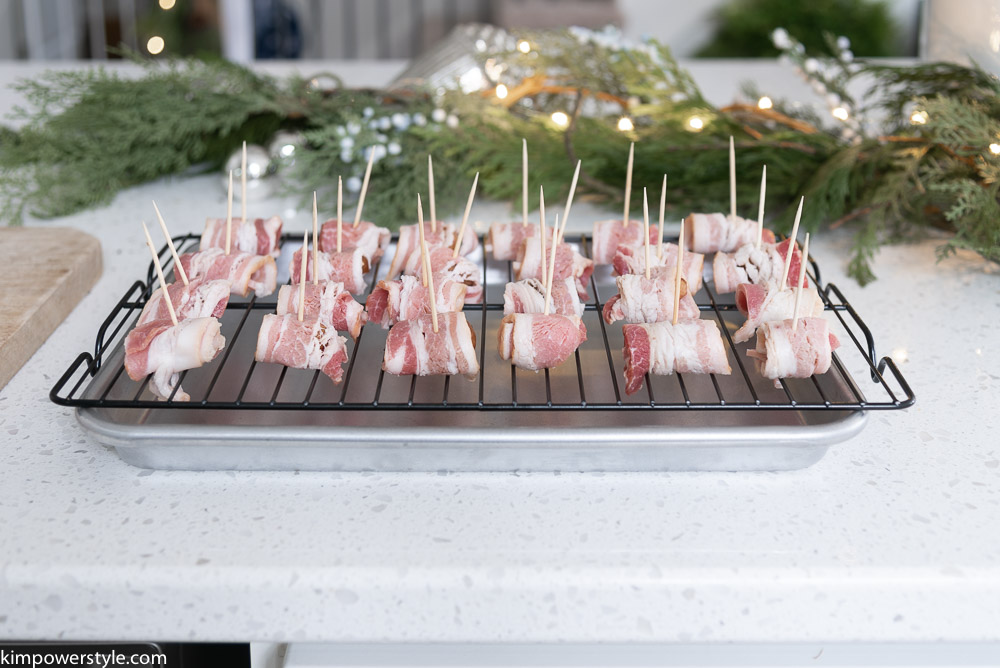
5. Wrap each water chestnut in the bacon and secure with a toothpick.

6.Arrange on a shallow baking dish. Bake in a 375° oven for 20 minutes or until bacon is crispy.

7. Eat them straight from the oven or you can choose a dipping sauce of your choice.

Festive Bacon Wrapped Water Chestnut Appetizers

Festive Bacon Wrapped Water Chestnut Appetizers

Festive Bacon Wrapped Water Chestnut Appetizers

Festive Bacon Wrapped Water Chestnut Appetizers

Festive Bacon Wrapped Water Chestnut Appetizers

Festive Bacon Wrapped Water Chestnut Appetizers

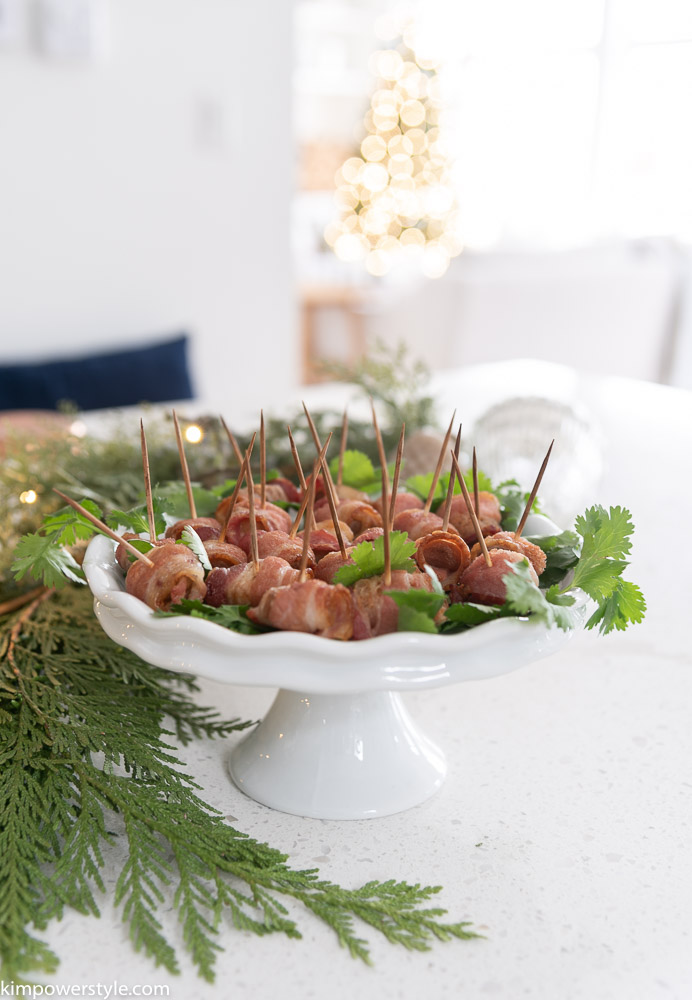
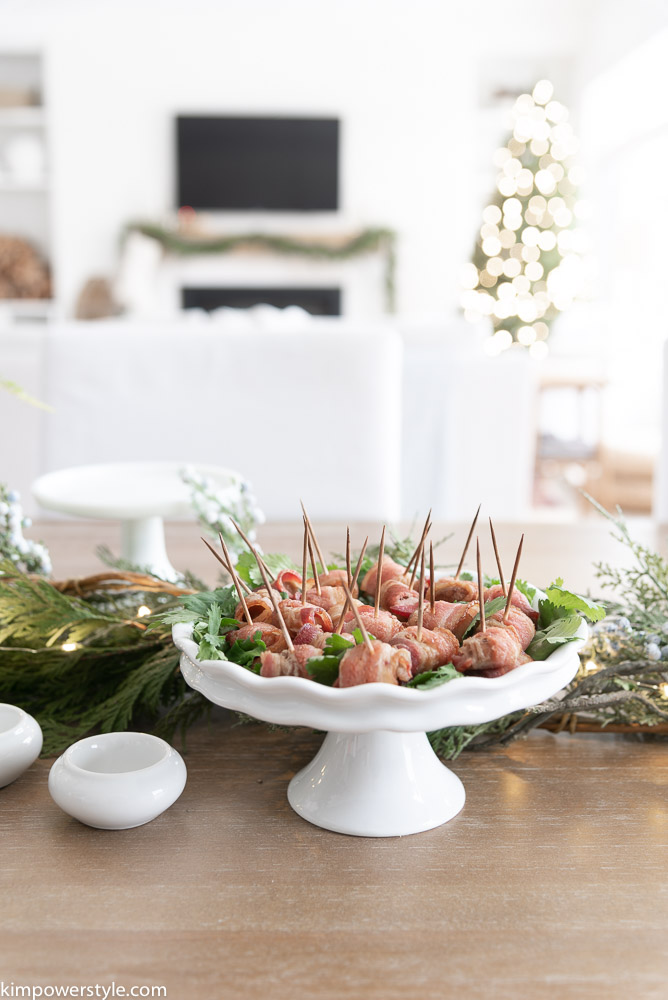
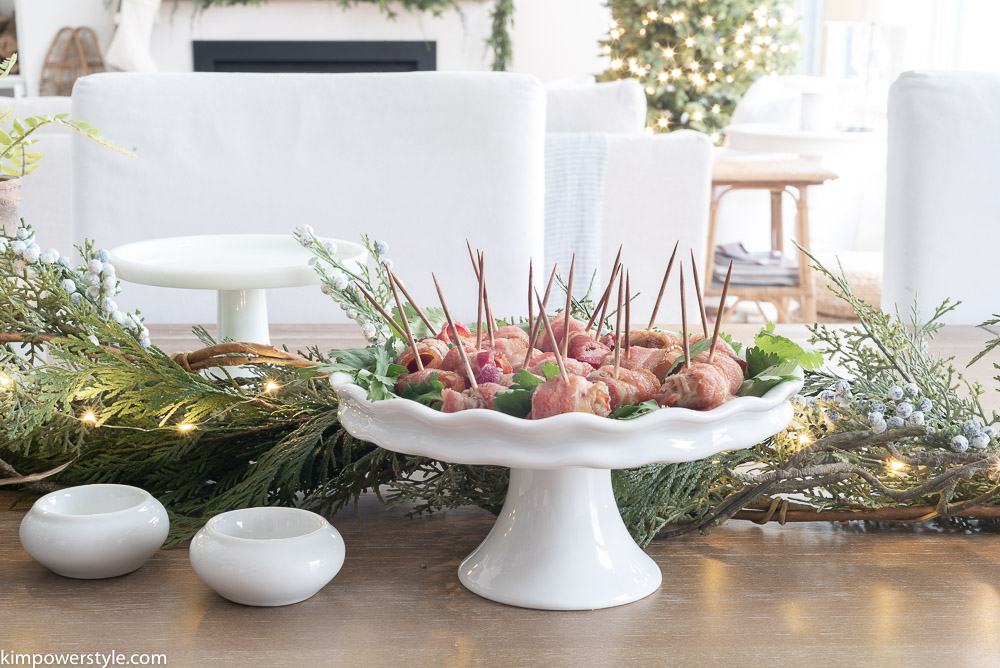
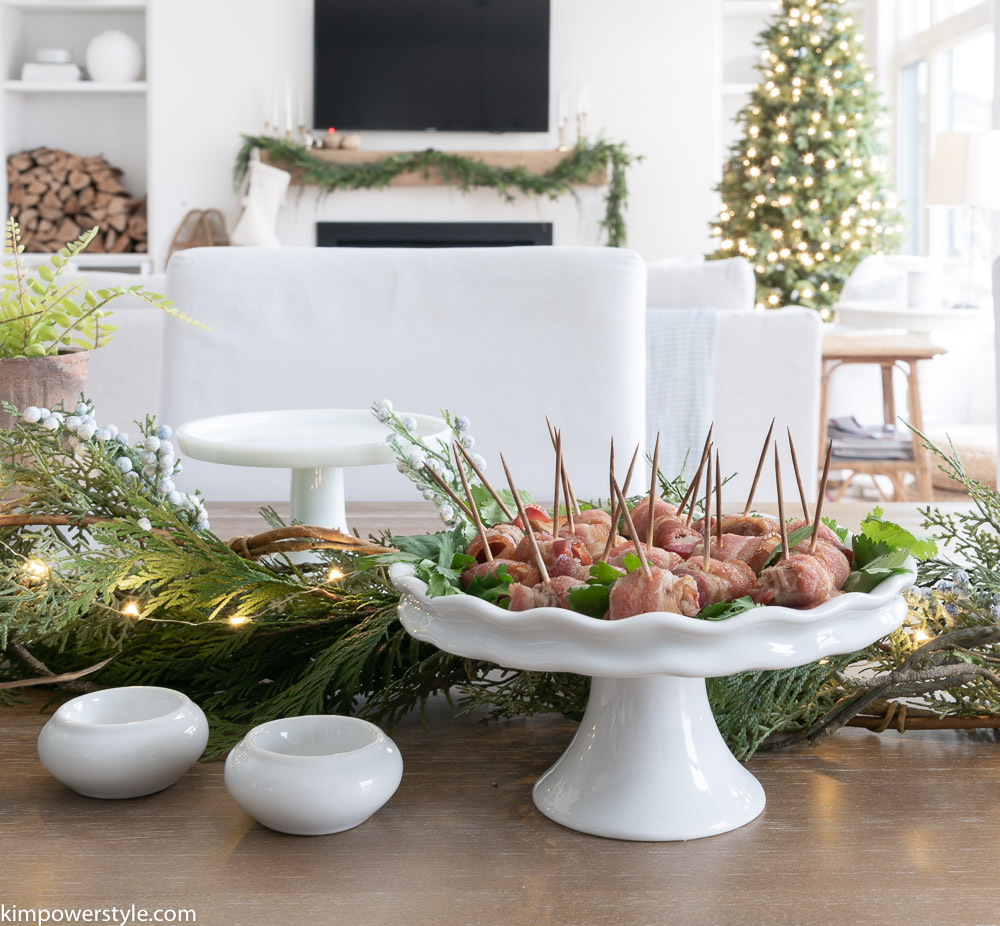
These simple and tasty appetizers are sure to become a favourite and a real crowd pleaser!


And today I’m joining some of my blogging friends who are also sharing their Holiday Appetizer recipes with you! Just click on the links below the pictures to be taken to their full recipe.

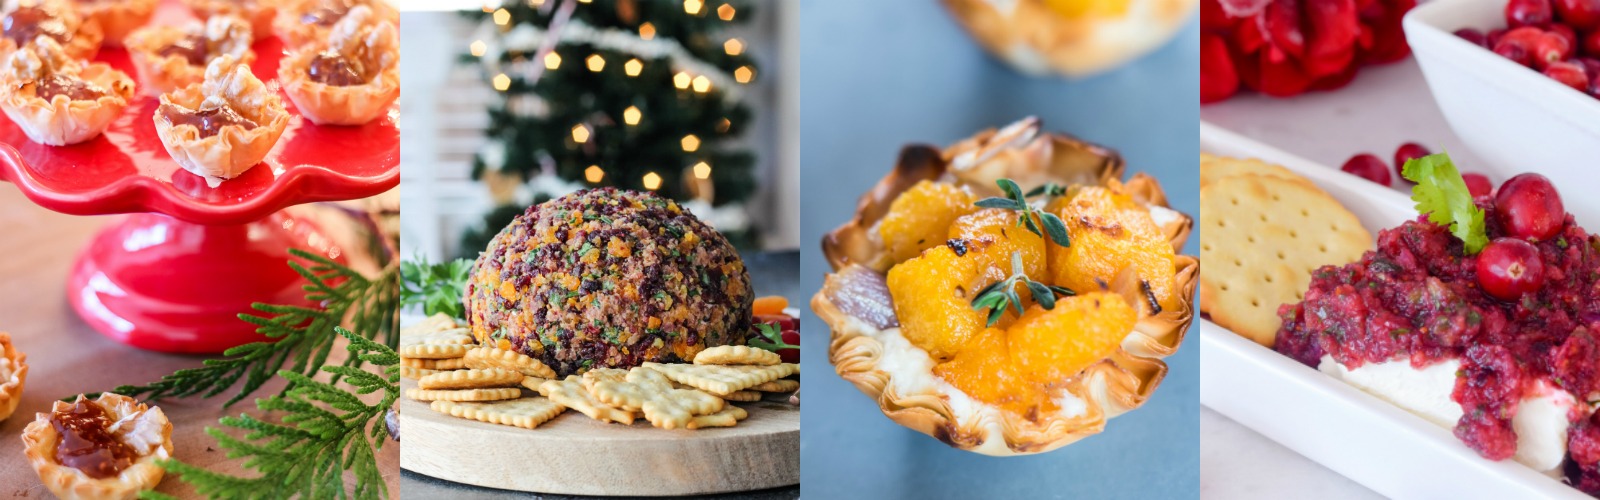
Baked Brie, Fig, and Walnut Phyllo Cups at The Happy Housie
Classic Cheese Ball Recipe at A Pretty Life
Cheesy Butternut Squash Bites at Jenna Kate at Home
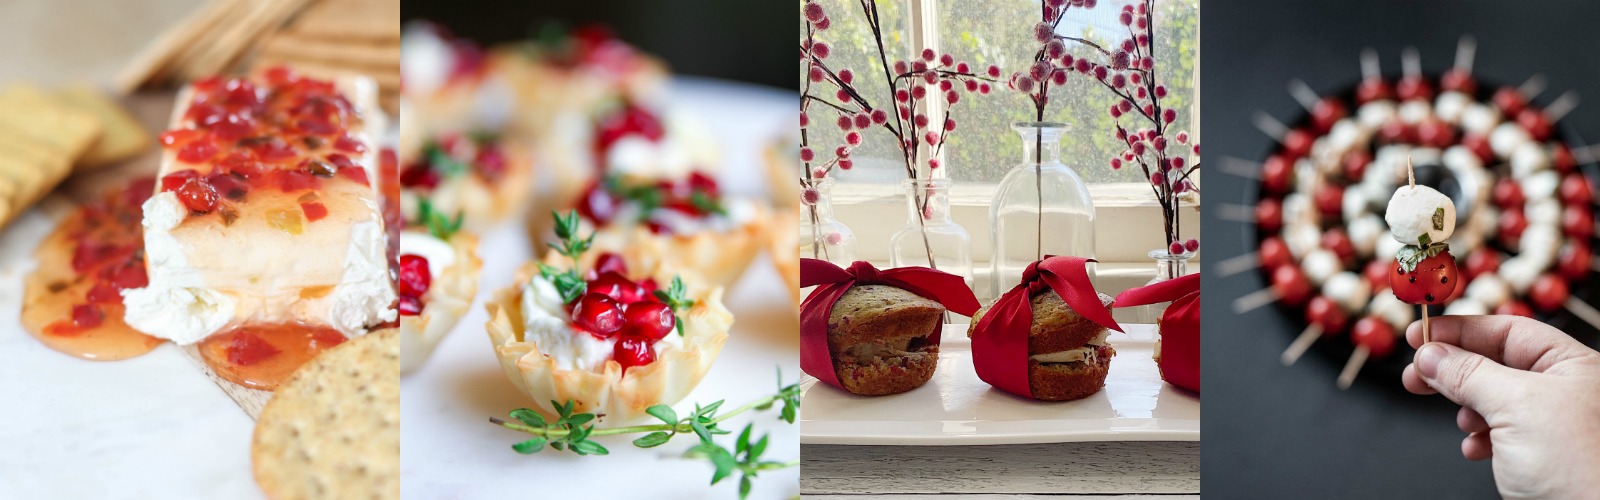
Fresh Cranberry Salsa at We’re the Joneses

Easy Holiday Party Appetizer at a Rooms FOR Rent
Baked Goat Cheese Bites at Modern Glam
Smoked Turkey with Cranberry Orange Muffins at My 100 Year Old Home
Caprese Salad Skewers at Cherished Bliss

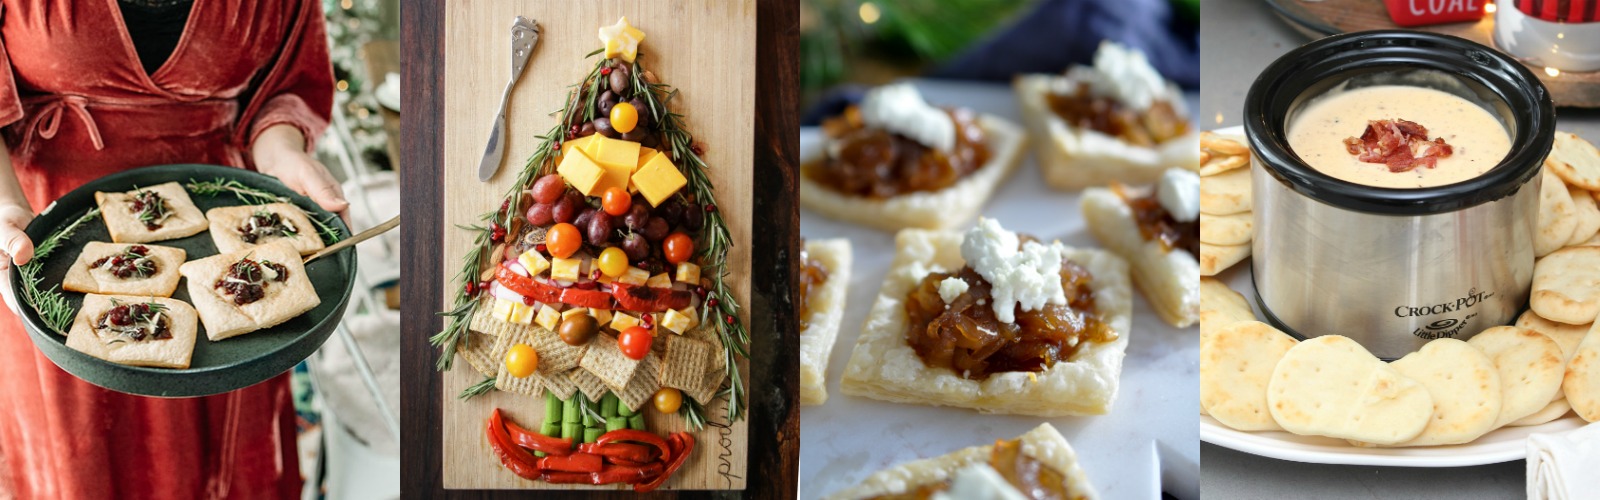
Easy Cranberry Brie Tarts at The DIY Mommy
Christmas Tree Charcuterie Board at Cassie Bustamante
Carmelized Onion and Goat Cheese Tarts at Life is a Party
Swiss Cheese Bacon and Beer Dip at Clean & Scentsible

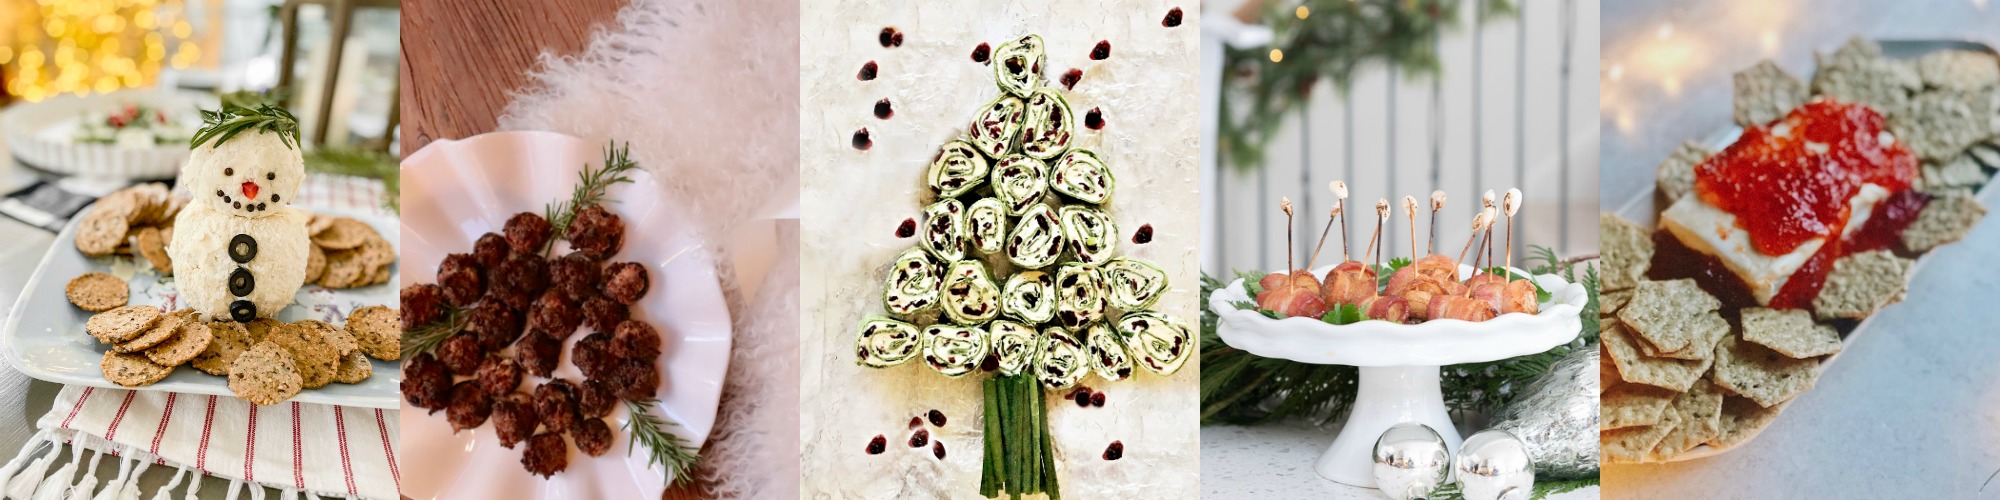
Snowman White Cheese Ball at Tatertots and Jello
3 Ingredient Stuffed Mushrooms at My Sweet Savannah
Easy Christmas Pinwheels Festive Holiday Appetizer at This is Our Bliss
Festive Bacon Wrapped Chestnut Holiday Appetizer at Kim Power Style
Red Pepper Jelly and Cream Cheese Appetizer at She Gave it a Go

Holiday Appetizers to try this Season

Filed Under: Christmas, recipes

DIY Mantel Decorated for Christmas

5:00 am by kim 8 Comments

Hi friends, It’s the most wonderful time of the year again and I’m sharing this DIY mantel I made and decorated for Christmas.

So settle in, grab a refreshment and join my friends and I from the Seasonal Simplicity Christmas Series hosted by Krista from The Happy Housie.

If you’ve followed me for a while you’ll know that I had every intention of adding a mantel as soon as we moved into our new home. I was looking for old barn beams but realized they would be too heavy to install without a lot of tweaking from yours truly…I knew I’d have to  make my own lighter version. Well it’s taken me 10 months to do but I made one just in time to decorate for Christmas!

DIY Mantel Decorated for Christmas

I love It! It’s added so much character to the space and I wish I had done it sooner.

Coastal Farmhouse Summer Home Tour

Here’s a picture from my summer tour. It looks so empty with just the TV and fireplace and really needed another element to make it look finished.

Below I’m sharing a bit of a tutorial on how I made the mantel. It’s not a complete tutorial because my camera fell and my lens broke! But you’ll get the gist of the how to. It’s pretty simple if you know how to use a saw and a nail gun.

DIY Mantel Decorated for Christmas

I started with 3 pieces of non-knotty pine in 1″x 8″x 5′. I had the home depot cut them for me to save time. Make sure you pick straight and non-warped pieces. You’ll need a little extra to apply to each end so one of my boards was a 1″x8″x8′. I also used a 2″x4″x8′ to use as brackets to sit my mantel on.

DIY Mantel Decorated for Christmas

You simply apply glue on both sides of two boards lengthways.

DIY Mantel Decorated for Christmas

Place your third board on top

DIY Mantel Decorated for Christmas

Nail it.

DIY Mantel Decorated for Christmas

Measure your opening and cut a piece wood to fit in each end.

DIY Mantel Decorated for Christmas

Glue and nail that piece in. (I used the ends to try out different colours of stains). You basically have a hollow box. The box will sit on brackets I made out of a 2″x4″ which are screwed into the studs. I simply sat the box/mantel on top of the brackets and nailed them in!

DIY Mantel Decorated for Christmas

You don’t need to do this step but I wanted my mantel to look like one solid piece of wood so I glued on some veneer at each end. I let the glue/veneer dry overnight and then sanded down all the edges. I mixed together 2 different stains to achieve this custom colour you see below. It was actually a pretty easy project!

DIY Mantel Decorated for Christmas

Even though there’s not a lot of space to use due to having the TV above, I was able to add some garland along with brass candlesticks. My motto lately is “Simple”.

DIY Mantel Decorated for Christmas

DIY Mantel Decorated for Christmas

I used two different faux garlands here and just draped them over 3 little nails. I added a battery operated fairy light garland and then added some extra fresh eucalyptus picks. Once they dry out I have some faux ones that I’ll add to it. I love the light and airy look it gives!

DIY Mantel Decorated for Christmas

Since there are 10 of us this year, I decided to put up only one stocking for my Grandson. I didn’t want to fill the space full of stockings!

DIY Mantel Decorated for Christmas

DIY Mantel Decorated for Christmas

DIY Mantel Decorated for Christmas

DIY Mantel Decorated for Christmas

DIY Mantel Decorated for Christmas

[show_shopthepost_widget id=”3818599″]

DIY Mantel Decorated for Christmas

Thanks for popping in! There’s a lot more mantel inspiration from my friends below. Just click on the links.

Blessings,

Kim


Welcome to the fourth week of the Seasonal Simplicity Christmas Series! Today a group of my blogging friends and I are sharing our Holiday Mantels and a few vignette decorating ideas, to help inspire you for the upcoming holidays. Click on the links below each image to be taken directly to the different posts.

The Happy Housie // Cherished Bliss // The Handmade Home
Modern Glam // Craftberry Bush

House by Hoff // Rambling Renovators // Rooms FOR Rent
Jenna Kate at Home // Just a Girl and Her Blog

The Turquoise Home // Sincerely, Marie Designs // Grace In My Space
My Uncommon Slice of Suburbia // Zevy Joy

Lolly Jane // Tatertots and Jello // She Gave it a Go
Jamie Costiglio //Southern State of Mind

Place of My Taste // Summer Adams Designs // Life is a Party
We Are The Joneses // Kim Power Style

The DIY Mommy // Two Twenty One // My 100 Year Old Home
This is Our Bliss // Taryn Whiteaker Designs

Amber Tysl // Styled With Lace // Happy Happy Nester
Clean and Scentsible // My Sweet Savannah // So Much Better With Age

Filed Under: Christmas, diy, Home decor, Seasonal tours, Uncategorised

Swiss Mountain Shortbread Christmas Cookies

5:00 am by kim 25 Comments

 Are you looking for the best Christmas cookie to bake for the holidays? Well look no further! I’m happy to be sharing one of my all-time favourites, the Swiss Mountain Shortbread Christmas Cookie. This is an easy recipe to make and I’m sure it will become one of your favourites to make too!

I’m joining together with friends for a cookie hop hosted by Jo-Anna from A Pretty Life In The Suburbs. So  for an easy 1-stop holiday cookie recipe list, check out the links at the bottom of this post.

Christmas Shortbread Cookies

I’ve hosted a cookie exchange for the past few years and my friend Kate always brought her Swiss Mountain shortbread Christmas cookies. Needless to say they were always a hit and everyone’s favourite including mine! They would be the first cookie gone from our immense tray of exchanged cookies and people would always ask for them when they came for a visit.

Since we’ve moved away to another city (more on that later) I won’t be hosting my annual cookie exchange this year but Kate was sweet enough to give me her family recipe so now I can share it with you. Thank you Kate!

Christmas Shortbread and Toblerone Christmas Cookies

Not only is it a delicious melt-in-your-mouth shortbread cookie, it’s also made with amazing milk chocolate Toblerone bars. You won’t be able to stop at just one!

Christmas Shortbread Cookies

Recipe:

  • 2 cups (500 ml) unsalted butter
  • 1 cup (250 ml) fruit sugar
  • 3 1/4 cups (800 ml) all purpose flour
  • 1/2 cup (125 ml) rice flour
  • 12 oz. (375 g) milk chocolate Toblerone bars
  • 1/4 cup (75 ml) icing sugar
  • 1/2 tsp salt or to taste
  1. Preheat oven to 325°F (160°c)
  2. Beat butter until very light. Gradually beat in sugar and continue beating until sugar is dissolved, about 5 minutes.
  3. Sift flours and salt together. Stir into butter mixture and combine well.
  4. Chop chocolate into 1/2 in. (1 cm) chunks. Save about 50 of the largest chunks and mix the rest into the batter just until combined.
  5. Arrange mounds of batter on baking sheets lined with parchment paper. Press a chunk of chocolate into each cookie.
  6. Bake 20 to 25 minutes in a preheated 325°F (160°c) oven until very lightly browned. Cool in a single layer on racks. Sift icing sugar over cookies.

Fruit sugar is finer than regular, buy it or make it by whizzing regular sugar in a food processor for about 1 minute. Rice flour makes the cookies very tender.

Makes about 50 cookies. Kate says her secret is that once everything is mixed together, she kneads the dough a few times. I used a small 1.5 in. ice-cream  scoop to place the dough on the cookie sheets. It’s so easy and makes the cookies have a more uniform appearance.

Christmas Shortbread Cookies

Christmas Shortbread Cookies

Christmas Shortbread Cookies

Christmas Shortbread Cookies

Christmas Shortbread Cookies

 Swiss Mountain  Shortbread Christmas Cookies

Christmas Shortbread Cookies

Unless you’re not partial to butter or chocolate, I’m sure you’ll love these cookies!

Now light some Christmas scented candles,  put on some festive Christmas music or your favourite Hallmark Christmas movie, (we have them on non-stop over here) and start baking!

Don’t forget to check out the links below for more great cookie recipes.

Blessings,

Kim

12 Christmas Cookie Recipes

More Delicious Christmas Cookie Recipes:

For more Christmas cookie recipes, make sure you check out the delicious recipes below!

Swiss Mountain Shortbread by Kim of Kim Power Style

German Iced Spice Christmas Cookies by Christina of The DIY Mommy

Slice and Bake Shortbread Cookies by Jo-Anna of A Pretty Life in the Suburbs

Cathedral Window Cookies by Rita of Harbour Breeze Home

Chocolate Peppermint Biscotti by Kendra of Joy In Our Home

Cranberry Orange Shortbread by Jen of Kitchen Counter Chronicles

Holiday Crinkle Cookies by Lisa of Fabulous Habits

Maple Shortbread Snowflakes by Laura of one house 2 barns

Ritz Cracker Bark (aka Crookies) by Courtenay of Creek Line House

Peppermint Hot Cocoa Cookies by Jennifer of Happily Organized Chaos

Earl Grey Snowball Cookies by Tan of Squirrelly Minds

Gingerbread Cookies by Dannyelle of Life is a Party

Filed Under: Christmas, recipes

White Christmas Tour

6:00 am by kim 27 Comments

Hello Everyone and Merry Christmas! I’m joining some great ladies today for our 2nd annual Joyful Holiday Home tour. If you’ve been following along in order you’ll be coming from Marci from Lemons to Lovelies Marci has a beautiful home and is the host of our tour. I hope you’ve enjoyed all the gorgeous homes and found plenty of inspiration for the season! I’m the last stop on the tour so  grab a beverage and join me as I share my White Christmas tour!

Joyful Holiday Home Tour 2017 vertical feature image

White Christmas Tour

White Christmas Tour 2017

Today I’m sharing my White Christmas living room. I wanted to make decorating a little more simple this year and decided to go with my basic white. We usually have a real tree in the living room but I wanted a flocked tree and they were so pretty I got two, one on either side of the sofa. To make it even more simpler this year, I didn’t add any decor to the trees. They’re so pretty on their own!

White Christmas Tour 2017

I found these great wicker baskets at Homesense and the stands fit inside them perfectly. They hide all the unattractive bits and finishes off the trees nicely.

White Christmas Tour 2017

I added a little bit of colour in a couple of the throw pillows.

White Christmas Tour 2017

White Christmas Tour 2017

The coffee table holds some vintage bowls with my Christmas balls along with some candles and waxed pinecones that I’ve had for years. They’re scented and still smell delicious!

White Christmas Tour 2017

For the mantel I used a faux eucalyptus garland along with some birch logs in a vase. I found these little led porcelain houses that light up and I’m smitten with them and I’ve set them all around the house. I’ve had these wooden candle holders for years and love the way they mimic the look of the birch logs.

White Christmas Tour 2017

The flocked wreath is gorgeous and mirrors the look of the trees and pulls the room together creating my little version of a white Christmas!

White Christmas Tour 2017

White Christmas Tour 2017

White Christmas Tour 2017

White Christmas Tour 2017

The minute you pull out a comfy throw or fluff a pillow, Butters is right there ready to nestle in and take a nap!

White Christmas Tour 2017

It’s so cozy in here with all the Christmas lights on and the candles lit in the evening. It may look a little bland to some but I’m enjoying the White Christmas look. In case you think there’s a lack of colour, don’t worry, I’ve added plenty in my wrapping paper!

White Christmas Tour 2017

I love red at Christmas time and I’ve used it in my wrapping paper and ribbon.

White Christmas Tour 2017

White Christmas Tour 2017

White Christmas Tour 2017

White Christmas Tour 2017

[show_shopthepost_widget id=”2925755″]

White Christmas Tour 2017

White Christmas Tour 2017

I hope you’ve enjoyed this peek into our homes. I love doing this tour as it’s a chance for me to peek into some of my favourite bloggers homes sharing their Christmas decor too! In case you’ve just popped in and haven’t seen the other bloggers, there are links to all of them below!

Blessings,

Kim

Joyful Holiday Home Tour 2017

Haley – The Mountain View Cottage

Jordan- JorDecor

Rachel- The Porch Light Cottage

Natalie- My Vintage Porch

Laura- Meaningful Spaces

Stephanie- Belle Amour Blog

Kate- White Lane Decor

Lisa- Farmhouse On Boone

Marci- Lemons to Lovelys

Kim- Kim Power Style

Filed Under: Christmas, Home decor, Seasonal tours

A Rustic Christmas Table Setting

6:00 am by kim 2 Comments

A Rustic Christmas Table Setting

Hello everyone! Welcome into the dining room while I share my rustic Christmas Table Setting. It’s simple, easy and festive.

A rustic Christmas table setting

I found the inspiration for my table in my wooden slice chargers. I used them last Christmas too, they’re too good not to use as much as possible!  You can find last year’s post here.

A rustic Christmas table setting

Everything that I used to set the table were things that I had on hand already. The only new purchase was this  gorgeous gold cutlery, an early Christmas gift to myself! I love adding a bit of glam and shine to the rustic look of the wood to balance out the whole setting.

A rustic Christmas table setting

I used an old piece of wood up the centre of the table and added candles of different heights. Then I covered the wood with some fresh cedar and boxwood. I added a few Christmas balls and a long string of fairy lights. So simple and easy to do but it makes a big impact!

A rustic Christmas table setting

A rustic Christmas table setting

With the leftover boxwood, I wired together some stems to make these little wreaths for each setting.

A rustic Christmas table setting

A rustic Christmas table setting

I also made a couple of boxwood wreaths using six inch embroidery hoops and a glue gun. These were hung on the armoire handles.

A rustic Christmas table setting

A rustic Christmas table setting

A rustic Christmas table setting

A rustic Christmas table setting

A rustic Christmas table setting.

A rustic Christmas table setting

A rustic Christmas table setting

Thanks so much for joining me again.If you’d like to see more of these posts, you can sign up to subscribe and receive them straight into your inbox. I hope everyone has a great week in the midst of the hustle and bustle of the last week before Christmas!

-Kim

I’ll be linking up at The Nester

Filed Under: Christmas, diy, Seasonal tours

Canadian Bloggers Christmas Home Tour 2016

6:00 am by kim 28 Comments

A Festive and Cozy Christmas Tour

Welcome everybody and thank you for joining me and 28 other talented bloggers and friends for the Canadian Bloggers Christmas Tour! This is my second year being part of this great group of bloggers hosted by the lovely Christina from The Diy Mommy. This is also home tour number two of the season for me. If you missed last year’s tour, you can find that here, and if you’ve missed my recent Christmas tour you can find that here.

Our first stop is the master bedroom. My house is pretty small and my master is no exception, It fits my kingsize bed and my two sewing-machine-tables-turned-nightstands perfectly though.

Simple Christmas decor in the bedroom

I kept the Christmas decor in the bedroom simple, easy and cozy. A boxwood wreath, some winter themed bedding, a few little baubles and some natural decor items were all I added to give it a festive feel.

Simple and easy Christmas decor in the bedroom

Simple and easy Christmas decor in the bedroom

Simple and easy Christmas decor in the bedroom

Christmas decor in the bedroom

Simple and easy Christmas decor in the bedroom

Winter themed bedding

I found this winter themed bedding in October and knew I needed it for my Christmas decor. It will last until February!

Canadian Bloggers Home Tour 2016

Next stop is the living room with a view into the breakfast nook. My decor centered around the toile fabric on the cushions. I found this fabric years ago at a garage sale and have used it as curtains before. I think it looks great as cushion covers. The pink pointsettia fit right in, I loove the colour!

A simple and natural Christmas

Christmas time in the living room

A simple natural Christmas tree

The pom poms on this throw fit in with the felt pom pom garland on the mantel and in the breakfast nook perfectly.

Christmas Tour in the living room

Christmas time in the living room

Christmas in the living room

The mantel done up for Christmas

bowl of Christmas balls

Pom pom garland on the mantel

I love the colour and whimsy these little felt pom pom garlands add.

Christmas Tour 2016

Christmas Tour 2016

I made this little bunny years ago and he has a lot of sentimental value. He can be found under the tree every year.

Christmas in the living room

Gingerbread houses in the breakfast nook

From the living room you can see into my breakfast nook. I’ve decorated it with a few gingerbread houses.

Gingerbread houses in the breakfast nook

Christmas Tablescape in the breakfast nook

This is what it looked like for my last tour when it was decorated for Christmas brunch.

Christmas in the living room

This is what the tree looks like at night. It’s a cozy spot to sit in the evening by the light of the tree and with the fireplace going.

Christmas tree lit up at night

Christmas Tour 2016

Thanks so much for joining me! Please make sure to visit all of the 28 other beautiful home tours featured this week. You can find all of the links at the bottom of this post. I hope you can find some inspiration to help make your own home festive and cozy!

2016-canadian-bloggers-christmas-home-tour

Monday

northern style exposure
The Learner Observer
The Uncommon Law
Heather In Heels
Clean and Scentsible
THE SWEETEST DIGS

Tuesday

Amidst the Chaos
Brooklyn Berry Designs
lemon Thistle
Suburble
Life is a Party
PMQ for two

Wednesday

Love Create Celebrate
Satori Design for Living
A Pop of Pretty
So Much Better With Age
VinYet ETC
Woman in Real Life

Thursday

The DIY Mommy
Fresh Crush
Time With Thea
A Pretty Life
Home To Heather
Nalles House

Friday

This Little Estate
Craftberry Bush
The Happy Housie
Kimpowerstyle
Elliven Studio


I’ll be linking up to The Nester

Filed Under: Christmas, Home decor, Seasonal tours

Joyful Holiday Home Tour 2016

6:00 am by kim 17 Comments

Joyful Holiday Home Tour

Joyful Holiday Home Tour 2016

Welcome to the Joyful Holiday Home Tour ! I’m so excited to join along with seven other talented bloggers to share our homes all done up for Christmas. This is one of two tours I’m a part of this year. I’ll also be joining in with The Canadian Bloggers Christmas Home Tour as well,  so stay tuned for more! If you’re following the tour in order, you just came from Natalie from My Vintage Porch’s home. I loved every bit of her gorgeous farmhouse style! If you missed it you can see it here you will be glad you did! OK then,  grab a cup of whatever you fancy, settle in and lets get started! In this tour I’ll be sharing a few spaces, one of them being my guest room that I have been working on over the past five weeks. I call it my “mini makeover” as it’s been a fairly simple and easy project. Since I’ve chosen this tour to reveal the guest room makeover, we’ll start here.

Guest room makeover

When my eldest daughter left home, the room looked very stark and empty. I decided that I needed to freshen up the space and add a few touches to make it homey and lived in again. So I spent a few weeks working on little projects that would make it warm and inviting. The buffalo check and ticking pillows were some of my sewing projects for this room, along with the tea towel bedskirt. If you missed the tea towel bedskirt post you can find it here.

Guest room makeover and Bubs likes it.

The slipcover was the biggest project for this room. I had found an ugly brown velvet wingback that was in good shape. When I saw a great denim fabric on for 50 % off I thought it was a great opportunity to try my hand at making a slipcover again. It took me a few days of marathon sewing but was so worth it! You can find that post here.

bubs-on-the-bed

You’ll notice a couple of my little guys in the pics. There is no way of working in any room without them following me around! I don’t try to stop them anymore because it’s a losing battle. Who could deny that sweet little face?

Corner tree in the guest room

I found this upholstery webbing for 5o% off at my local fabric store too and thought it would pass for garland on my little rustic tree.

Pillows in the guest room

I love adding touches of greenery to my Christmas decorating. It’s so simple but makes everything cozy and festive.

Reindeer ring holder

dresser in the guest room

Whitewashing the dresser was my first guest room makeover project and set the tone for the rest of the room. You can find the tutorial here.

Guest room makeover tray

tree in guest room

Guestroom tree with gifts

The guest room is all ready for my daughter and son in law when they come to visit for the holidays!

Guestroom bed done up for Christmas

From there, we’ll move into the breakfast nook. On Christmas day, we start off with mimosas in champagne flutes and brunch. We usually have scrambled eggs, bacon and one of my faves, banana pancakes, along with a treat or two. My three daughters usually cook and I clean. It works out perfectly. The food is placed on platters and set on the counter in a buffet style and then we sit at our little table to enjoy. We usually fit the five of us around the table but now there are six counting our new son in law. We may have to move to the dining room now! The tablescape is easy and can be done the night before so that the morning is a little less hectic. It also means we can get to opening our gifts much sooner!

Christmas Tablescape in the breakfast nook

Christmas morning table setting

Christmas morning breakfast

Christmas morning table.

We wait until after breakfast to open our gifts, but sometimes somebody can’t wait..thats usually me!

Christmas morning breakfast coziness

 Bowl full of ornaments and felt ball garland

I loved adding a little colour and whimsy to  the shelves with these lovely ornaments and felt ball garland.

Joyful Holiday Home Tour

The next room on our tour is the living room. This is where we spend most of our time. It’s small but I call it “cozy”

Christmas living room

I found this toile fabric a few years ago at a garage sale and had used it as curtains in the past. But this year I made a number of pillow and bolster covers with it and I decorated around it. It’s a pinky red so I drew out the pink and found this pinky pompom throw to go with it. I love my pretty in pink living room!


Christmas in the living room

I used natural elements to decorate with. As stated before it’s simple and easy but so festive with adding too much decor to my small space.

Christmas wreath

Thank you so much for joining me for Part 1 of the tour! Remember to stay tuned for Part 2 of my home tour when I share my master bedroom, dining room and more of the living room in the Canadian Bloggers Christmas HomeTour on Dec. 9th! The next person up on our tour is Rachel from The Porch Light Cottage.

Marci- Lemons to Lovelys

Jordan from JorDecor

Natalie from MyVintagePorch

Rachel from The Porch Light Cottage

Lisa from Farmhouse on Boone

Laura from Meaningful Spaces

Jennifer from Delightfully Noted

I’ll be linking up to The Nester

Filed Under: Christmas, Seasonal tours

The 5 Minute Christmas Birch Bucket

6:00 am by kim 5 Comments

The 5 Minute Christmas Birch Bucket

Hi everyone! This week I’m revisiting an oldie but a goodie! Five years ago I created a  galvanized bucket full of birch, sugar pinecones, greens and ornaments. You can see that old post here, but be warned, my photography was not the best! Since I’m blogging again, I thought I’d share these updated favourites of mine. I do them every year in some form or another. This year I’m using vintage sap buckets I found at a decor store in the summer. I love the height and narrowness of these buckets and they fit perfectly into my small living room, flanked on either side of my fireplace. The 5 minute Christmas Birch Bucket’s are so easy to put together! Once you have all your ingredient at hand, it will literally take you five minutes to do.

The 5 Minute Christmas Birch Bucket

The 5 Minute Birch Bucket Tutorial

Ingredients needed:

  • Start off with a container of your choice. I’m using this vintage sap bucket, but you can use whatever you like and fits in with your decor.
  • Birch branches. Using 3 poles in varying heights works best.
  • 2-3 Large Sugar pinecones. If you’re unable to find these, the smaller pinecones will work as well.
  • Greenery. I love the softness and texture of Cedar. You can choose whatever is available, fresh or faux.
  • Christmas balls etc. You can use varying colour to match your decor. I’m keeping mine neutral this year with mercury glass.
  • Ribbon or garland. I used this burlap garland to make a bow.
  • Fairy lights or branches.
  • You  may need something to help fill in the bottom of your container so the ingredients don’t all fall to the bottom. I’ve used tissue paper to fill in my bucket.

The 5 minute birch bucket ingredients.

  1. Start  by filling the bottom of the bucket with bunches of tissue paper leaving room for the birch branches to fit in behind.
  2. Arrange your birch branches at the back of the bucket.
  3. Arrange the tissue paper in such a way that your sugar cones will sit up high in the bucket. You can place 2 or 3 in depending on their size.
  4. Place in your greenery, this can be done in whatever way looks good to you.
  5. If you’r using branch lights you can add them now. If you’re using fairy lights I leave those till the end.This is the basis of your bucket. You can add whatever you’d like now. But the sky’s the limit. In the past, I’ve used cinnamon sticks, faux poinsettias etc.

The 5 minute birch bucket tutorial.

The 5 minute Birch Bucket Tutorial.

The 5 minute birch bucket tutorial.

The 5 minute Birch Bucket Tutorial.

The 5 minute birch bucket tutorial.

The 5 minute birch bucket tutorial.

These two are slightly different. I’ve added a burlap bow to the one above and I added some faux flowers to the bucket below.

The 5 minute birch bucket tutorial.

Thanks so much for dropping by. I hope you try one of these, They’re super easy! You can add whatever you like to make it your own. If you try your hand at one of these, let me know how it turned out!

 -Kim


Filed Under: Christmas, diy, Tutorials

Canadian Bloggers Christmas Home Tour 2015

7:00 am by kim 35 Comments

Down Home Christmas
Merry Christmas everybody!
I’m so excited to be a part of The Canadian BloggersChristmas Home Tour 2015 along with eleven other talented ladies, Hosted by Christina from the thediymommy and Shannon from AKAdesign You can scroll to the bottom of this post for the entire lineup of these talented ladies.
For those of you who’ve come from The Creek Line House tour welcome to my home!


Generations of my family come from “The Island” also known as PEI. Whenever we think or talk about the Island we refer to it as “down home”
My decorating reflects what I envision when I think of down home at Christmas.

Keeping it  simple and natural suits me and my little home perfectly!
I had so many decorations to add but kept removing them as I felt that simpler was better for my small cozy space.
I’ve used my go- to sugar pinecones which I love for their colour and texture, birch logs and seeded eucalyptus. I’ve kept my cotton stems out because it reminds me of snow on branches. Adding some plaid in the cushions brings in a bit of colour and pattern as well as that down home winter lodge feel.


The pom-pom garland I made last year was placed on my ladder and the pom-pom wreath moved to the mantel.


The boxwood wreaths are placed throughout and bring that lovely shot of green that goes with everything at Christmas.
Here I’ve placed one on a little vintage chair I found at a local thrift store, that sits beside the fireplace.
On the mantel I used these raw wood lanterns with little twinkle lights inside each one
and some faux greenery. I added this red berry wreath at one point to add a little colour and then removed it and replaced it with the pom-pom wreath.
My brass candleholders add a little old-world charm to the rustic down home feel.


I mixed things up here on the mantel by adding this large silver Christmas ball which was a nice contrast to all the natural elements.


Beautiful scented candles add so much ambiance to a space and this white pumpkin has been one of my favourites.


When friends and family drop by during the holidays, I usually set up one of two tables buffet style, It makes for easy and casual entertaining. With the small  table in the breakfast area I continued with my natural theme throughout by using  wooden candleholders, wood slices and burlap.
This lovely dollar store disco ball adds that little whimsical touch which helps to break up all the natural elements I’ve got going on. I love the way the light reflects all over the kitchen.
Nothing was immune to the boxwood wreaths including Mr. Moose!


I carried on with my simple, natural down home theme in the dining room…


The same natural theme was carried through with a linen table runner along with more plaid in the table napkins and cushions.
I loved the feel of this room, it really felt like you were in a down home winter lodge!
Thank you so much for the visit,
I hope you’ve enjoyed my down home Christmas house tour! I love to decorate my home and create an atmosphere where family and friends can gather and feel comfortable, welcomed and where we can all celebrate everything this season is all about..the birth of our saviour!

Now it’s time to take a tour of my Canadian blogging friends’ gorgeous homes. Come back each day to see a new set of home tours from Monday to Thursday this week.

Monday:
AKA Design
Northern Style Exposure
The DIY Mommy
Tuesday:
The Creek Line House
Restoration House
Wednesday:
Suburble
The Happy Housie
Nalle’s House
Thursday:
Clean and Scentsible
Fynes Designs
Rambling Renovators 
A Pop of Pretty“

Filed Under: Christmas, Seasonal tours

Primary Sidebar

Hi, I'm Kim Read More…

Instagram

Follow along on Instagram

Sign up and don't miss a post!

Recent Posts

  • Festive Bacon Wrapped Chestnut Holiday Appetizer
  • DIY Mantel Decorated for Christmas
  • Simple and Cozy Fall Home Tour
  • Simple Fall Tablescape

Archives

Footer

Copyright © 2025 · Foodie Pro Theme by Shay Bocks · Built on the Genesis Framework · Powered by WordPress