. A number of you have asked for a tutorial for the GROCERIES sign I posted a couple days ago. I was a little hesitant because for the most part I NEVER REALLY KNOW WHAT I’M DOING! lol here.


For this project I used some acrylic paint in white and black, some verathane stain I had left over from my breakfast nook table, a sanding block, paint brushes, scissors, pencil, a bowl of water, and old saucer to mix my paints, and the lettering that I got form my word program.

I started by painting my board with the white paint, I mixed the paint with water to give the board a color wash. You can add more color/water as you need. I just wanted the wood to look a little aged but you could certainly make it more opaque.

You can see the difference here between the color wash and the original board.

While the board was drying I picked out my font and size for the lettering, printed them out and then cut them out. (originally I thought I could find some stencils and stencil the letters on but they were limited in size and font and were too expensive. It may have been a little less time consuming but you have more options by printing the letters out yourself and much cheaper!)
(Since posting this I’ve received a really good tip! Instead of doing all the cutting, use a ball point pen and trace over the letters with a bit of pressure. You could also use tracing paper! Who knew? apparently some of you and not me! lol)
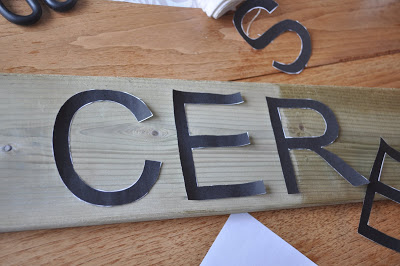
Once they are all cut out, I placed and spaced them evenly.

I then took a pencil and traced each one out. I thought that this would be difficult considering the paper was so thin and flimsy but it was quite easy using both hands and it took me about ten minutes to trace them all out.

After they are all traced out. I painted them. I mixed a little of the white and black together for a more charcoal color so it would look a little more aged as opposed to stark black. Here again you can you can use so many different colors, mixes etc. to get the look you want.

After all the letters were dry, I used a little bit of my stain to add a little more aging, texture etc. I used an old cloth and just added it randomly, wiping most of it off.
(Marian at MMS has a great glaze/stain that she uses and I think I will try that one next time. She mentions how some glaze/stain can look like a bronzer and orangey, my stain did this slightly but I was able to work it in well.)

Once the stain is dry you can begin to sand and distress your board. This is the fun part as it really adds that aged look to your sign.
( I’d like to add that at this point if you feel you need to you can add more paint, stain etc. I added a little of my gray water left in the bowl from mixing to do a soft wash over some places that were unever and it just added to the rustic look of it).


Isn’t it great! We’ll have to ask Robin how she did it. I love it!
 Ali at My Third True Love is a new follower of mine and while visiting her blog I seen this. This is her first sign too!

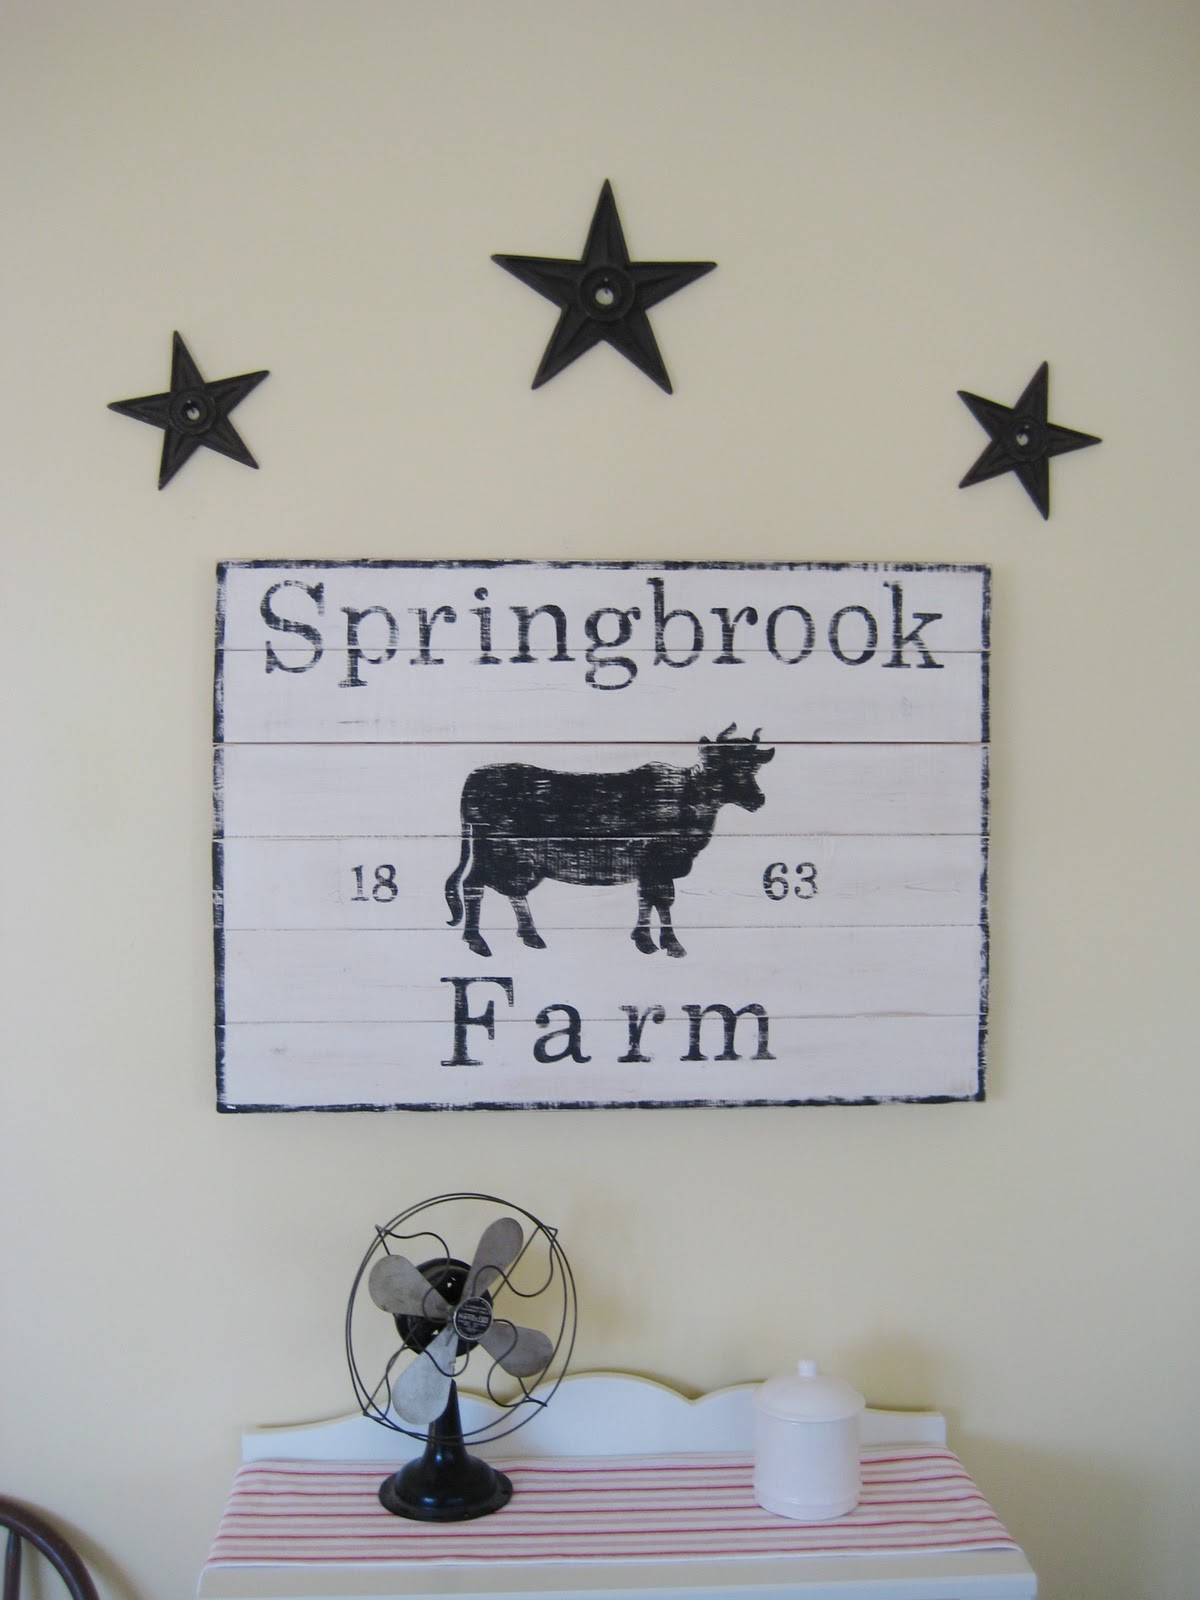
Last but certainly not least is Lori from Frugal Farmhouse Design. Her sign was also inspiration for my GROCERIES sign. Lori does awesome work on very tight budgets!
Hope this has helped to inspire you to start creating and restoring!
Be blessed and thanks for visiting!
I love the sign…I think it turned out great!
Kim I recently made a similar sign using Lori's inspiration. My tutorial post is here:
http://thatsmyletter.blogspot.com/2011/01/s-is-for-signs.html
Close to yours only I never cut out the letters, simply trace with a pen pressing hard enough to get an outline. Can't wait to see more!
love the sign! i actually just made a grocery sign too… and plenty of others. inspired by miss mustard seed!
i too trace the letters.. no way i'm cutting all that out! haha.
love the groceries sign. beautiful.
This looks great, I'm trying to think of a place to put a groceies sign, lol. Thanks for the inspiration!
Thanks Jaime and Michael for that tip! That would certainly save time!lol will try it out next time. Thanks for the input!
KIm:)
I love these, I'm going to have to try my hand at a neat little sign sometime! Thanks for sharing the tutorial!
Thanks so much for the tutorial! I'm going to try my hand at one very soon! You did a beautiful job, and I can't wait to see more. *Becca*
Hey Miss Kim!
Great tutorial! You made it look so easy! I will bookmark this post because I'd love to try this. I can't believe I missed the sign that Marian made. They are all great! I have "sign" love!
Blessings,
~Michelle 🙂
I just love your sign, Kim, and didn't have a clue how you did it, so thanks. I am going to look for some wood!
XO,
Jane
Thanks so much for showing-off my sign! I am in love with your sign and definitely want to make one similar for my kitchen. Thanks again 🙂
Thanks for the tutorial … I definitely have to make one.
lovvve signs!! i have made a few small ones! I need to start making some bigger ones! I want need one now that says Laundry since we are now moving into a house with a laundry room and not the basement…. =) YAY
You did a great job with the tutorial..love the sign and thanks for sharing your ideas!
Thanks so much for sharing a tutorial with us! I am definitely going to go visit the other blogs you mentioned. I want to make one of these, but am having a hard time figuring out what to say on it. It will go outside on my front porch and be visible to people walking by so it can't be too wacky. Will be thinking…
Great tips! I like your idea to mix the black and white paint to make it more faded or grey. I've always wondered how to get that look. You can bet all be trying it out on my next sign.
Thanks for featuring my cow sign, that was very sweet of you.
p.s. Have you hung your pretty sign yet! LOL no pressure or anthing, but it's got to be getting a little awkward carrying it around the house.
Thanks so much for sharing how you made this great sign. I love the way it looks.
Have a great night.
Really nice sign and a great tutorial,thanks
Looks great. Thank you for sharing the tips.
Hi just found you through linky party, havn't joined in yet just looking at how it all works but had to stop and read this post very inspirational so have become a follower.
I'll admit I have some reluctance with paint. I don't know why! I'm just so messy with paint. I love what you've done though! Thanks for the tutorial. Gives me hope!
Brenda
Hey Kim, Nice Sign! I just posted about it and a few others…including one my mom made for us. 🙂 I hate to have to tell ya, but we can't get that glaze that Marian uses. Sigh. Ralph Lauren was replaced with Martha Stewart at all the HD's in Canada. I've looked everywhere…I even called RL. Nothing. Boo. All the more reason to get creative though, right?!
Shannon
{aka}|design
I love it Kim! My pantry could use something like this. I'm posting it to my tumblr.
-Rene
I like, like, like your blog!!!
So glad I found it.
I'm your newest follower.
🙂 Janet
http://www.homeward4.blogspot.com
LOVE it! You are a talent!
Kaye
Whoa! This signage making idea is so cool! It has a touch of old school idea. I think it would also suit a coffee shop.
Love the sign, I'm a new follower and linked to you here http://vintagegypsywagon.blogspot.com/2011/07/sign-boards.html
Hi! Love signs, and these are great! I have painted several signs myself… freehand though. One tip is to sketch your design on paper or type it out first. The 3 main things to consider are colors, words/saying, and any images. I like an old, weathered look, so I sand everything down, in some places more than others, and spray with an acrylic sealant spray to finish.